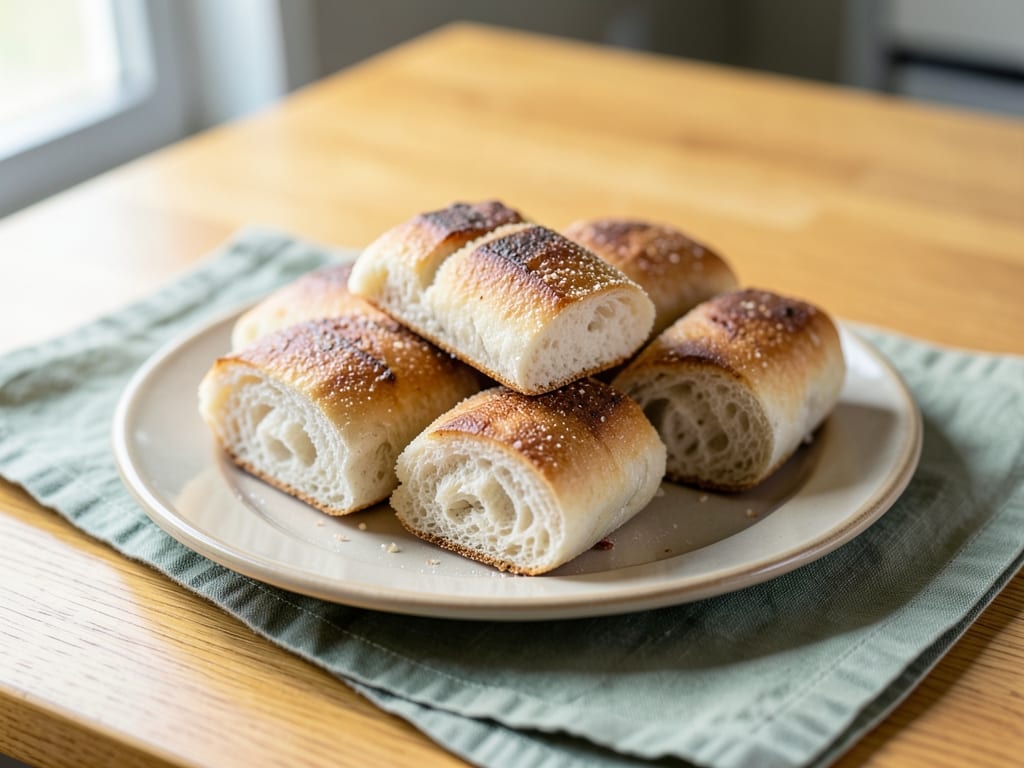
Vietnamese Banh Mi Rolls
Light, airy rolls with a crispy, blistered crust and delicate crumb, made with a blend of all-purpose and rice flour. These rolls are the foundation of Vietnamese street-food banh mi sandwiches—perfect for filling with pâté, cold cuts, pickled vegetables, fresh herbs, and sauce. The rice flour creates a tender interior while the steam-baking technique delivers an authentic crackly exterior.
- Prep
- 40 min
- Cook
- 15 min
- Wait
- 3 hr 30 min
- Total
- 4 hr 25 min
- Makes
- 6 rolls
Steps
Before you start
- Use room-temperature water (75–80°F / 24–27°C) for predictable fermentation
- Have a spray bottle filled with water ready for creating steam in the oven
- Read through all steps before starting—the dough involves multiple proofing stages
- Allow 1–1.5 hours for bulk fermentation, plus 45–60 minutes for final proof
Combine dry ingredients
- In a large bowl or the bowl of a stand mixer, whisk together the bread flour, rice flour, yeast, salt, and sugar.
- Make sure the salt and yeast are evenly distributed throughout the mixture.
- This prevents the salt from directly contacting the yeast, which can inhibit fermentation.
+ Show details− Hide details
Ready when: All dry ingredients are evenly combined with no lumps
Tip: Whisking the dry ingredients helps distribute yeast evenly and prevents salt from settling.
Add water and form shaggy dough
- Add the room-temperature water and, if using, the oil to the dry ingredients.
- Using a dough hook on low speed or by hand, mix for 3 minutes until a shaggy dough forms.
- The dough should be slightly wet and sticky; do not over-develop the gluten yet.
+ Show details− Hide details
Ready when: Shaggy dough forms with visible flour streaks and some liquid pooling
Tip: Keep the dough slightly wetter than a typical bread dough—this hydration creates the light, airy crumb banh mi rolls are known for.
Knead until smooth and elastic
- Continue mixing on medium speed for 8–10 minutes (or knead by hand for 12–15 minutes) until the dough is smooth, elastic, and slightly tacky to the touch.
- It should hold its shape but still feel damp.
- The dough temperature should reach around 78°F / 26°C.
+ Show details− Hide details
Ready when: Dough is smooth and elastic; springs back quickly when poked and feels tacky but cohesive
Tip: Resist adding more flour if the dough feels sticky—proper hydration is essential for a light, open crumb.
Bulk fermentation (first rise)
- Place the dough in a lightly oiled bowl, turn it to coat all sides, and cover with a damp kitchen towel or plastic wrap.
- Let it rise at room temperature (68–72°F / 20–22°C) for 1–1.5 hours, until it has increased in volume by about 50–75%.
- The dough should feel airy when you gently poke it; it should not double completely.
+ Show details− Hide details
Ready when: Dough has increased 50–75% in volume with visible bubbles and feels light and airy
Tip: A cooler, slower fermentation develops better flavor. If your kitchen is warm (above 75°F / 24°C), reduce the time to 60–75 minutes.
Divide and pre-shape
- Turn the dough out onto a lightly floured surface.
- Using a bench scraper or dough cutter, divide the dough into 6 equal pieces (approximately 70 g each).
- Shape each piece into a loose ball by gently pulling the edges toward the center, then place on a parchment-lined baking sheet with 2 inches of space between rolls.
- Cover loosely with plastic wrap.
+ Show details− Hide details
Ready when: Six evenly sized dough balls are shaped and spaced on the baking sheet
Tip: Don't overwork the dough during shaping—gentle handling preserves the air already developed during bulk fermentation.
Shape into rolls
- Gently flatten each dough ball into an oval about 3 inches long.
- Starting from the short end, tightly roll it toward you, then taper the ends slightly by rolling on the work surface to create an oblong roll shape, about 4–5 inches long.
- Place each shaped roll, seam-side down, on the parchment-lined baking sheet, spacing them 2–3 inches apart.
+ Show details− Hide details
Ready when: All six rolls are uniformly shaped and positioned seam-side down
Tip: Tight, even shaping helps the rolls expand upward during proofing rather than spreading sideways.
Final proof (second rise)
- Cover the shaped rolls with a damp towel or plastic wrap and let them rise at room temperature for 45–60 minutes, until they are visibly puffy and light, with about 50% volume increase.
- When you gently poke one, it should spring back slowly but leave a slight indentation.
+ Show details− Hide details
Ready when: Rolls are puffy and have increased about 50% in volume; gentle poke leaves a slight indent
Tip: Avoid over-proofing, which weakens the dough structure. Properly proofed rolls should still spring back when poked.
Preheat oven with steam setupOven 450°F / 230°C
- About 20 minutes before baking, preheat your oven to 450°F (232°C).
- Position a rack in the upper-middle of the oven.
- If you have a baking stone, place it on the middle rack.
- Have a spray bottle filled with water ready—steam is crucial for developing a crispy, blistered crust.
+ Show details− Hide details
Ready when: Oven reaches 450°F (232°C) and is fully preheated
Tip: Steam during the first 10 minutes of baking creates the characteristic crispy, blistered exterior.
Score and bake with steamOven 450°F / 230°C
- Using a sharp serrated knife or lame, score the top of each roll with a single diagonal slash about ¼ inch deep.
- Quickly open the oven door and mist the inside generously with water (2–3 spritzes), then place the baking sheet on the upper-middle rack.
- Close the door and continue misting the oven walls 2–3 more times within the first 2 minutes.
- Bake for 15–18 minutes until the rolls are deep golden brown and crispy.
- The rolls should sound hollow when tapped on the bottom.
+ Show details− Hide details
Ready when: Rolls are deep golden brown, sound hollow when tapped, and crust is crispy to the touch
Tip: Don't over-mist after the first 2 minutes, as excess moisture later softens the crust. Open and close the oven quickly to trap steam.
Cool before serving
- Transfer the baked rolls to a wire cooling rack and let them cool for at least 20–30 minutes before slicing or filling.
- The interior continues to set as they cool, and the crust will crisp up further.
- Once cooled, the rolls are ready to be filled with traditional banh mi fillings.
+ Show details− Hide details
Ready when: Rolls are cool to the touch and the crust is fully crisp
Tip: Resist slicing while warm—the steam inside will escape and make the bread gummy.
Good to know
Tips
- Use filtered or bottled water if your tap water is hard or heavily chlorinated—minerals and chlorine can interfere with fermentation and gluten development.
- For a tangier, more complex banh mi roll, use cooler water (65–68°F / 18–20°C) and extend the bulk fermentation to 2–2.5 hours at room temperature for slower fermentation.
- If you don't have a spray bottle, place a pan of hot water on the bottom oven rack before baking to create steam, though direct misting is more effective.
- Split the warm rolls and fill with pâté, cold cuts (head cheese, Vietnamese ham), pickled daikon and carrot, fresh herbs (cilantro, mint, Thai basil), sliced jalapeños, and a drizzle of soy sauce or Vietnamese-style dipping sauce for authentic banh mi sandwiches.
Make ahead
Yes. Prepare the dough through the end of bulk fermentation (step 4), then shape, place in an airtight container, and refrigerate for up to 12 hours. The next day, let the shaped rolls come to room temperature (about 1 hour) before beginning the final proof and bake. Cold fermentation develops deeper, more complex flavor.
Storage & reheating
Room temperature (2 days): Store in a paper bag or loose container to keep the crust crispy. After 1 day, the crust will soften; refresh in a 350°F (175°C) oven for 5 minutes. Refrigerator (4 days): Wrap tightly in plastic to prevent drying; reheat gently in a 350°F (175°C) oven for 5–7 minutes. Freezer (3 months): Wrap individually in plastic wrap and foil; thaw at room temperature for 2 hours, then reheat as above.
Substitutions
- rice flour, sweet or regular → Cornstarch or potato starch. Use a 1:1 ratio by weight. The crust will be slightly less delicate, but crispness is still good.
- instant yeast or active dry yeast → Active dry yeast. Use the same amount but increase all rise times by 10–15 minutes, as active dry yeast ferments slightly more slowly.
- bread flour (or all-purpose flour) → All-purpose flour. The rolls will be slightly less chewy and less extensible. All-purpose flour works fine if bread flour is unavailable.
- neutral oil, vegetable or canola → Omit entirely. The rolls will be slightly drier and less browned. The oil improves tenderness and browning but is not essential.
More rolls & buns
See all →
Find more like this
- Meal
- Lunch
- Cuisine
- Vietnamese
- Method
- Oven
- Quick & Easy
- 5 Ingredients or Less