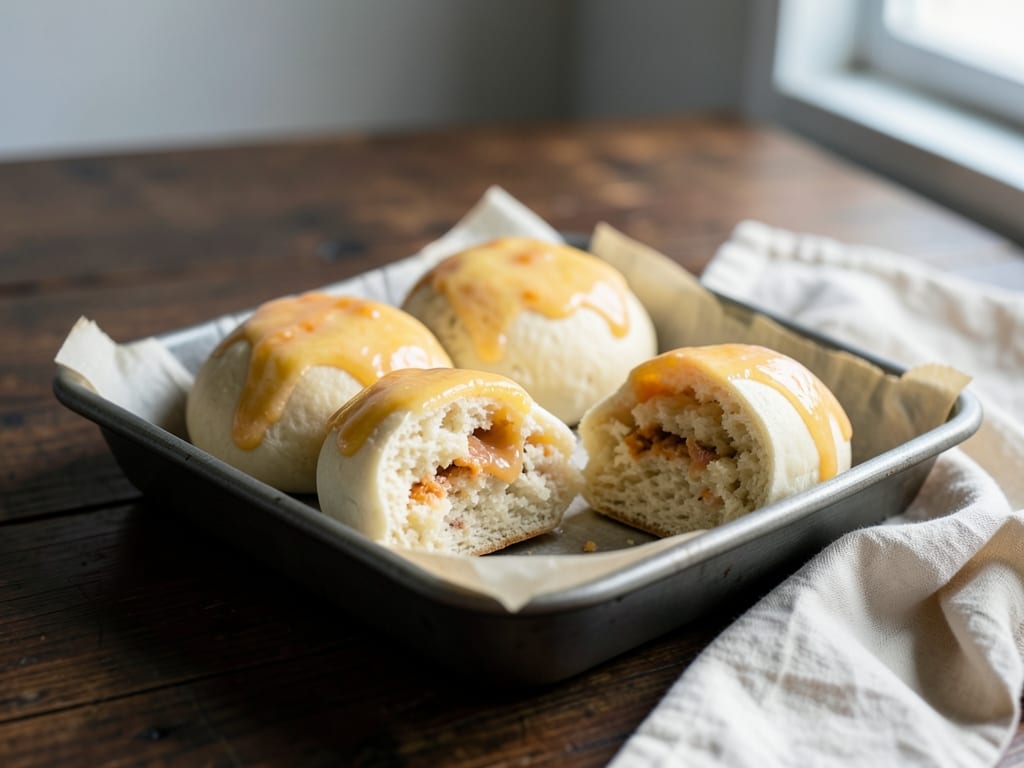
Korean Sweet Potato Buns
Soft, pillowy Korean-style sweet potato buns with a naturally sweet, delicate crumb. Made with mashed sweet potato worked into a tender yeast dough, these buns are perfect for breakfast, snacking, or alongside soups and stews. They have a subtle earthy sweetness, a beautiful golden crust, and that signature light, airy texture of Korean bakery buns.
Steps
Before you start
- If using fresh sweet potato, cook and mash it ahead; it should be smooth, cooled, and ready to use (allow 30 minutes)
- Gather all ingredients and bring to proper temperatures: milk warmed to 110°F (43°C), butter softened, eggs at room temperature
- Read through the entire recipe to understand the timeline; the whole process takes about 2 hours 50 minutes
- Ensure your kitchen is at a comfortable temperature (70–75°F/21–24°C) for optimal yeast activity
Activate yeast and combine
- In a large mixing bowl, pour 180ml (¾ cup) of warm milk—it should feel comfortably warm to the inner wrist, about 110°F (43°C), not hot to the touch.
- Add 5g (1½ tsp) instant yeast and 5g (1 tsp) sugar.
- Stir gently and let sit undisturbed for 2–3 minutes until the mixture becomes foamy and smells fragrant and yeasty.
- If it doesn't foam, your yeast is dead or the milk temperature was wrong; start over with fresh yeast.
- Add 200g (7 oz) mashed sweet potato, 1 large egg yolk (at room temperature), and 5ml (1 tsp) vanilla extract to the foamy mixture.
- Stir well, breaking up any chunks of sweet potato until the mixture is completely smooth and uniform in color, with no visible lumps.
+ Show details− Hide details
Ready when: Yeast mixture is foamy and fragrant; sweet potato mixture is smooth with no lumps
Tip: The yeast should foam within 2–3 minutes—this confirms it's alive. If there's no foam, the yeast is dead or the milk temperature was incorrect.
Mix flour into dough
- Add 450g (3¾ cups) all-purpose flour and 5g (1 tsp) salt to the bowl.
- Using a stand mixer fitted with a dough hook, mix on medium-low speed for about 10 minutes until the dough comes together and forms a shaggy mass.
- As the mixer runs, add 45g (3 tbsp) softened unsalted butter in 3–4 small pieces (about 1 tablespoon at a time), allowing each piece to fully incorporate before adding the next.
- Continue mixing for 2–3 minutes after all butter is added until the dough becomes smooth and elastic.
- Alternatively, if mixing by hand, knead on a lightly floured surface for 12–15 minutes until smooth and elastic.
+ Show details− Hide details
Ready when: Dough is smooth and elastic, pulls away from the bowl sides, and springs back when poked; it feels soft and slightly sticky but not wet
Tip: Don't add all the butter at once; adding it gradually in pieces ensures it fully incorporates and creates a smooth, cohesive dough.
First rise
- Lightly oil a clean large bowl.
- Shape the dough into a smooth ball and place it in the oiled bowl, then turn it over once to coat thinly with oil.
- Cover the bowl with a damp kitchen towel or plastic wrap.
- Let rise at room temperature (around 70–75°F/21–24°C) for 60 minutes, or until the dough has roughly doubled in size.
+ Show details− Hide details
Ready when: Dough has increased to roughly double its original volume; a gentle poke should leave a slight indent that doesn't fully spring back
Tip: If your kitchen is cool, place the bowl in a turned-off oven with just the light on, or in a warm spot wrapped in a towel. If your kitchen is warm (above 78°F/26°C), the dough may rise faster—begin checking at 45 minutes.
Divide and shape bunsOven 375°F / 190°C
- Preheat your oven to 375°F (190°C).
- Line a 9×13-inch (23×33 cm) baking sheet with parchment paper.
- Turn the risen dough onto a lightly floured work surface.
- Gently press out excess gas by patting the dough flat.
- Using a bench scraper or knife, divide the dough into 8 equal portions (about 100g each).
- Taking one portion, cup your hands around it and roll in a circular motion, tucking the seams underneath to create a smooth, tight ball.
- Repeat with all portions.
- Arrange the buns on the prepared baking sheet in two rows of 4, spacing them about 2 inches apart.
+ Show details− Hide details
Ready when: Each bun is a smooth, uniform ball; seams are tucked underneath and invisible on top
Tip: Keep your hands lightly dusted with flour but not too dry—a bit of moisture on your palms helps the dough ball tighten and smooth itself. Handle gently to preserve air bubbles.
Proof shaped bunsOven 375°F / 190°C
- Cover the baking sheet loosely with a damp kitchen towel or plastic wrap.
- Let the buns rise at room temperature for 40–50 minutes, until they are visibly puffed and increased in size by about 50%.
- They don't need to double this time—just become noticeably soft and pillowy.
- Toward the end of proofing, confirm your oven is preheated to 375°F (190°C).
+ Show details− Hide details
Ready when: Buns are visibly puffed and soft; a gentle poke should leave a slight indent that slowly springs back halfway
Tip: Don't over-proof the buns; if they rise too much, they may merge together in the oven or become overly domed. If your kitchen is warm, check them at 35–40 minutes.
Make egg wash
- While the buns are proofing, crack 1 large egg into a small bowl and whisk with 15ml (1 tbsp) milk until well combined and uniform in color.
- This is your egg wash.
+ Show details− Hide details
Ready when: Egg and milk are completely mixed and uniform in color
Apply egg wash and topping
- Once the buns have finished proofing, use a pastry brush to gently brush the egg wash evenly over the top of each bun, using a light touch.
- Avoid the sides to prevent them from browning too much.
- If desired, sprinkle a few grains of coarse sugar on top of each bun for a subtle sparkle and texture.
- Use restraint—too much topping will weigh the buns down.
+ Show details− Hide details
Ready when: All bun tops are coated with a thin, even layer of egg wash; optional topping is lightly sprinkled
Tip: Use one light coat of egg wash only. Over-brushing can make the buns soggy before they bake.
Bake until goldenOven 375°F / 190°C
- Place the baking sheet in the preheated 375°F (190°C) oven.
- Bake for 18–22 minutes, until the tops of the buns are deep golden brown.
- Check the buns at 15 minutes; if the tops are browning too quickly, tent loosely with aluminum foil to slow browning while the interior continues to cook.
- To verify doneness, insert an instant-read thermometer into the center of a bun—it should read 190–195°F (87–90°C).
- Additionally, tap the bottom of a bun; it should sound hollow.
+ Show details− Hide details
Ready when: Tops are deep golden brown; instant-read thermometer in the center reads 190–195°F (87–90°C); bottom of a bun sounds hollow when tapped
Tip: If the tops are browning too quickly, cover loosely with foil for the last 5 minutes. Err on the side of baking a minute or two longer rather than underbaking, which can result in a gummy interior.
Cool and serve
- Remove the baking sheet from the oven and let the buns rest on the sheet for 5 minutes to allow the structure to set.
- Transfer the buns to a wire cooling rack and let cool for 10–15 minutes.
- They can be served warm or at room temperature.
- For extra richness, you may lightly brush the warm buns with a bit of melted butter once they come out of the oven (optional).
+ Show details− Hide details
Ready when: Buns are cool enough to handle comfortably
Tip: Cooling on a wire rack rather than leaving them on the baking sheet prevents condensation from making the bottoms soggy.
Good to know
Tips
- Sweet potato buns are best enjoyed fresh and warm, ideally within 4–6 hours of baking, when they have the most tender crumb. They still taste lovely for 1–2 days, but will become denser over time.
- For a more decadent version, brush the warm buns with melted butter just after removing them from the oven and sprinkle lightly with cinnamon sugar for a subtle spiced sweetness.
- These buns freeze exceptionally well; make a double batch and freeze half in an airtight container for quick future breakfast or snacking. Thaw and warm gently for nearly fresh texture.
- The natural sweetness of sweet potato pairs beautifully with both sweet spreads (jam, honey butter, Nutella) and savory toppings (cream cheese, deli meat, egg salad), making them equally at home at breakfast or lunch.
Make ahead
Dough can be shaped and refrigerated overnight after the first rise (end of Step 3). The next morning, remove from the refrigerator, let come to room temperature for about 1 hour, then proceed with the second proof (Step 5) and baking. This slow overnight rise adds subtle depth of flavor. Fully baked buns can also be frozen for up to 3 months; thaw at room temperature and warm in a 300°F (150°C) oven for 5–10 minutes before serving.
Storage & reheating
Room temperature: Store in an airtight container or bread box for 1–2 days; beyond this they begin to dry. Refrigerator: Keep in an airtight container for up to 5 days; let come to room temperature or warm gently in a 300°F (150°C) oven for 5 minutes before eating. Freezer: Wrap cooled buns individually in plastic wrap, then place in a freezer-safe bag or container for up to 3 months. Thaw at room temperature (1–2 hours) or warm from frozen in a 300°F (150°C) oven for 8–10 minutes.
Substitutions
- sweet potato → Unsweetened pumpkin puree. Use 200g unsweetened pumpkin puree instead. Will create a slightly earthier, less sweet bun with a more subdued flavor. Texture will be nearly identical; baking time may increase by 1–2 minutes.
- all-purpose flour → Bread flour. Use the same amount (450g). Bread flour has higher protein content, resulting in a slightly chewier, more robust crumb and better oven spring. Baking time may decrease by 1–2 minutes.
- instant yeast → Active dry yeast. Use 6g (1 standard packet) active dry yeast. Active dry yeast ferments more slowly; increase rising time by 10–15 minutes (first rise to 70–75 minutes, second proof to 50–60 minutes).
- whole milk → Evaporated milk (diluted). Mix 90ml evaporated milk with 90ml water to create 180ml total. Diluting restores proper hydration. This creates a slightly richer, more custard-like crumb.
More rolls & buns
See all →
Find more like this
- Meal
- Breakfast
- Cuisine
- Korean
- Main ingredient
- EggsSweet Potatoes
- Diet
- VegetarianHalal
- Method
- Oven