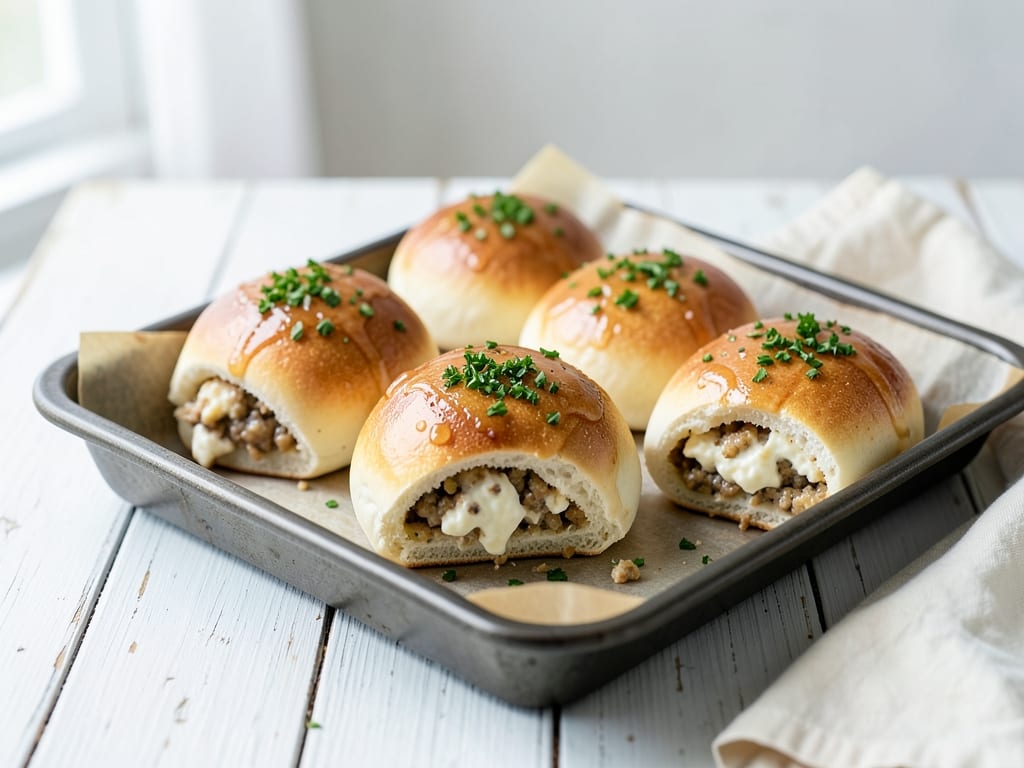
Korean Garlic Cream Cheese Buns
Soft, pillowy buns filled with a savory garlic and cream cheese mixture, topped with fragrant garlic butter. These Korean-style buns are rich, flavorful, and perfect as a snack or side. The enriched dough yields a tender crumb, while the creamy filling stays melty and delicious. Make a batch to share or freeze for later.
- Prep
- 45 min
- Cook
- 18 min
- Wait
- 2 hr 33 min
- Total
- 3 hr 36 min
- Makes
- 12 buns
Steps
Before you start
- Let cream cheese, butter, and egg come to room temperature (1 to 2 hours ahead) for smooth dough and filling.
- Warm milk to 110°F (43°C)—too cold won't activate yeast; too hot will kill it.
- Have a warm, draft-free spot ready for rising, such as an oven with just the light on.
Mix dry ingredients
- In the bowl of a stand mixer (or a large mixing bowl), combine flour, instant yeast, salt, and sugar.
- Whisk together for about 1 minute to evenly distribute the yeast throughout the flour.
+ Show details− Hide details
Tip: Mixing the yeast with dry ingredients prevents it from dissolving too early and activating unevenly.
Incorporate milk, egg, and butter
- Add the warmed milk and room-temperature egg to the dry mixture.
- Add the softened butter pieces.
- If using a stand mixer, fit the bowl with the dough hook.
- Mix on low speed for 3 to 4 minutes, until all ingredients are incorporated and a shaggy dough forms.
+ Show details− Hide details
Ready when: Shaggy dough forms with no dry flour visible
Tip: Milk should be warm (110°F/43°C) but not hot, or it may kill the yeast. Whole milk adds richness to the dough.
Knead until smooth and elastic
- Increase mixer speed to medium (or if kneading by hand, turn the dough onto a lightly floured surface).
- Knead for 8 to 10 minutes until the dough becomes smooth, elastic, and springs back when gently poked.
- The dough should be slightly tacky but not sticky.
+ Show details− Hide details
Ready when: Dough is smooth and elastic; springs back slowly when poked with a finger
Tip: Do not add extra flour—the dough should remain slightly tacky. This creates softer, more tender buns.
Let dough rise until doubled
- Lightly oil a large bowl and place the dough inside, turning to coat all sides.
- Cover the bowl with plastic wrap or a damp kitchen towel.
- Place in a warm, draft-free spot (like an oven with the light on, set to 75–80°F/24–27°C).
- Let rise for 1 to 1.5 hours, until the dough has doubled in volume.
+ Show details− Hide details
Ready when: Dough has doubled in size; a finger poke leaves a slow-filling indent
Tip: Room temperature and humidity affect rising time. On a warm day, it may take 60 minutes; on a cool day, 90 minutes.
Make garlic cream cheese filling
- While the dough rises, combine softened cream cheese, minced garlic, and butter in a small bowl.
- Mix with a fork or spatula until smooth and well combined.
- Taste and add salt to preference (usually about 1/4 teaspoon).
- Set aside.
+ Show details− Hide details
Ready when: Mixture is smooth, with no visible lumps of cream cheese
Tip: The filling should be soft enough to spread easily. If it's too thick, warm it a few seconds in the microwave.
Divide dough into 12 pieces
- Turn the risen dough onto a lightly floured surface.
- Gently punch down to release excess gas.
- Using a bench scraper or sharp knife, divide the dough into 12 equal pieces (about 2 ounces or 57 grams each).
- Shape each piece into a tight ball, then gently press it into a 4-inch (10 cm) flat disc about 1/4 inch (6 mm) thick.
+ Show details− Hide details
Ready when: Twelve uniform discs, each about 4 inches across and evenly sized
Tip: Keep the cut dough covered with a towel while you shape; this prevents the surface from drying out.
Fill and seal each bun
- Place about 1 tablespoon (about 19 grams) of the garlic cream cheese filling in the center of each dough disc.
- Pull the edges of the dough up and over the filling, pinching and sealing the seams at the top firmly.
- Turn seam-side down and gently roll between your palms to create a smooth, sealed ball.
- Place each bun seam-side down on parchment-lined baking sheets, spacing them about 2 inches (5 cm) apart.
+ Show details− Hide details
Ready when: Twelve sealed buns with smooth tops, evenly spaced on baking sheets
Tip: Seal the seams firmly to prevent filling from leaking during the rise and bake. If seams open, pinch them closed again.
Let buns proof until puffy
- Cover the baking sheets loosely with plastic wrap or a damp kitchen towel.
- Let the buns rise in a warm, draft-free spot for 45 to 50 minutes, until they are noticeably puffy and light to the touch but not quite doubled in height.
+ Show details− Hide details
Ready when: Buns are puffy and jiggly when the pan is gently moved; they spring back slowly when lightly poked
Tip: Avoid over-proofing (more than 1 hour), which can cause the dough to deflate or lose shape during baking.
Combine garlic butter and herbs
- In a small bowl, mix together the minced garlic, melted butter, finely chopped parsley (if using), and salt.
- Stir until well combined and the garlic is evenly distributed.
+ Show details− Hide details
Tip: Prepare this just before baking so the garlic butter is still warm and aromatic.
Preheat oven and brush bunsOven 375°F / 190°C
- Preheat your oven to 375°F (190°C).
- Using a pastry brush or small spoon, brush each proofed bun generously with the garlic butter mixture, covering the entire top surface.
- Make sure to get into the seams.
+ Show details− Hide details
Tip: Reserve a little garlic butter to brush on the buns again immediately after baking for extra flavor and shine.
Bake until golden brownOven 375°F / 190°C
- Bake for 15 to 18 minutes, until the buns are deep golden brown on top.
- The bottoms should also be light golden brown.
- If using two baking sheets, rotate them halfway through baking for even browning.
- Begin checking at 15 minutes.
+ Show details− Hide details
Ready when: Buns are deep golden brown on top and bottom; they sound hollow when tapped on the bottom
Tip: Do not overbake or the buns will be dry. If the tops are browning too quickly, tent loosely with foil for the last few minutes.
Cool before serving
- Remove from oven and let the buns cool on the baking sheets for 5 minutes, then transfer to a wire rack to cool for at least 10 minutes before serving.
- They are best enjoyed slightly warm or at room temperature.
- If desired, brush with additional melted butter right after removing from the oven.
+ Show details− Hide details
Ready when: Buns can be handled without breaking; interiors are set but still soft
Tip: These buns are best eaten within a few hours of baking, while the centers remain soft and creamy.
Good to know
Tips
- Don't skip the gluten development. Proper kneading (8 to 10 minutes) creates the soft, tender crumb that makes these buns special. The dough should be smooth and elastic, not rough or sticky.
- Proof in a warm spot. Yeast works best at 75 to 80°F (24 to 27°C). If your kitchen is cool, place the bowl in an oven with just the light on, a proofing box, or a turned-off oven with a pot of hot water inside.
- Seal the dough well. Carefully pinch and seal the seams at the top of each bun when filling. Any gaps will let the filling leak out during baking.
- Watch for over-proofing. The second rise should be 45 to 50 minutes maximum. Over-proofed dough loses structure and may collapse when baked.
Make ahead
The filled, shaped buns can be refrigerated after the second rise (before baking). Cover tightly and refrigerate up to 12 hours. Bake directly from the cold—they may take an extra 2 to 3 minutes. Alternatively, bake completely, cool, and freeze wrapped tightly for up to 1 month. Thaw at room temperature and warm in a 300°F (150°C) oven for 5 to 10 minutes.
Storage & reheating
**Room Temperature:** Keep in an airtight container for up to 2 days. Refresh by wrapping in foil and warming in a 300°F (150°C) oven for 5 minutes. **Refrigerator:** Store in an airtight container for up to 4 days. Reheat as above. **Freezer:** Wrap individually in plastic wrap and foil, then place in a freezer bag. Freeze for up to 1 month. Thaw overnight in the fridge and reheat as above.
Substitutions
- all-purpose flour → Bread flour or cake flour. Use 3.75 cups (450 g) bread flour for a slightly chewier crumb, or 3.75 cups (390 g) cake flour for extra tenderness. Adjust liquid slightly if needed.
- cream cheese → Ricotta cheese or mascarpone. Use 8 oz (227 g) ricotta cheese (drained if watery) mixed with 1 tablespoon grated Parmesan for a lighter, less tangy filling.
- instant yeast → Active dry yeast. Use the same amount (2.25 tsp/7 g), but bloom it in the warm milk for 5 minutes before adding to dry ingredients.
- garlic cloves → Roasted garlic or garlic powder. Replace with 6 to 8 roasted garlic cloves (mashed) for a milder, sweeter flavor, or 1 to 1.5 teaspoons garlic powder for convenience.
More rolls & buns
See all →
Find more like this
- Meal
- Snack
- Cuisine
- Korean
- Main ingredient
- Cream Cheese
- Diet
- VegetarianHalal
- Method
- Oven
- Quick & Easy
- Make AheadFreezer Friendly