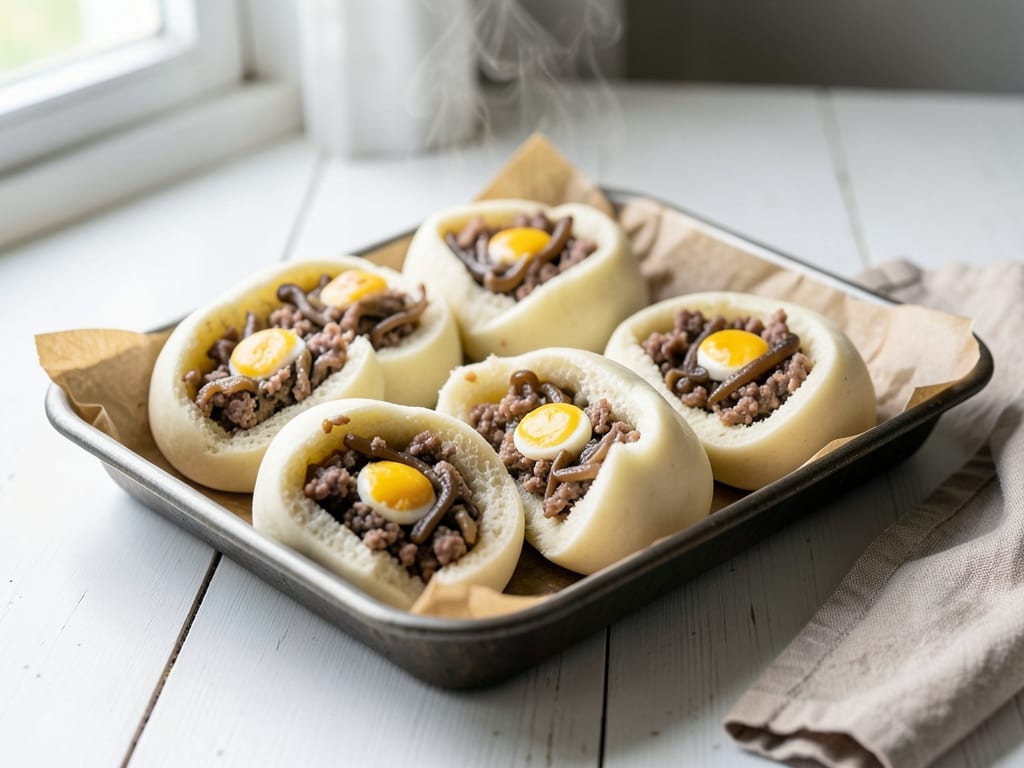
Bánh Bao: Vietnamese Steamed Pork and Egg Buns
These soft, pillowy Vietnamese bánh bao are filled with seasoned ground pork, tender wood ear mushrooms, and a golden quail egg. Made with an easy yeast dough and steamed to fluffy perfection, they're a beloved street food that's surprisingly achievable at home. The filling combines caramelized shallots, aromatic fish sauce, and earthy mushrooms for a savory depth that complements the delicate, slightly sweet bun.
- Prep
- 48 min
- Cook
- 25 min
- Wait
- 2 hr 32 min
- Total
- 3 hr 45 min
- Makes
- 10 steamed buns
Steps
Before you start
- Hard-boil the quail eggs 1–2 hours ahead (or the night before) so they're completely cool before assembling
- Read through the entire recipe to understand the timeline—there are multiple rising periods with passive time when you can prep the filling
- Prepare parchment paper squares (2½ × 2½ inches each) for the buns to rest on during proofing and steaming
- Set up your bamboo or metal steamer over a pot of water so you know your setup before you start
Rehydrate wood ear mushrooms
- Place dried wood ear mushrooms in a small bowl and pour 1 cup hot water (not boiling) over them.
- Let soak for 15 minutes until soft and pliable.
- Drain in a fine sieve, gently squeeze out excess water, and chop finely into roughly ¼-inch pieces.
- Set aside.
+ Show details− Hide details
Ready when: Mushrooms are fully softened, pliable, and no longer tough
Tip: Don't soak too long or mushrooms become mushy; 15 minutes is ideal
Mix dry dough ingredients
- In a large mixing bowl, whisk together 3 cups (375g) all-purpose flour, 1½ tsp (5g) instant yeast, ¼ cup (50g) granulated sugar, and 1 tsp (5g) kosher salt until well combined and no clumps remain.
- Create a well in the center of the dry mixture.
+ Show details− Hide details
Ready when: All ingredients are evenly combined with no streaks or pockets of yeast
Tip: Whisking everything together distributes the yeast evenly and prevents it from being deactivated by direct contact with salt
Combine wet and dry dough
- Pour 1 cup (240 ml) warm water (about 110°F / 43°C) and 2 tbsp (30 ml) vegetable oil into the well in the center of the dry ingredients.
- Using a wooden spoon, stir in a circular motion from the center, gradually pulling the flour into the wet mixture until a rough, shaggy dough forms and most of the flour is incorporated.
+ Show details− Hide details
Ready when: All flour is incorporated; the dough is shaggy and slightly sticky
Tip: The dough will look rough at this stage—that's fine; the kneading step will smooth it out
Knead dough until smooth
- Turn the dough onto a lightly oiled work surface.
- Knead by hand for 8–10 minutes (or use a stand mixer with dough hook for 5–6 minutes on medium speed), pressing the dough away from you with the heel of your hand, folding it back over itself, and rotating a quarter turn each time.
- Continue until the dough is smooth, elastic, and slightly glossy.
- It should feel soft and just slightly tacky; if it sticks heavily, dust in a tiny pinch more flour.
- The dough should spring back immediately when poked.
+ Show details− Hide details
Ready when: Dough is smooth, elastic, springs back when poked, and feels soft and slightly tacky
Tip: Avoid adding too much flour; the dough should be soft and pliable, not stiff. Proper kneading develops the gluten structure needed for light, airy buns
Dough first rise
- Lightly oil a large bowl and place the kneaded dough in it, turning to coat.
- Cover the bowl with a damp kitchen cloth or plastic wrap.
- Let the dough rise at room temperature (68–75°F / 20–24°C) for 1 hour, or until it has nearly doubled in size.
- You can gently poke the dough; it should not spring back fully.
+ Show details− Hide details
Ready when: Dough has increased to about 1.5–2 times its original volume; when poked, the indentation doesn't spring back completely
Tip: If your kitchen is cold, place the bowl in a warmed oven (100°F / 37°C turned off) or in an unheated microwave with the door closed. If it's very warm (above 80°F / 26°C), rising may take only 45 minutes
Prep shallots and garlic
- While the dough is rising, mince or finely chop 3 medium shallots (about ¾ cup / 180g total) and 3 garlic cloves until very fine.
- Set aside.
+ Show details− Hide details
Ready when: Shallots and garlic are minced uniformly with no large pieces remaining
Tip: Finely mincing ensures they caramelize evenly and distribute flavor throughout the filling
Cook pork filling on stovetop
- Heat 2 tbsp (30 ml) vegetable oil in a medium skillet (10–12 inch) over medium heat until shimmering, about 1 minute.
- Add the minced shallots and garlic, stirring frequently, and cook for 2–3 minutes until fragrant and just beginning to turn golden.
- Add 1 lb (450g) ground pork, breaking it up with a wooden spoon as it cooks.
- Continue cooking for 6–8 minutes, stirring occasionally, until the pork is no longer pink, lightly browned, and reaches an internal temperature of 160°F (71°C).
- Stir in the chopped wood ear mushrooms, 2 tbsp (30 ml) fish sauce, 1 tbsp (15g) sugar, ¼ tsp (1.5g) salt, and ½ tsp (2g) white pepper.
- Reduce heat to medium-low and simmer gently, stirring often, for 3–4 minutes until the flavors meld and the mixture is fragrant.
- Taste and adjust seasoning.
- Remove from heat.
+ Show details− Hide details
Ready when: Pork reaches 160°F (71°C) internal temperature and is no longer pink and lightly browned; mushrooms are tender; filling is fragrant and well-combined
Tip: Use an instant-read thermometer to confirm the pork reaches 160°F (71°C) for food safety. Let the filling cool completely before filling the dough—a warm filling will steam the dough and make it soggy
Cool filling to room temperature
- Spread the warm filling thinly on a plate or clean work surface to cool faster.
- Let sit at room temperature for 15–20 minutes until completely cool to the touch.
- Meanwhile, check the dough—it should be nearly or fully risen by now.
+ Show details− Hide details
Ready when: Filling is completely cool to the touch
Tip: This step is crucial—a warm filling will cause condensation and make the buns soggy and gummy
Punch down and divide dough
- Once the dough has nearly doubled, gently turn it onto a lightly oiled work surface and lightly punch it down to release gas (be gentle—you don't want to deflate it completely).
- Using a bench scraper or sharp knife, divide the dough into 10 equal pieces (each should weigh about 80–85g).
- Shape each piece into a smooth, tight ball by gathering the edges underneath and pinching to seal.
- Cover loosely with a damp cloth while you work so the dough doesn't dry out.
+ Show details− Hide details
Ready when: Dough is divided into 10 equal balls with smooth, sealed surfaces
Tip: Keep the dough balls covered; if they dry out, the surface will crack when you try to shape them, making it hard to seal
Flatten, fill, and seal buns
- Working with one dough ball at a time (keep the others covered), place it on a lightly oiled surface.
- Using your fingers and palm, gently flatten it into a disk about 3½ inches (9 cm) in diameter and roughly ¼ inch (6 mm) thick—it should be even in thickness.
- Place about 1½ tbsp (20–25g) of cooled filling in the center of the disk, then top the filling with one quail egg half, yolk side up.
- Carefully gather the edges of the dough disk and pull them up and over the filling, pinching firmly at the top where they meet to seal completely.
- The sealed end should feel secure and the filling should not leak out.
- Gently flip the bun seam-side down and place it on a 2½ × 2½ inch (6 × 6 cm) parchment square.
- Repeat with the remaining dough balls and filling until you have 10 filled buns.
- (You will have 16 quail egg halves; 6 halves remain—you can serve them separately or save for another use.)
+ Show details− Hide details
Ready when: All 10 buns are sealed tightly, evenly shaped, and sitting seam-side down on parchment squares
Tip: A tight seal is essential—if you leave gaps, steam will enter and the dough may be unevenly cooked or waterlogged. Practice your pinching on the first bun if needed
Proof buns before steaming
- Arrange the filled buns on their parchment squares on a work surface or a large tray, spacing them about ½–¾ inch (1–2 cm) apart so they have room to puff slightly without touching.
- Cover loosely with a damp cloth.
- Let them proof at room temperature for 30–45 minutes.
- They should increase in volume by about 50%—they'll feel noticeably lighter and puffier.
- When you gently poke one with a floured finger, the indentation should fill in very slowly.
+ Show details− Hide details
Ready when: Buns have visibly puffed; when poked gently, dough springs back slowly; buns feel light and airy
Tip: This final proof is important for light, fluffy buns. Do not overproof (1+ hours), or they may collapse in the steamer
Heat water in steamer
- While the buns are proofing (or just before they finish), fill the steamer pot with 2 inches (5 cm) of water and bring it to a rolling boil over high heat with the lid off.
- Lightly oil or line the steamer tiers/baskets if using bamboo or metal tiers to prevent sticking (the parchment squares help, but a light oiling is good insurance).
- Once the water is boiling and steam is rising steadily, reduce the heat to medium-high to maintain a gentle, consistent steam without vigorous boiling.
+ Show details− Hide details
Ready when: Water is at a rolling boil; steam is rising steadily
Tip: Don't let the water boil too vigorously or it may splash up into the buns; a gentle, consistent steam is ideal
Steam buns until cooked through
- Carefully place the proofed buns (on their parchment squares) on the steamer tiers, leaving about ½ inch (1 cm) of space between each bun for steam to circulate.
- If using multiple tiers, offset them so steam can rise around all sides.
- Cover the steamer with its lid (tilt it slightly away from you to avoid a splash of hot condensation).
- Steam over rolling boiling water for 15–18 minutes.
- The buns are done when they are puffy, pale, and the dough springs back immediately and completely when you gently poke it with a floured finger.
- The steamed buns will have a matte surface with a slight sheen, and the quail egg inside will be warm to the touch.
- Carefully open the steamer lid, tilting it away from you to let steam escape.
- Use tongs or a long utensil to gently transfer each bun (still on its parchment square) to a wire cooling rack or serving plate.
- Serve warm.
+ Show details− Hide details
Ready when: Buns are light, pale, matte-surfaced, and dough springs back immediately when poked; quail egg is warm
Tip: Don't peek too often while steaming—each time you lift the lid, you release steam and extend cooking time. If buns seem dense when served, the dough wasn't proofed long enough or the steamer temperature was too low
Good to know
Tips
- For best results, use a kitchen scale to weigh flour and other dry ingredients. Volume measurements can vary by 10–15% depending on how you scoop, which affects dough texture and rise
- The quail eggs can be hard-boiled up to 2 days in advance and stored in the refrigerator, making day-of assembly faster
- If your steamer pot doesn't have a tight-fitting lid, tent the steamer with aluminum foil to keep steam in and reduce cooking time variance
- Bánh bao are most delicious served warm, within an hour of steaming. Serve with sriracha, soy sauce, or a simple dipping sauce of 2 tbsp fish sauce mixed with 1 tbsp lime juice and a tiny pinch of sugar
Make ahead
The filled, proofed buns can be frozen: arrange them on a baking sheet, freeze until solid (about 2 hours), then transfer to an airtight freezer bag for up to 1 month. To serve, steam directly from the freezer without thawing, adding 3–5 minutes to the steaming time (18–23 minutes total). The dough can be made and refrigerated overnight: prepare through step 5, then cover and refrigerate for up to 12 hours. Bring to room temperature before proceeding. The cooked filling can be made 1–2 days ahead, refrigerated in an airtight container, and brought to room temperature before filling.
Storage & reheating
Bánh bao are best served fresh and warm, but they keep well. Store leftover cooked buns in an airtight container at room temperature for up to 6 hours, or refrigerate for up to 3 days. To reheat, steam for 3–5 minutes or microwave wrapped in a damp paper towel for 45–60 seconds until warm. Freeze cooked buns in an airtight freezer bag for up to 2 weeks; reheat by steaming directly from frozen for 5–7 minutes.
Substitutions
- quail eggs, large → 1 medium chicken egg, hard-boiled and halved. Quail eggs are traditional and pretty, but one halved chicken egg per bun works just as well if quail eggs are unavailable
- Vietnamese fish sauce → 1 tbsp (15 ml) soy sauce mixed with 1 tsp miso paste. If you don't have fish sauce or prefer not to use it, soy sauce and miso provide umami and saltiness
- dried wood ear mushrooms → 4 oz (115g) finely diced shiitake or oyster mushrooms (fresh, sautéed), or 3 oz (85g) finely diced water chestnuts for a crisper texture. Wood ear mushrooms have a unique chewy texture, but other mushrooms or water chestnuts add similar earthy or light texture
- ground pork (80/20 blend recommended) → Ground chicken (preferably 85/15 if available) or ground shrimp mixed with a bit of diced pork fat or oil to maintain juiciness. Pork is traditional, but chicken or shrimp are common variations; adjust seasoning to taste
More rolls & buns
See all →
Find more like this
- Meal
- Breakfast
- Cuisine
- Vietnamese
- Main ingredient
- Ground PorkMushroomsEggs
- Diet
- Dairy-Free
- Method
- Stovetop