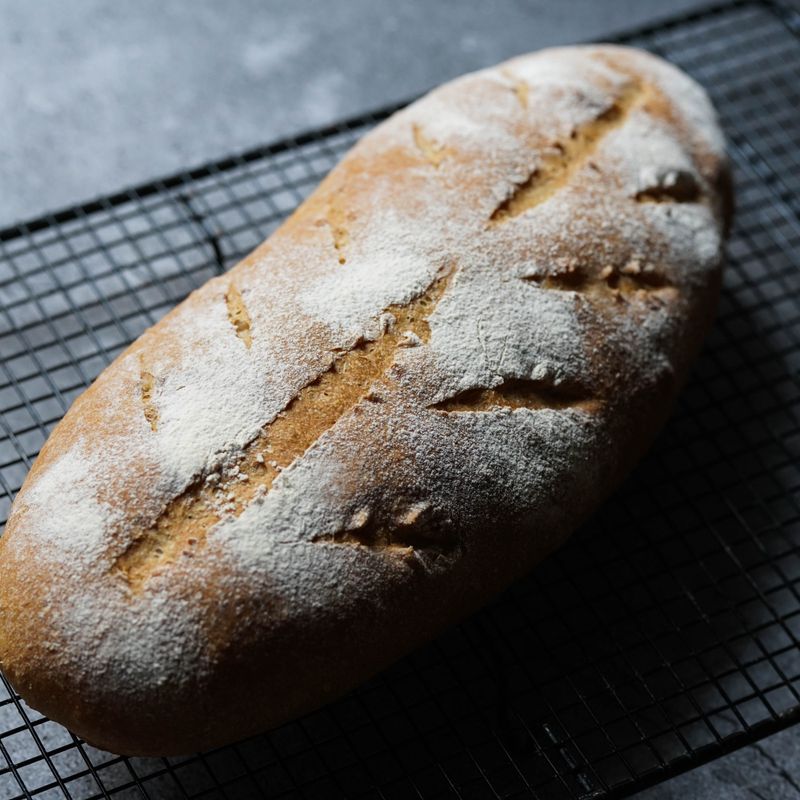
Sourdough Dominican Amarillo Turmeric and Plantain Bread
A vibrant golden-hued sourdough bread infused with earthy turmeric and Caribbean spices, studded with tender caramelized plantain pieces. The tanginess of sourdough balances the sweet plantain and warm spice notes, creating a complex, savory loaf that's perfect for sandwiches or alongside Caribbean stews and beans.
- Prep
- 30 min
- Cook
- 45 min
- Wait
- 8 hr
- Total
- 9 hr 15 min
- Makes
- 1 loaf (12–14 slices)
Steps
Before you start
- Activate your sourdough starter 4–6 hours ahead (or overnight if using cold retard)
- Have all ingredients at room temperature before mixing
- Preheat oven to 475°F (245°C) 45 minutes before baking
- Line a Dutch oven with parchment paper or preheat it empty
Caramelize the plantain
- Heat 1 tablespoon (15 ml) of the olive oil in a large skillet over medium-high heat.
- Once shimmering, add the diced plantain cubes in a single layer.
- Let them cook undisturbed for 2–3 minutes until the bottoms are deeply golden, then stir and continue cooking for another 2–3 minutes until the edges are caramelized and tender.
- The plantain should be slightly yielding but still hold its shape.
- Transfer to a plate and let cool to room temperature; you should have about 1.5 cups.
+ Show details− Hide details
Ready when: Plantain cubes are golden-brown at edges and tender throughout
Tip: Don't stir too early or too often—let the pieces caramelize and develop color for deeper flavor.
Mix dough
- In a large bowl, whisk together the bread flour, all-purpose flour, turmeric, garlic powder, and oregano.
- Make a well in the center and add the active sourdough starter and water.
- Mix with a dough whisk or your hand until all flour is incorporated and you have a shaggy, sticky dough with no dry pockets.
- Cover the bowl loosely with a damp kitchen towel.
+ Show details− Hide details
Ready when: All flour is wetted and dough is shaggy with no dry bits
Tip: Don't knead yet—just mix until the flour is fully incorporated.
Autolyse rest
- Let the dough rest, covered, for 30 minutes at room temperature.
- This allows the flour to fully hydrate and begins developing gluten structure without mechanical work.
+ Show details− Hide details
Tip: The autolyse step is essential for sourdough; it improves extensibility and final crumb structure.
Add salt and laminate
- Uncover the dough and sprinkle the sea salt over the top.
- Wet your hand with water and pinch and fold the dough toward the center, rotating the bowl as you go, for about 1 minute until the salt is incorporated.
- The dough should be slack and wet.
- Now perform a lamination: wet your work surface, turn the dough out onto it, and gently stretch it into a large thin sheet (8×10 inches).
- Scatter the cooled caramelized plantain evenly over the surface, then fold the dough in thirds as if folding a letter, gently press down to seal, give it a quarter turn, and fold in thirds again.
- Transfer the dough back to the bowl, seam-side down, and cover.
+ Show details− Hide details
Ready when: Plantain is evenly distributed throughout and dough is cohesive
Tip: Lamination is gentler than traditional kneading for sourdough; it builds strength while keeping the dough extensible.
Bulk fermentation—first series
- Cover the dough and let it rest for 30 minutes.
- Then perform a coil fold: wet your hand, reach underneath the dough to grab the bottom, lift it up and fold it over the top toward the center.
- Rotate the bowl 90 degrees and repeat three more times (four folds total, each from a different cardinal direction).
- The dough should become smoother and slightly tighter.
- Cover and repeat this sequence (30-minute rest plus four coil folds) three more times over the next 2 hours, for a total of four rounds of folds.
+ Show details− Hide details
Ready when: Dough is roughly doubled, jiggly, and holds gentle indents when poked
Tip: Coil folds are gentler than stretch-and-fold and help distribute gas evenly. By the final fold, the dough should feel noticeably stronger.
Check fermentation progress
- After the fourth set of folds, check the dough's readiness by performing the poke test: gently poke the dough with a floured finger.
- If the indentation springs back slowly (taking 1–2 seconds) and leaves a slight dimple, the dough is ready to shape.
- If it springs back instantly, bulk fermentation needs 15–30 more minutes; if it doesn't spring back, you may have overfermented slightly (it will still bake well, but watch carefully).
+ Show details− Hide details
Ready when: Poke test shows slow recovery with a slight permanent dimple
Tip: Room temperature affects fermentation speed significantly; cooler kitchens may need 30 minutes longer.
Shape the dough
- Turn the dough out onto a lightly floured work surface.
- Pre-shape it gently into a round by folding the edges toward the center and under to create surface tension, then let it rest seam-side up for 15 minutes.
- This rests the gluten before final shaping.
- After resting, perform the final shape: flip the dough seam-side down, fold the top third down toward you, press firmly, then fold the bottom third up and seal.
- Rotate the dough 90 degrees and repeat (right third in, left third in, seal).
- Finally, roll the dough away from you, sealing as you go, until it forms a tight log.
- Flip seam-side up into a well-floured banneton basket.
+ Show details− Hide details
Ready when: Dough is a smooth, tight log with the seam facing up
Tip: Adequate tension on the surface helps the bread rise up rather than spreading. Don't deflate the dough during shaping.
Final proof—cold retard
- Cover the banneton with a plastic bag or wrap and place in the refrigerator for 12–16 hours.
- A long, cold retard develops flavor and makes scoring easier.
- You can also proof at room temperature for 2–3 hours if needed, though cold proofing is preferred for sourdough.
+ Show details− Hide details
Ready when: Dough should hold the shape of the banneton with a slight indent when gently poked (cold test)
Tip: The cold retard is your friend: flavor improves, scoring is easier, and timing is more forgiving.
Preheat Dutch ovenOven 475°F / 245°C
- About 45 minutes before baking, preheat your oven to 475°F (245°C).
- Place a Dutch oven with the lid on the lowest oven rack.
- The vessel needs to be thoroughly preheated so it can trap steam and create a crispy crust.
+ Show details− Hide details
Ready when: Oven thermometer confirms 475°F (245°C) and Dutch oven is very hot
Tip: A properly preheated Dutch oven is essential for a bold, crispy crust on your sourdough.
Score and loadOven 475°F / 245°C
- Carefully remove the hot Dutch oven from the oven.
- Line it with parchment paper if it doesn't already have a liner.
- Turn your cold dough out of the banneton onto the parchment, seam-side down.
- Using a sharp lame, serrated bread knife, or clean razor blade, score the top with one long diagonal slash or an X, cutting about ½ inch (1.3 cm) deep.
- These cuts guide the oven spring.
+ Show details− Hide details
Ready when: Dough is scored with clean, deliberate cuts that open slightly
Tip: A cold dough is much easier to score without tearing. Move quickly to minimize heat loss from the Dutch oven.
Bake coveredOven 475°F / 245°C
- Set the parchment and dough into the hot Dutch oven.
- Cover it with the lid and bake at 475°F (245°C) for 20 minutes.
- The closed vessel traps steam, which gives the bread its characteristic crispy, golden crust and helps the dough expand dramatically.
+ Show details− Hide details
Ready when: Bread is visibly puffed and starting to turn pale gold
Tip: Do not lift the lid during this phase; you will release the steam and compromise the crust.
Bake uncoveredOven 475°F / 245°C
- Carefully remove the lid and continue baking for 22–25 minutes until the bread is a deep golden-brown all over, with the turmeric giving it a warm amber hue.
- The bottom should sound hollow when tapped.
- The internal crumb temperature should reach 205–210°F (96–99°C).
+ Show details− Hide details
Ready when: Crust is deep golden-amber, bottom is hollow when tapped, internal temperature 205–210°F (96–99°C)
Tip: The turmeric will make the crust appear darker than a plain sourdough; use temperature and the hollow-tap test as your guides rather than color alone.
Cool completely
- Remove the bread from the Dutch oven and place it on a wire rack in a cool spot.
- Let it cool for at least 1 hour before slicing.
- The interior continues to set as it cools, and the crumb structure will be much cleaner when fully cooled.
+ Show details− Hide details
Ready when: Bread is at room temperature and feels light and crispy on the outside
Tip: Cutting into a warm loaf will tear the crumb; patience pays off in a cleaner slice.
Good to know
Tips
- For the deepest plantain caramelization and best texture, use a medium or medium-high skillet and let the cubes rest in the hot pan; moving them too frequently prevents browning.
- The long cold retard (12–16 hours) is the secret to superior flavor: cold fermentation produces organic acids and develops complex sourdough character that fast, room-temperature proofing cannot replicate.
- If your sourdough starter is less vigorous (rises slower), add an extra 30 minutes to bulk fermentation or proof until the poke test passes, rather than timing strictly.
- This bread pairs beautifully with Caribbean beans, stewed meats, or fresh cheese; it also makes excellent sandwiches with roasted vegetables and avocado.
Make ahead
The dough can be shaped and refrigerated in the banneton for up to 18 hours; bake straight from the cold. Alternatively, after bulk fermentation, wrap the shaped dough and refrigerate for up to 2 days—the longer cold time deepens flavor but the bread will proof very slowly and may need checking before scoring.
Storage & reheating
Store the cooled loaf in a paper bag at room temperature for up to 3 days (paper keeps the crust crispy while allowing the interior to stay soft). For longer storage, wrap tightly in plastic and freeze for up to 3 months. Thaw at room temperature, then refresh in a 350°F (175°C) oven for 10 minutes to restore the crust. Sourdough stales more slowly than yeasted bread due to its acidity, and the plantain adds moisture that extends shelf life.
Substitutions
- yellow plantain, just starting to develop brown spots → green plantain (unripe, starchy) or firm banana. Green plantain will be less sweet; ripe banana will add more sweetness. Adjust cook time when caramelizing—green plantain needs 4–5 minutes per side. The bread will be slightly less complex if using banana.
- ground turmeric → 1 teaspoon (2 g) ground ginger or a mix of ginger and 0.5 tsp cayenne pepper. Ginger will give a sharper, spicier note instead of the earthy turmeric warmth. The bread will look pale instead of golden unless you add a pinch of saffron or annatto for color.
- dried oregano → dried thyme, dried cilantro, or a mix of cumin (0.5 tsp) and coriander (0.5 tsp). Thyme is more subtle; cumin and coriander will add a warm, toasted Middle Eastern note. Cilantro (if using dried) adds freshness.
- extra-virgin olive oil, divided → unsalted butter (same amount) or avocado oil. Butter will add richness and a slight nutty flavor. Avocado oil is neutral and behaves similarly to olive oil.
More yeast breads
See all →



Find more like this
- Meal
- Dinner
- Cuisine
- Caribbean
- Method
- Oven
- Quick & Easy
- Make Ahead