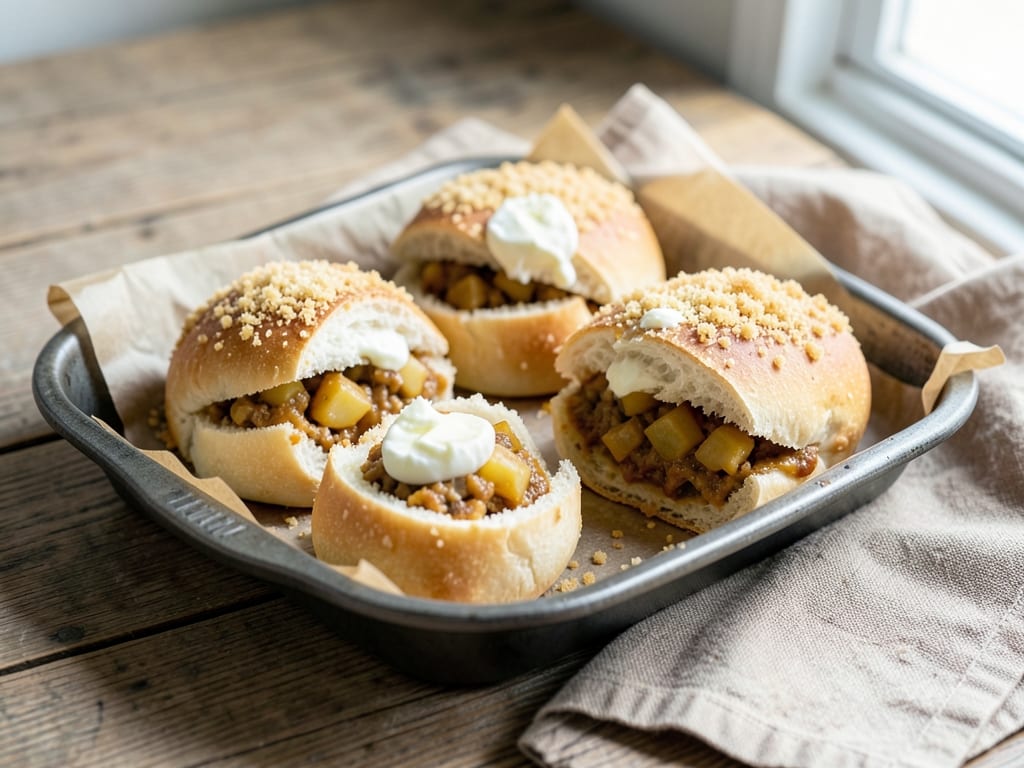
Curry Pan Baked Buns
Japanese-style soft, slightly sweet bread buns filled with creamy curry-potato filling and topped with crispy panko breadcrumbs. These golden baked buns are a comforting snack or light meal, with tender potatoes and aromatic curry roux in every bite.
- Prep
- 40 min
- Cook
- 40 min
- Wait
- 2 hr 35 min
- Total
- 3 hr 55 min
- Makes
- 8 buns
Steps
Before you start
- Read the entire recipe—this takes about 4 hours from start to finish
- Warm milk to 110°F (43°C) and bring butter and egg to room temperature before starting
- Peel and dice potatoes and onion in advance so filling prep moves quickly during the first dough rise
Make the dough
- In a large bowl, combine the flour, sugar, salt, and instant yeast.
- Pour the warm milk into the center and stir with a wooden spoon until a shaggy dough forms.
- Add the softened butter and mix until incorporated, then knead by hand for 10 minutes (or use a stand mixer fitted with the dough hook for 8–10 minutes).
- Knead until the dough is smooth, elastic, and slightly tacky.
- Test for proper gluten development using the windowpane test: gently stretch a small piece between your thumbs; if you can see light through it without tearing, gluten is fully developed.
+ Show details− Hide details
Ready when: Smooth, elastic dough that passes the windowpane test (stretches thin without tearing)
Tip: Don't skip the windowpane test; it ensures proper gluten development for a light, airy crumb.
First rise
- Transfer the dough to a lightly oiled bowl, cover with plastic wrap or a damp kitchen towel, and let rise at room temperature for 60–90 minutes.
- The dough is ready when it's nearly doubled in size and springs back slowly (but not completely) when you gently poke your finger into the surface.
+ Show details− Hide details
Ready when: Dough is puffy and nearly doubled; springs back slowly when poked
Tip: Cooler kitchens (below 68°F / 20°C) may take closer to 90 minutes; warmer kitchens may finish in 60 minutes.
Prepare the curry filling
- Melt 2 teaspoons of butter in a medium saucepan over medium heat.
- Add the diced onion and sauté for 3 minutes, stirring occasionally, until softened and fragrant.
- Add the diced potato and stir to coat with the butter.
- Pour in 100 ml of water and add the curry roux pieces, breaking them up as they dissolve into the liquid.
- Simmer uncovered for 12–15 minutes, stirring occasionally, until the potatoes are completely tender and the mixture is thick and creamy (you should be able to draw a line through it with a spoon).
- Season with salt and black pepper to taste.
- Spread the filling on a clean plate or shallow dish and let cool to room temperature, about 20 minutes (cooling prevents the dough from becoming too warm when you assemble the buns).
+ Show details− Hide details
Ready when: Potatoes are tender, filling is thick and creamy with no hard pieces remaining
Tip: Keep the curry filling well-seasoned; taste and adjust salt and pepper now, as the flavors will mellow slightly as the buns bake.
Shape the buns
- Turn the risen dough out onto a lightly floured surface.
- Using a bench scraper or knife, divide the dough into 8 equal portions (each should weigh 65–70g).
- Roll each piece into a ball, then gently flatten with your palm into a 4-inch (10 cm) disc.
- Place about 25g (roughly 1.5 tablespoons) of cooled curry filling in the center of each disc.
- Bring the edges of the dough up and over the filling, pinching them firmly together to seal and create a ball shape with the seam on the bottom.
- Place each sealed bun seam-side down on parchment-lined baking sheets, spacing them 3 inches (7.5 cm) apart.
+ Show details− Hide details
Ready when: All 8 buns shaped and sealed with filling completely enclosed
Tip: Don't overfill; exactly 25g of cooled filling per bun is ideal. Too much filling will leak out during baking.
Second rise
- Cover the shaped buns loosely with plastic wrap and let them rise at room temperature for 45–60 minutes, until they're visibly puffier and have increased in size by about 50%.
- They should feel light and airy when gently pressed, and spring back slowly.
+ Show details− Hide details
Ready when: Buns are noticeably puffier, spring back slowly when gently poked, visible increase in volume
Tip: Avoid over-proofing; if buns are too puffy and soft, the structure may collapse in the oven.
Top and bakeOven 375°F / 190°C
- About 15 minutes before you're ready to bake, preheat your oven to 375°F (190°C).
- In a small bowl, whisk together the egg with 1 tablespoon (15 ml) of water to create an egg wash.
- Lightly brush the top of each proofed bun with the egg wash, using a pastry brush.
- In another small bowl, mix the panko with the melted butter until evenly coated.
- Sprinkle about 5g (roughly 1.5 teaspoons) of the buttered panko on top of each bun, gently pressing so it adheres firmly.
- Place the baking sheets on the middle rack and bake for 22–26 minutes, until the tops are deep golden brown and the buns sound hollow when tapped on the bottom.
+ Show details− Hide details
Ready when: Tops are deep golden brown, buns sound hollow when tapped on the bottom
Tip: Mixing the panko with melted butter before sprinkling ensures even coating and extra crispness.
Cool and serve
- Transfer the hot buns from the baking sheets to wire cooling racks.
- Let them rest for at least 10 minutes before serving.
- These buns are best enjoyed warm or at room temperature; they'll continue to soften slightly as they cool and their flavor develops.
+ Show details− Hide details
Ready when: Buns are cool enough to handle without burning your fingers
Tip: Curry flavor is most pronounced while the buns are still warm; serve them warm for the best experience.
Good to know
Tips
- Don't skip the windowpane test when kneading; it ensures gluten is developed enough for a light, airy crumb that holds the filling well.
- Curry flavor mellows as buns cool; enjoy them warm straight from the oven for the most pronounced and aromatic curry taste.
- Keep the filling well-seasoned—it's the star of the bun. Taste and adjust salt and pepper before using.
- If using a stand mixer, knead for 8–10 minutes until smooth and elastic. By hand, knead for 10–12 minutes until the dough passes the windowpane test.
Make ahead
Yes. After shaping and proofing, cover the buns and refrigerate overnight. They can also be frozen at this stage for up to 3 months. Bake refrigerated buns adding 5–7 minutes to bake time; bake frozen buns directly from the freezer, adding 8–10 minutes.
Storage & reheating
Store cooled buns in an airtight container at room temperature for 2–3 days, or refrigerated for up to 5 days. To reheat: wrap in foil and warm in a 300°F (150°C) oven for 8–10 minutes until heated through. Freeze baked buns for up to 2 months in a freezer bag; thaw at room temperature or reheat directly from frozen using the foil method above.
Substitutions
- Japanese curry roux blocks (such as S&B or House brand) → 2 tablespoons curry powder mixed with 1 tablespoon water. Whisk the paste into the filling toward the end of cooking for a similar depth of flavor.
- waxy potatoes (such as Yukon Gold) → Sweet potato, or a 50/50 mix of waxy potato and diced carrot. Sweet potato will add a slight sweetness and orange color; carrot adds brightness and texture.
- whole milk → Water mixed with 2 tablespoons non-fat dry milk powder, or plant-based milk. Plant-based milk may produce a slightly less rich crumb, but the buns will still be soft and delicious.
- panko breadcrumbs → Sesame seeds or poppy seeds, or omit the topping entirely. Toast sesame seeds briefly for more flavor. A plain finish is also traditional and delicious.
More rolls & buns
See all →
Find more like this
- Meal
- Snack
- Cuisine
- Japanese
- Main ingredient
- Potatoes
- Diet
- VegetarianHalal