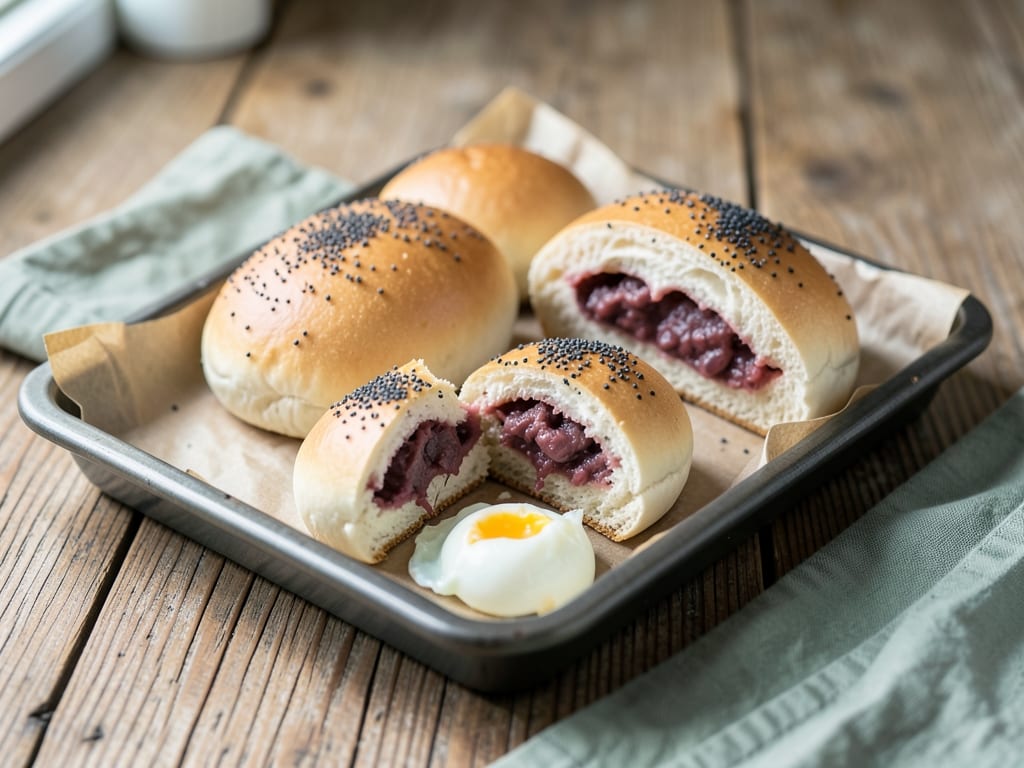
Anpan Red Bean Buns
Soft, pillowy Japanese sweet buns filled with creamy red bean paste (anko) and topped with poppy seeds. These tender, enriched dough buns are a beloved Japanese pastry—perfect for breakfast, snacks, or an elegant dessert. The combination of a gently sweet dough and earthy red bean paste makes them irresistible, and they stay fresh for a couple of days when stored properly.
- Prep
- 40 min
- Cook
- 17 min
- Wait
- 2 hr 30 min
- Total
- 3 hr 27 min
- Makes
- 8 buns
Steps
Before you start
- Warm the milk to about 110°F (43°C)—test with your finger; it should feel comfortably warm, not hot
- Bring the egg and butter to room temperature by leaving them out for 30–45 minutes
- Have the red bean paste at room temperature for easier filling
- Line two large baking sheets with parchment paper
Combine dry ingredients
- In a large mixing bowl, combine the all-purpose flour, instant yeast, sugar, and salt.
- Whisk together for about 1 minute to evenly distribute the yeast and salt throughout the flour.
+ Show details− Hide details
Ready when: Dry ingredients evenly mixed with no lumps of yeast
Add wet ingredients and mix
- Add the warm milk to the dry mixture, reserving about 1/4 cup (60 ml) for the glaze later.
- Add the room-temperature egg and softened butter.
- Using a wooden spoon or stand mixer with dough hook on low speed, mix until a shaggy dough forms with no visible dry flour, about 2–3 minutes.
+ Show details− Hide details
Ready when: Shaggy, rough dough with all dry flour incorporated
Knead the dough smooth
- Turn the dough out onto a lightly floured work surface.
- Knead by hand for 8–10 minutes (or use a stand mixer with dough hook on low speed for 8 minutes) until the dough becomes smooth, elastic, and only slightly tacky.
- When you poke it gently with a finger, it should spring back slowly, about halfway.
- Add a little more flour only if the dough sticks severely to your hands.
+ Show details− Hide details
Ready when: Smooth, elastic dough that is slightly tacky but not sticky; springs back halfway when poked
Tip: The dough should be soft and slightly sticky—this is normal for enriched buns. If it feels like Play-Doh, you've added too much flour.
First rise (bulk fermentation)
- Lightly butter or oil a large bowl.
- Place the kneaded dough inside and turn it to coat all sides with butter.
- Cover the bowl with a damp kitchen towel or plastic wrap.
- Let it rise in a warm, draft-free place (around 75–80°F / 24–27°C) for 60–90 minutes, or until the dough has roughly doubled in volume.
+ Show details− Hide details
Ready when: Dough doubled in size; poking it causes an indentation that slowly springs back halfway
Tip: If your kitchen is cool, place the covered bowl in a turned-off oven with the light on, or on top of the refrigerator for warmth.
Divide dough into eight portions
- Turn the risen dough out onto the work surface and gently deflate it with your hands—do not punch it aggressively.
- Using a bench scraper or sharp knife, divide the dough into 8 roughly equal pieces (each piece will weigh about 2.5 oz / 70 g).
- Using your hands, shape each piece into a smooth, tight ball by pinching the seams underneath and rolling it against the counter in a circular motion.
+ Show details− Hide details
Ready when: Eight smooth, even-sized dough balls with no visible seams on top
Shape and fill with red bean paste
- Working with one dough ball at a time (keep the others covered with a damp towel), gently flatten it into a disc about 3 inches (7.5 cm) in diameter, keeping the edges slightly thicker than the center.
- Place about 1.5 tablespoons (25 g) of room-temperature red bean paste in the center of the disc.
- Gather all the edges of the dough up and over the filling, then pinch them tightly together to seal the seam completely.
- Place the bun seam side down on a parchment-lined baking sheet.
- Repeat with the remaining dough balls and paste.
- Space the buns about 2 inches (5 cm) apart.
+ Show details− Hide details
Ready when: Eight sealed buns with the filling completely enclosed and no visible paste peeking through
Tip: Keep the seams tight and well-sealed; if the red bean paste is too warm and soft, it will soften the dough and may leak out during baking. If necessary, refrigerate the paste for 10 minutes before filling.
Second rise (proofing)
- Cover the buns loosely with a damp kitchen towel or plastic wrap.
- Let them rise in a warm, draft-free place for 45–60 minutes, until they are visibly puffy and feel light and airy to the touch.
- A gentle poke should leave a slow-filling indentation rather than springing back instantly.
+ Show details− Hide details
Ready when: Buns are visibly puffy and feel very light; a gentle poke leaves an indentation that slowly springs back
Apply milk glaze and poppy seedsOven 375°F / 190°C
- About 10 minutes before the buns finish their second rise, preheat your oven to 375°F (190°C).
- Once the buns have finished rising, whisk together the reserved milk (about 1/4 cup / 60 ml) with the water in a small bowl to create a thin glaze.
- Using a pastry brush, lightly and evenly brush the glaze over each bun.
- Sprinkle about 1 teaspoon (2–3 g) of poppy seeds on top of each bun, pressing gently so they adhere to the glaze.
+ Show details− Hide details
Ready when: Buns evenly glazed with poppy seeds stuck firmly to the surface
Tip: Apply the glaze evenly but not too heavily; too much liquid may prevent the buns from browning properly. If the glaze is too thick, whisk in another 1–2 teaspoons of water.
Bake until golden brownOven 375°F / 190°C
- Place the baking sheets on the center rack of the preheated oven.
- Bake for 16–18 minutes, until the tops are deep golden brown and the buns sound hollow when gently tapped on the bottom.
- The buns should feel light and airy when lifted.
+ Show details− Hide details
Ready when: Deep golden brown tops, hollow sound when tapped on the bottom, light and airy feel
Cool on a wire rack
- Transfer the baked buns to a wire cooling rack to cool for at least 15 minutes before serving.
- The buns are best enjoyed warm or at room temperature.
- Do not wrap them while still hot, as the trapped steam will soften the crust.
+ Show details− Hide details
Ready when: Buns cooled to warm or room temperature
Good to know
Tips
- Room-temperature milk, egg, and butter ensure the dough rises evenly and develops better flavor. Cold ingredients slow fermentation and can result in a denser, less flavorful bun.
- Don't overfill the buns—about 1.5 tablespoons (25 g) of paste per bun is ideal. Too much filling increases the risk of the paste leaking out and creating a mess in the oven.
- To check if the buns have risen properly during the second rise, gently poke one. Your finger should leave a slow-filling indentation. If it springs back instantly, they need more time; if the dough doesn't spring back at all, they may be slightly over-proofed (but will still taste good).
- These buns are best eaten on the day they are baked, while the crumb is still tender. After 2–3 days, they will begin to stale, so freeze any extras promptly for best results.
Make ahead
You can prepare the dough up to 12 hours ahead and refrigerate after kneading. Bring it to room temperature for 30 minutes before proceeding with the first rise. Alternatively, shape and fill the buns, then refrigerate for a slow overnight rise (8–12 hours) and bake directly from the cold, adding 2–3 minutes to the bake time.
Storage & reheating
Room temperature (in an airtight container): 2 days. Refrigerator (airtight container or zip-top bag): 4 days. Freezer (airtight bag or container): 2 months. To reheat: Wrap in foil and warm in a 300°F oven for 8–10 minutes until heated through, or wrap loosely and microwave for 30–45 seconds per bun.
Substitutions
- red bean paste (anko) → Mung bean paste, black bean paste, or chestnut paste. These will change the flavor but work structurally the same. Some recipes use sweetened adzuki paste, which is even closer to traditional anpan.
- poppy seeds → Black sesame seeds, white sesame seeds, or a mix of both; alternatively, no topping. Sesame seeds are more authentic in some regional Japanese variations. Omitting the topping is also common.
- whole milk → Water, or non-dairy milk (oat, soy, almond). Water will work but the dough will be less rich and the buns will brown less evenly. Non-dairy milks are a good substitute but may slightly affect dough texture.
- instant yeast → Active dry yeast (1.5 tsp). Rise times may be 10–15 minutes longer with active dry yeast. Proof the yeast in warm water first if using an older package.
More rolls & buns
See all →
Find more like this
- Meal
- Breakfast
- Cuisine
- Japanese
- Diet
- VegetarianHalal
- Method
- Oven