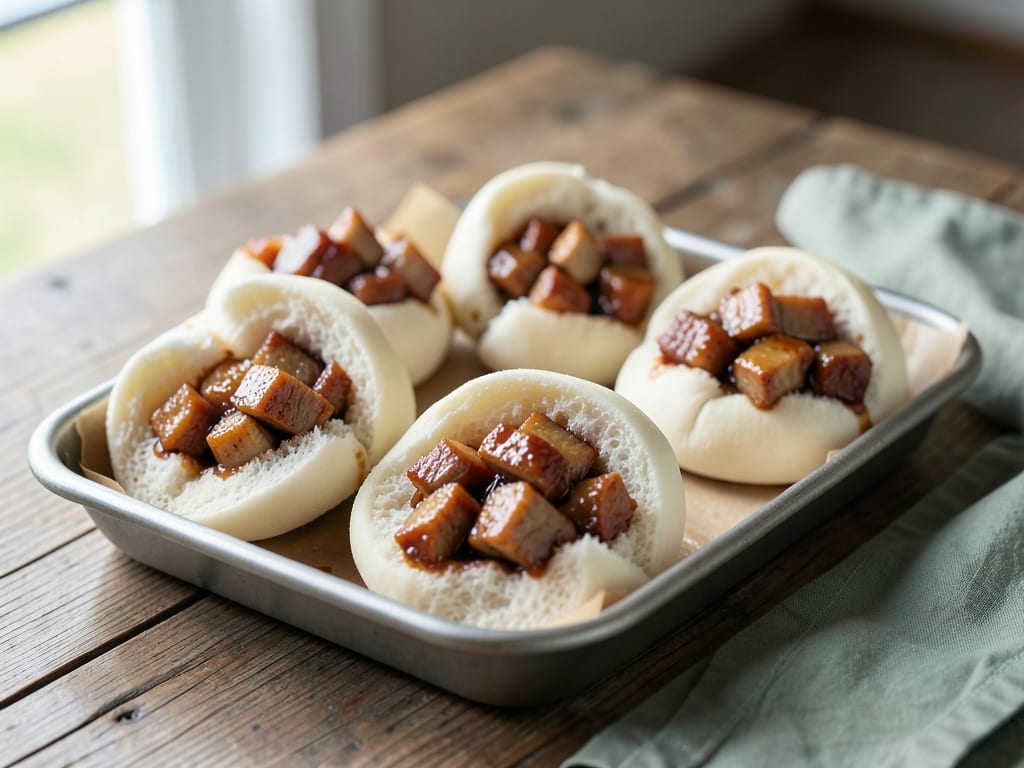
Char Siu Bao
Fluffy steamed buns filled with tender char siu pork in a savory-sweet glaze. These pillowy buns are a beloved dim sum staple that are surprisingly approachable for home cooks. The soft, slightly sweet dough contrasts beautifully with the rich, glossy pork filling.
- Prep
- 50 min
- Cook
- 10 min
- Wait
- 2 hr 10 min
- Total
- 3 hr 10 min
- Makes
- 12 steamed buns
Steps
Before you start
- Have all ingredients measured and ready before starting (mise en place).
- Ensure you have a warm, draft-free place for the dough to rise (such as an oven with the light on, at 75–80°F / 24–27°C).
- Use warm water for yeast (about 110°F / 43°C); water above 120°F will kill the yeast.
- Prepare 12 parchment paper squares (roughly 2×2 inches / 5×5 cm each) and preheat your steamer basket.
- Ensure any pork used is fully cooked; if making your own char siu or using the suggested substitutes, the pork must reach an internal temperature of 145°F (63°C) before use in the filling.
Activate the yeast
- In a small bowl, combine 2/3 cup warm whole milk (about 110°F / 43°C) with 1 tsp instant yeast and 2 tbsp sugar.
- Stir gently to combine and let sit, uncovered, for 5 minutes.
- The mixture should become foamy on top, indicating the yeast is active and alive.
+ Show details− Hide details
Ready when: Mixture is foamy on the surface
Tip: If the mixture does not foam, the yeast is dead or expired; discard and start over with fresh yeast.
Mix the dough
- In a large mixing bowl, whisk together 2.5 cups all-purpose flour and 1/2 tsp salt.
- Create a well in the center of the flour.
- Pour the activated yeast mixture and 1 tbsp vegetable oil into the well.
- Using a dough scraper or your fingers, gradually incorporate the flour into the wet ingredients, mixing until a shaggy dough forms with no dry flour bits remaining.
+ Show details− Hide details
Ready when: Dough is shaggy and all flour is incorporated
Knead until smooth
- Turn the dough onto a lightly oiled surface and knead for 8–10 minutes, working it vigorously with the heel of your hand.
- The dough should become smooth, elastic, and should spring back gently when poked with a finger.
- Shape into a ball.
+ Show details− Hide details
Ready when: Dough is smooth, elastic, and springs back when poked
Tip: Knead until just smooth; over-kneading can make the buns tough. The dough should still feel slightly tacky to the touch.
First rise
- Place the dough ball in a lightly oiled bowl, turning to coat all sides.
- Cover with a damp kitchen towel or plastic wrap.
- Let rise in a warm spot (75–80°F / 24–27°C) for 60–90 minutes, until the dough has roughly doubled in size.
- When ready, press gently on the dough with your finger; it should not fully spring back immediately.
+ Show details− Hide details
Ready when: Dough has roughly doubled in size; a finger poke leaves a slight indentation that does not fully spring back
Make the filling
- Heat 1 tbsp vegetable oil in a small saucepan over medium heat.
- Add 2 minced garlic cloves and 1 tsp minced fresh ginger; sauté for about 30 seconds until fragrant.
- Add 1.5 cups diced char siu pork (fully cooked), 3 tbsp hoisin sauce, 1 tbsp soy sauce, 1/2 tbsp oyster sauce (if using), 1 tbsp sugar, and 2 tbsp water.
- Stir well and simmer gently for 3–4 minutes, stirring occasionally, until the flavors blend and the pork is heated through.
- In a small bowl, mix 1 tsp cornstarch with 1 tbsp water until smooth.
- Slowly add the cornstarch slurry to the simmering filling while stirring constantly.
- Simmer for 1 minute more until thickened and glossy.
- Remove from heat and stir in 1 tsp sesame oil.
- Transfer the filling to a plate and let cool to room temperature, about 10 minutes.
+ Show details− Hide details
Ready when: Filling is thickened, heated through, and cooled to room temperature
Tip: It is crucial to cool the filling completely before using it. If the filling is warm, the dough will become sticky and be difficult to seal.
Divide and shape dough discs
- Turn the risen dough onto a lightly floured work surface and divide it into 12 equal portions (each should weigh about 50g if using a scale).
- Roll each portion into a smooth ball between your palms.
- Flatten each ball gently with the heel of your hand to form a disc roughly 3–3.5 inches (7.5–9 cm) across and about 1/4 inch (6 mm) thick.
- The center should be slightly thicker than the edges to help prevent filling from leaking.
+ Show details− Hide details
Ready when: You have 12 flattened dough discs, each about 3–3.5 inches across
Tip: Work quickly and keep unused dough covered with a damp towel to prevent drying out. If the dough springs back as you flatten it, let the discs rest for a few minutes before continuing.
Fill and seal the buns
- Place about 1.5–2 tbsp of cooled filling in the center of each dough disc.
- Gather the edges of the dough up and around the filling, pinching them together tightly at the top to seal.
- Be careful not to trap air pockets; gently squeeze as you gather to create a tight seal.
- You can fold and pleat the dough as you gather it, or simply pinch to create a gathered pouch.
- Once sealed, place each bun seam-side down on a 2-inch (5 cm) square of parchment paper.
+ Show details− Hide details
Ready when: You have 12 filled buns, each sealed at the top with the seam facing downward
Tip: If the dough is slipping or hard to handle, let the discs rest for 5–10 minutes while covered. If the filling is not completely cool, the dough will tear.
Second rise
- Arrange the sealed buns on the parchment squares in a steamer basket, spacing them at least 1 inch (2.5 cm) apart (they will expand as they rise and steam).
- Cover the basket with the steamer lid or a damp towel.
- Let the buns rise in a warm place (75–80°F / 24–27°C) for 30–45 minutes, until they are noticeably puffy and jiggly when the basket is gently shaken.
- They should not quite double in size, but should feel light and airy.
+ Show details− Hide details
Ready when: Buns are noticeably puffy and jiggly; they spring back slowly when gently poked
Steam the buns
- Fill a large pot with about 2 inches (5 cm) of water and bring to a rolling boil.
- Carefully place the steamer basket with the risen buns over the boiling water, ensuring the water does not touch the bottom of the basket.
- Cover the steamer with the lid.
- Steam the buns for 12–15 minutes, until they are cooked through and have a slightly glossy, firm exterior.
- The buns should look set and feel spongy when gently pressed, not doughy or raw.
+ Show details− Hide details
Ready when: Buns are glossy, firm, and spring back when gently pressed; they are no longer doughy
Tip: Avoid opening the steamer during the first 10 minutes; sudden temperature changes can cause the buns to collapse or sink. If you need to check progress, lift the lid quickly and carefully.
Good to know
Tips
- Yeast must be alive and active: Always check that your yeast foams when mixed with warm liquid and sugar. Expired yeast is the most common reason for flat, dense buns.
- Don't skip the cooling step for the filling: Warm filling will make the dough sticky and difficult to seal, and may cause holes or splitting in the finished buns.
- Avoid opening the steamer while cooking: Sudden temperature changes can shock the buns and cause them to sink or become dense.
- Room temperature is crucial for rising: If your kitchen is cool, place rising buns in a turned-off oven with just the light on (creates a warm microenvironment at about 80°F / 27°C) for faster, more even rising.
Make ahead
The dough can be made up to 1 day ahead: after the first rise (step 4), divide, shape, and fill the buns as directed in steps 6–7, then wrap them tightly in plastic wrap and refrigerate overnight. In the morning, let them come to room temperature for 15–20 minutes, then proceed with the second rise and steaming. The buns can also be steamed, cooled completely, and frozen for up to 3 months; reheat by steaming for 3–4 minutes until warmed through.
Storage & reheating
Room temperature: Keep in an airtight container for up to 2 days; eat at room temperature or reheat in the microwave. Refrigerator: Store in an airtight container for up to 4 days; reheat by steaming for 3–5 minutes until warmed and soft. Freezer: Freeze cooked buns in an airtight freezer bag for up to 3 months. Reheat by steaming from frozen for 8–10 minutes, or thaw overnight in the refrigerator and steam for 3–4 minutes.
Substitutions
- char siu pork → Shredded rotisserie chicken or slow-cooked pork shoulder. If using plain cooked pork, toss it with an extra 1 tbsp hoisin sauce and 1/2 tbsp sugar to add depth of flavor similar to traditional char siu. If using raw or undercooked pork, ensure it reaches 145°F (63°C) internal temperature before use.
- hoisin sauce → Mixture of oyster sauce (1 tbsp), soy sauce, and 1 tbsp of honey or brown sugar. The flavor will be less sweet and slightly more savory, but still delicious.
- whole milk → Whole milk and water in equal parts (1/3 cup milk + 1/3 cup water), or any non-dairy milk. Non-dairy milk will produce slightly less rich dough, but the texture will still be tender.
- oyster sauce → Omit entirely, or increase soy sauce to 1.5 tbsp. The filling will be slightly less umami-rich but will still have great flavor.
More rolls & buns
See all →
Find more like this
- Meal
- Brunch
- Cuisine
- Cantonese
- Main ingredient
- Pork
- Method
- Stovetop
- Quick & Easy
- Make Ahead