
Thrifty Sourdough Discard Pumpkin and Pinto Bean Bread
A rustic, naturally leavened bread that transforms sourdough starter discard into a tender, subtly spiced loaf studded with pinto beans for protein and texture. Pumpkin puree adds moisture and a warm autumn flavor, while the beans contribute an earthy character. Perfect for sandwiches, toast, or alongside soups—and a smart way to use discard instead of throwing it away.
- Prep
- 20 min
- Cook
- 45 min
- Wait
- 8 hr 15 min
- Total
- 9 hr 20 min
- Makes
- 1 loaf (12 slices)
Steps
Before you start
- Remove sourdough discard from the fridge 30 minutes before mixing so it reaches room temperature
- Drain and rinse canned pinto beans thoroughly
- Preheat oven to 450°F (232°C) 30 minutes before baking
- Line a Dutch oven or covered baking vessel with parchment paper
Mix dough
- In a large mixing bowl, combine 1 cup (240 ml) sourdough discard, 0.75 cup (180 ml) pumpkin puree, and 0.5 cup (120 ml) room-temperature water.
- Stir until mostly combined.
- Add 2.25 cups (300 g) bread flour, 0.5 cup (60 g) whole wheat flour, 1.5 teaspoons (9 g) salt, 1 teaspoon (2 g) nutmeg, 0.5 teaspoon (1.5 g) cinnamon, and 0.25 teaspoon (0.5 g) ginger if using.
- Mix with a bench scraper or wooden spoon until all flour is hydrated and a shaggy dough forms—about 2 minutes.
+ Show details− Hide details
Ready when: All flour is incorporated and dough is roughly shaggy
Tip: Do not overwork the dough at this stage. A rough, uneven texture is fine.
Autolyse and rest
- Cover the bowl with a damp kitchen towel or plastic wrap.
- Let the dough rest at room temperature for 45 minutes.
- This resting period allows the flour to fully hydrate and makes the dough easier to work with.
+ Show details− Hide details
Tip: This rest is worth the time and helps develop gluten structure without additional kneading.
Fold in beans and develop gluten
- Add 0.75 cup (150 g) drained and patted-dry pinto beans to the dough.
- Perform 6–8 sets of stretch-and-folds over the next 30 minutes, at 5-minute intervals.
- Use a wet hand or bench scraper to stretch one side of the dough from the bowl's edge toward the center, fold it over itself, rotate the bowl 90 degrees, and repeat.
- By the end, the dough will feel firmer, smoother, and the beans will be evenly distributed throughout.
+ Show details− Hide details
Ready when: Dough is smooth, elastic, and beans are evenly mixed throughout
Tip: Stretch-and-folds add strength without heavy kneading, perfect for wet doughs. If a bean breaks, it's fine—spread it through the dough.
First rise (bulk fermentation)
- Cover the bowl and let it rise at room temperature (68–72°F / 20–22°C is ideal) for 4–5 hours.
- The dough should increase in volume by 50–75%, with some visible bubbles on the surface and sides.
- It should feel airy but still hold its shape.
+ Show details− Hide details
Ready when: Dough has increased 50–75% in volume with visible fermentation bubbles
Tip: Fermentation time varies with kitchen temperature. In a cooler kitchen (65°F / 18°C), it may take 5–6 hours. Poke the dough gently—if it slowly springs back halfway, it's ready for shaping.
Preshape and bench rest
- Turn the dough onto a lightly floured work surface.
- Use a bench scraper to gently preshape it into a round or oval (don't deflate it aggressively).
- Let it sit uncovered for 20 minutes to relax the gluten.
+ Show details− Hide details
Ready when: Dough is no longer tight and springs back gently when poked
Tip: A gentle hand here prevents degassing. You want the preshape to retain its shape without tight tension.
Final shape and proof
- Shape the dough into a round or oval loaf with a slight tension on the surface (pull the sides toward the center, then flip seam-side down).
- Place it seam-side up in a floured banneton or a bowl lined with a floured kitchen towel.
- Cover with plastic wrap or a plastic bag and let it rise at room temperature for 1–2 hours until puffy.
- Alternatively, refrigerate overnight (8–12 hours) for deeper flavor—if chilling overnight, do not let it come fully to room temperature before scoring.
+ Show details− Hide details
Ready when: Dough is puffy, and a gentle poke leaves a slight indentation that slowly springs back halfway
Tip: Overnight cold fermentation develops more complex flavor and makes scoring easier. If using the cold option, pull from the fridge 15 minutes before baking.
Preheat Dutch ovenOven 450°F / 230°C
- Position a rack in the lower-middle of the oven and preheat to 450°F (232°C) for at least 30 minutes.
- Place a Dutch oven or covered baking vessel (4–5 quart / 4–5 L) inside to preheat as well.
+ Show details− Hide details
Ready when: Dutch oven is hot and ready (carefully test with a drop of water on a wooden spoon—it should sizzle immediately)
Tip: A preheated Dutch oven creates steam, which gives the bread a crispy crust. Do not skip this step.
Score and bakeOven 450°F / 230°C
- Carefully remove the hot Dutch oven from the oven.
- Line the bottom with parchment paper if needed (it likely has some from prepping).
- Working quickly to minimize heat loss, invert the proofed dough onto the parchment, seam-side down.
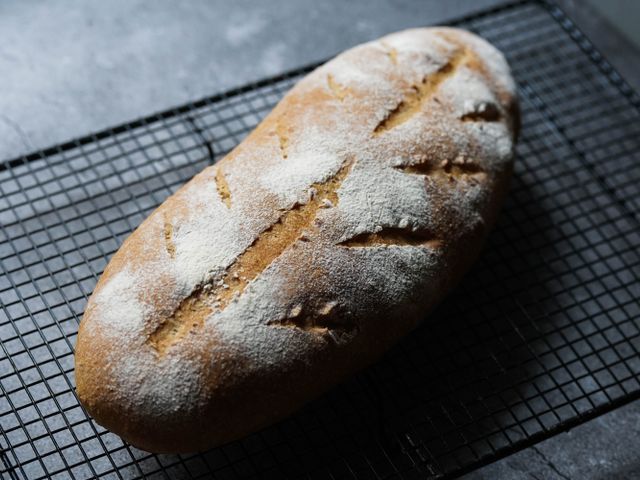
- Using a sharp knife or lame (bread scoring blade), make a single confident slash about ¼ inch (0.6 cm) deep across the top at a 30–45 degree angle, or make an X with two intersecting slashes.
- Immediately replace the lid and return to the oven.
- Bake covered for 25 minutes to trap steam.
+ Show details− Hide details
Ready when: Steam has developed inside the Dutch oven (visible as condensation on the lid)
Tip: A confident, quick slash prevents the knife from catching and dragging the dough. If using a banneton, invert it directly onto the parchment in one smooth motion.
Finish bakingOven 420°F / 215°C
- Remove the Dutch oven lid and reduce the oven temperature to 420°F (216°C).
- Bake uncovered for 18–22 minutes longer until the crust is deep golden-brown and sounds hollow when tapped on the bottom.
- The loaf should reach an internal temperature of 205–210°F (96–99°C) at the center.
+ Show details− Hide details
Ready when: Crust is deep golden-brown, bottom sounds hollow when tapped, and internal temperature is 205–210°F (96–99°C)
Tip: If the crust is browning too fast, tent it loosely with foil. Use the internal thermometer to avoid underbaking, which results in a gummy crumb.
Cool completely
- Transfer the loaf to a wire cooling rack and let it cool completely at room temperature for at least 1–2 hours before slicing.
- The crumb will set and the flavor will mellow as it cools.
+ Show details− Hide details
Ready when: Loaf is at room temperature and feels light when picked up
Tip: Slicing warm bread can compress the crumb. Patience here rewards you with clean slices and better texture.
Good to know
Tips
- Sourdough discard does not need to be freshly fed or particularly active. Unfed, refrigerated discard works beautifully in this recipe and creates a slower, more forgiving fermentation.
- This dough is wetter than a typical sourdough loaf due to the pumpkin and beans, so use a bench scraper and wet hands during shaping. Avoid adding extra flour unless absolutely necessary.
- The pinto beans should be soft enough to break easily with a spoon but not mushy. If canned beans are very soft, pat them extra dry before adding to prevent excess moisture.
- For a rustic, open crumb, extend the bulk fermentation slightly (to 5–6 hours) and ensure proper stretch-and-fold technique. For a tighter, more standard crumb, ferment for 4 hours and be gentle with the dough.
Make ahead
Store the shaped dough in the refrigerator overnight (8–12 hours) after Step 6 for deeper flavor development and easier scoring. Bake directly from the cold dough without thawing.
Storage & reheating
Room temperature (1–2 days): Wrap the cooled loaf in a clean kitchen towel or place in a paper bag. Refrigerator (up to 5 days): Wrap tightly in plastic wrap or an airtight container. Revive by misting lightly with water and warming in a 375°F (190°C) oven for 8–10 minutes. Freezer (up to 3 months): Wrap in plastic wrap and foil, then place in a freezer bag. Thaw at room temperature for 4–6 hours, then refresh in the oven as above if desired.
Substitutions
- bread flour or all-purpose flour → All-purpose flour. Use all-purpose flour in place of bread flour for a slightly softer, less chewy crumb. The loaf will be equally delicious.
- cooked pinto beans → Cooked black beans, chickpeas, or kidney beans. Any cooked bean with a firm texture works. Avoid overly soft beans, which may break apart during folding.
- pumpkin puree (canned or homemade) → Butternut squash puree or sweet potato puree. Substitute in equal volume. Squash imparts a slightly earthier flavor; sweet potato adds more sweetness. Both work beautifully.
- whole wheat flour → Rye flour or spelt flour. Use an equal weight of rye or spelt for a nuttier, more complex flavor. Rye absorbs slightly more water, so monitor dough consistency during mixing.
More yeast breads
See all →




Find more like this
- Meal
- Breakfast
- Main ingredient
- White Beans
- Method
- Oven
- Quick & Easy
- Make AheadBudget