
Sourdough Sprouted Grain Loaf
A rustic whole-grain sourdough that balances the nutty, earthy flavor of sprouted grains with a chewy crumb and crispy crust. The sprouted grain flour provides nutrition and complex flavor, while a blend with white flour ensures good rise and structure. Long, cool fermentation develops tanginess and depth.
- Prep
- 15 min
- Cook
- 40 min
- Wait
- 5 hr 30 min
- Total
- 6 hr 25 min
- Makes
- 1 loaf (10 slices)
Steps
Before you start
- Your sourdough starter must be active and fed 4–8 hours prior; it should be bubbly and at peak (doubled or just beginning to fall back).
- Pull out all ingredients and let them come to room temperature (about 70°F / 21°C) for 30 minutes.
- Preheat your Dutch oven in the oven at 500°F (260°C) during the final 30 minutes of proofing.
- Read through the entire method so you understand the bulk fermentation timeline.
- Have a kitchen scale; by weight is essential for consistency.
Autolyse: Combine Starter & Water
- In a large mixing bowl, whisk the active sourdough starter into the room-temperature water until mostly dissolved (a few small clumps are fine).
- Set aside.
Mix Flours into Liquid
- Add the sprouted grain flour and bread flour to the starter-water mixture.
- Using your hand or a bench scraper, mix thoroughly until all dry flour is hydrated and you have a shaggy, wet dough with no dry pockets.
- Cover loosely with a damp towel and let rest uncovered at room temperature for 30 minutes.
- This allows the flours to fully absorb water and begins gluten development naturally.
+ Show details− Hide details
Ready when: All dry flour is incorporated; dough looks shaggy and wet
Add Salt & Initial Stretch
- Sprinkle the salt evenly over the dough.
- Wet your hand and pinch and fold the dough over itself, rotating the bowl as you work, until the salt is fully incorporated (about 1 minute).
- The dough will feel slightly looser—this is normal.
- Perform 4–5 stretch-and-folds: wet your hand, grab the top edge of the dough, and pull it up and over the center, rotating the bowl each time.
- This builds early strength without kneading.
+ Show details− Hide details
Ready when: Salt is fully distributed; dough shows light stretching resistance
Bulk Fermentation with Coil Folds
- Cover the bowl loosely with a damp towel or shower cap.
- At room temperature (68–72°F / 20–22°C), perform a set of 4 coil folds every 45 minutes for the first 2.5 hours (at 0:45, 1:30, and 2:15).
- For each coil fold: wet your hand, grab one side of the dough, pull it up and over the center, pinch it down slightly, then rotate the bowl 90° and repeat from the remaining three sides.
- After 2.5 hours, stop folding and let the dough rest undisturbed for another 1.5–2 hours.
- Total bulk fermentation is 4–5 hours.
- By the end, the dough should increase in volume by 50–75% (not quite doubled) and show visible bubbles on the surface and sides.
- When you gently poke it, it should spring back slowly but leave a slight indent.
+ Show details− Hide details
Ready when: Dough increases 50–75% in volume; visible bubbles on surface; gentle poke leaves slow spring-back with slight indent
Tip: Sprouted grain dough ferments slightly faster than all-white doughs. Watch for visual cues (volume increase and bubbles) rather than relying solely on the clock.
Pre-shape & Bench Rest
- Turn the dough out onto a lightly floured work surface (flour the top lightly too; the dough is wet).
- Using a bench scraper, gently pre-shape it into a round: fold the far edge toward you, rotate the dough 90°, fold again, rotating as you work to create surface tension.
- You're aiming for a loose round, not a tight one.
- Cover with a towel and let rest for 20 minutes at room temperature.
+ Show details− Hide details
Ready when: Dough is a loose, rounded shape; surface is relaxed but holds form
Final Shape
- Flip the dough seam-side up on the work surface.
- Using the bench scraper and your hands, fold the bottom third up and seal with the heel of your hand, then fold the sides inward slightly and roll the dough toward you, pulling gently to build tension.
- End with the seam underneath.
- Flip seam-side up into a well-floured banneton or proofing basket.
+ Show details− Hide details
Ready when: Dough is shaped tightly; seam faces up in basket; surface is taut
Tip: Sprouted grain dough is more delicate than conventional dough. Shape gently and avoid tearing the surface.
Final Proof—Room Temperature or Cold
- Cover the banneton loosely with a towel or shower cap.
- OPTION A (2–4 hours, same-day): Proof at room temperature (68–72°F / 20–22°C).
- The dough should increase by 50% in volume.
- Poke test: gently press your finger into the side; it should spring back slowly but leave a slight indent.
- OPTION B (8–12 hours, overnight): Cover the banneton tightly and refrigerate.
- This develops more flavor and makes scoring easier.
- You can bake straight from the fridge the next morning.
+ Show details− Hide details
Ready when: Dough increases 50% in volume; poke test leaves slow spring-back with slight indent
Tip: Cold final proof (overnight in fridge) improves flavor and gives scheduling flexibility.
Preheat Oven & Prepare for BakeOven 500°F / 260°C
- About 45 minutes before you plan to bake, preheat your oven to 500°F (260°C) with the Dutch oven inside.
- The oven and pot must be smoking hot so the dough gets a strong oven-spring.
- If proofing cold, remove the banneton from the fridge about 10 minutes before baking and place it on the counter (do not let it come fully to room temp; cold dough bakes better).
+ Show details− Hide details
Ready when: Dutch oven is smoking hot; oven is fully preheated
Score & LoadOven 500°F / 260°C
- Carefully remove the preheated Dutch oven from the oven (use thick oven mitts).
- Turn the dough out onto parchment paper, seam-side down.
- Using a lame, sharp knife, or razor blade held at 45°, score the top with one long slash or an artistic cross pattern about ¼–½ inch (6–12 mm) deep.
- This controls where the dough expands and creates an ear.
- Immediately transfer the parchment and dough into the hot Dutch oven, cover with the lid, and return to the oven.
- Lower the oven temperature to 450°F (232°C).
+ Show details− Hide details
Ready when: Dough is scored and placed in hot Dutch oven; oven door is closed quickly
Tip: Work quickly to avoid losing oven heat. The first 15 minutes covered traps steam, which gives you that crispy crust.
Covered BakeOven 450°F / 230°C
- Bake covered at 450°F (232°C) for 20 minutes.
- Do not open the oven door.
- This trapped steam is essential for crust development.
+ Show details− Hide details
Ready when: Dough is set and lightly golden underneath the lid (you will not see this until you remove the lid)
Uncovered Bake to Deep GoldenOven 450°F / 230°C
- Remove the lid carefully (steam will rise).
- Continue baking uncovered for 18–22 minutes, until the crust is a deep golden-brown color, almost approaching mahogany.
- If it is browning unevenly, rotate the Dutch oven once halfway through.
- At the 18-minute mark, insert an instant-read thermometer into the center of the loaf (through a small opening if using the pot, or briefly remove and check).
- The internal temperature should reach 205–210°F (96–99°C).
- The crust should sound hollow when tapped on the bottom.
+ Show details− Hide details
Ready when: Crust is deep golden-brown; internal temperature is 205–210°F (96–99°C); loaf sounds hollow when tapped
Tip: Sprouted grain loaves can be denser than white bread—don't underbake. If the internal temp is below 205°F, continue baking in 2-minute increments.
Cool Completely
- Transfer the bread to a wire cooling rack (use the Dutch oven handle or carefully lift with a kitchen towel).
- Let cool completely at room temperature, about 20–30 minutes, before slicing.
- The crumb will be very soft if cut too early; the cooling time allows the starches to set.
+ Show details− Hide details
Ready when: Loaf is cool to the touch; interior feels stable when gently pressed
Good to know
Tips
- Starter readiness is crucial: Use starter that has at least doubled in height, shows lots of bubbles, and smells pleasantly sour. If your starter is sluggish, feed it 2–3 times with 12–24 hours between feedings before baking.
- Sprouted grain flour is heavier and won't develop gluten as robustly as white flour, so the 30% bread flour is there for strength. Do not reduce the white flour or the loaf may be very dense and won't rise well.
- Fermentation is visual: The exact timing depends on your kitchen temperature. Watch for the dough to increase in volume by 50–75% and show bubbles on top, rather than relying on the clock alone.
- Cold final proof is your friend: Doing an overnight cold proof in the fridge (8–12 hours) improves flavor, makes scoring easier, and gives you flexibility to bake on your own schedule.
Make ahead
You can prepare the dough through the end of bulk fermentation (Step 4) up to 8 hours ahead. After bulk fermentation, proceed straight to shaping and do an overnight cold final proof (Step 7, Option B). This actually improves flavor and is the most convenient method for home bakers. You can then bake the next morning straight from the fridge.
Storage & reheating
Room temperature: Keep the cooled loaf in a breathable bread bag or wrapped lightly in a kitchen towel for up to 3 days. Refrigerator: Store in an airtight container or wrapped tightly for up to 5 days; toast or lightly steam slices before serving. Freezer: Wrap the cooled loaf tightly in plastic wrap, then place in a freezer bag. Freeze for up to 3 months. Thaw at room temperature for 2–3 hours, then warm in a 350°F (175°C) oven for 10 minutes, covered with foil, to restore crust.
Substitutions
- Sprouted grain flour → Whole wheat flour. Use the same weight. Whole wheat will produce a denser, less nutty loaf. You may need to add 5–10g more water as whole wheat absorbs slightly more than sprouted grains.
- Bread flour or all-purpose flour → All-purpose flour. All-purpose flour (11–12% protein) works but may yield slightly less rise. Use the same weight; no adjustment needed.
- Active, fed sourdough starter → Active dry yeast (7g). Not recommended for this recipe—sourdough's long fermentation and unique flavor cannot be replicated with yeast. If you must: hydrate yeast in water for 5 minutes, then proceed. Reduce bulk fermentation to 2–3 hours and final proof to 1 hour at room temperature. The flavor will be different.
- Water → Ice water (for summer baking above 75°F). Use ice-cold water to keep the dough cooler and slow fermentation. The bulk fermentation may extend to 5–6 hours; follow visual cues (bubbling, volume increase) rather than the timer.
More sourdough
See all →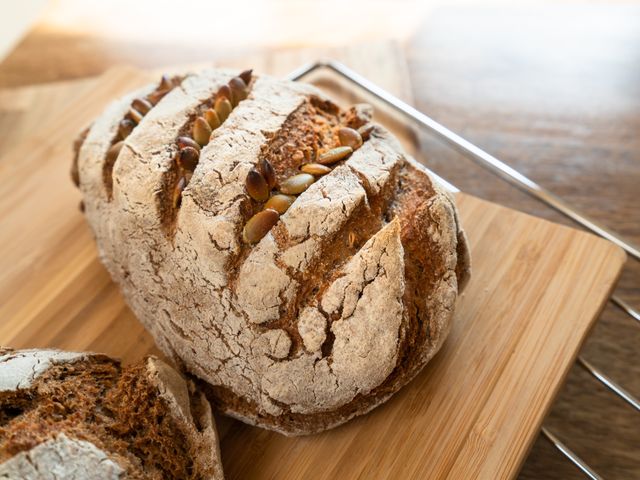
Find more like this
- Meal
- Breakfast
- Method
- Oven
- Quick & Easy
- 5 Ingredients or LessMake Ahead