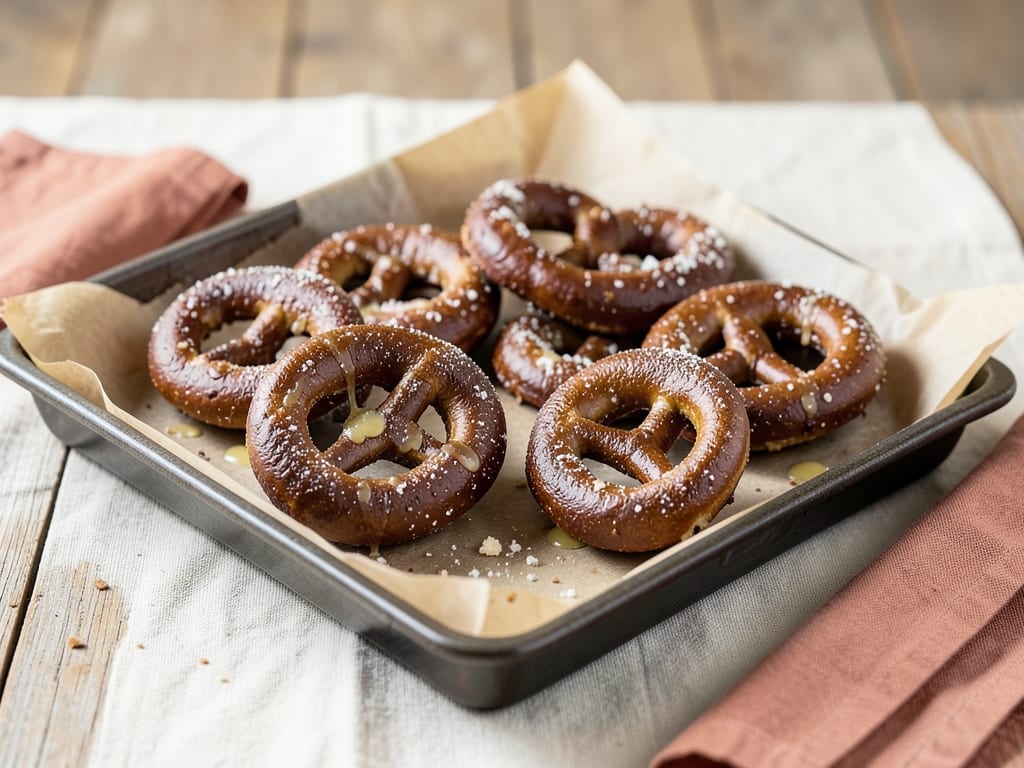
Sourdough Pretzels
Chewy, mahogany-crusted German-style pretzels with a gentle tang from active sourdough starter. A quick baking soda bath gives the classic glossy skin and deep flavor, and a short chill makes the shaped pretzels easy to handle.
- Prep
- 45 min
- Cook
- 25 min
- Wait
- 4 hr 50 min
- Total
- 6 hr
- Makes
- 8 large soft pretzels
Steps
Before you start
- Feed your starter 4–8 hours ahead so it is bubbly, doubled, and floats in water. A sluggish starter will make the first rise much longer.
- Use a 100% hydration starter (equal weights flour and water). If yours is thicker or thinner, expect to adjust the water by a tablespoon or two.
- Plan about 6 hours from start to finish, most of it hands-off. The dough can also bulk ferment overnight in the fridge (see Make Ahead).
- Baking soda bath: use a wide non-aluminum pot (stainless steel or enamel). Aluminum discolors and can give off a metallic taste.
- Wear oven mitts near the bath. Adding baking soda to hot water makes it foam up.
Mix the dough
- In the bowl of a stand mixer, combine the bread flour, sourdough starter, lukewarm water, brown sugar, and fine sea salt.
- Stir with a spatula or run the dough hook on low for about 2 minutes until no dry flour remains and a stiff, shaggy dough forms.
+ Show details− Hide details
Ready when: No dry flour remains; the dough looks shaggy and stiff.
Tip: Add the salt with the flour, not on top of the starter, so it doesn't clump.
Knead in butter
- With the mixer on low-medium speed, add the softened butter a few pieces at a time and knead for 8 minutes total.
- (By hand: knead on an unfloured counter for 10–12 minutes.) Scrape the hook and bowl once or twice.
+ Show details− Hide details
Ready when: The dough is smooth, firm, and slightly tacky but not sticky; it clears the sides of the bowl and a small piece stretches into a thin, translucent window without tearing right away.
Tip: This is a stiff dough by design. Resist adding water; a firm dough holds the pretzel shape.
Bulk ferment
- Shape the dough into a ball and place it in a lightly oiled or buttered large bowl.
- Cover and let rise at 75°F (24°C) for 4 to 5 hours.
- After the first hour, wet your hand and do one set of stretch and folds: lift an edge, stretch it up, and fold it over the center, turning the bowl 4 times.
+ Show details− Hide details
Ready when: Dough has grown by about 50–75%, looks puffy and airy with a few bubbles at the edges, and springs back slowly when poked.
Tip: Don't wait for it to double. Stiff pretzel dough that overferments turns slack and is hard to shape.
Divide and rest
- Turn the dough onto a clean, unfloured counter.
- Cut it into 8 equal pieces, about 115 g (4 oz) each; weigh them for even baking.
- Roll each into a loose ball, cover with a damp towel, and rest for 10 minutes so the gluten relaxes.
+ Show details− Hide details
Ready when: Balls feel soft and no longer spring back when pressed.
Tip: Line two baking sheets with parchment now so they are ready.
Roll and shape
- Roll one ball on an unfloured counter with your palms, working from the center outward, into a rope about 24 inches (60 cm) long, thicker in the middle and tapered at the ends.
- Form a U, cross the ends twice near the top, then fold the twist down and press the ends onto the bottom curve of the U at about 4 and 8 o'clock.
- Place on the parchment, 4 per sheet.
+ Show details− Hide details
Ready when: Each rope is an even 24 inches (60 cm) with tapered ends, and the pressed ends are firmly stuck on.
Tip: If the dough springs back while rolling, rest it under a towel for 5 minutes. A little water on the ends helps them stick.
Chill and preheatOven 425°F / 220°C
- Refrigerate the shaped pretzels uncovered on the baking sheets for 30 minutes to dry the surface and firm them up so they hold their shape in the bath.
- After 15 minutes of chilling, position racks in the upper and lower thirds of the oven and preheat to 425°F (220°C).
- Pour the cold water into the wide pot, and bring to a boil over high heat.
+ Show details− Hide details
Ready when: The surface of the pretzels feels dry and slightly firm to the touch, and the water is at a rolling boil.
Tip: Chilled pretzels are much easier to lift without stretching or tearing.
Boil in baking soda
- Lower the heat to medium-high.
- Carefully add the baking soda to the water; it will foam up, so add it gradually and stir to dissolve.
- When the water returns to a steady simmer, lower 2 pretzels at a time into the bath, top side down first.
- Cook 30 seconds, flip gently with a slotted spatula, and cook 30 seconds more.
- Lift out, let the water drip off, and return to the parchment, leaving space between them.
+ Show details− Hide details
Ready when: Pretzels look slightly puffed and look wet and glossy with a faintly yellow tint on the surface.
Tip: Don't crowd the pot and don't boil longer than 30 seconds per side, or the crust turns leathery and tastes metallic.
Salt and slash
- Immediately sprinkle each wet pretzel with coarse salt, about 1 teaspoon each, so it sticks.
- Use a sharp paring knife or razor to make one ½-inch (1.2 cm) deep slash across the thickest part of the bottom curve of each pretzel.
+ Show details− Hide details
Ready when: Salt is evenly scattered and each pretzel has a clean, open slash.
Tip: Salt right after the bath. Once the surface dries, the salt bounces off.
BakeOven 425°F / 220°C
- Bake at 425°F (220°C) for 14 to 16 minutes, switching and rotating the sheets halfway through, until the pretzels are deep mahogany brown.
- Rotate the pans after about 8 minutes for even color.
+ Show details− Hide details
Ready when: Deep, glossy mahogany brown all over, with a firm crust that sounds hollow when tapped on the bottom.
Tip: Pale pretzels are underbaked. Wait for the rich dark brown, which is where the flavor is.
Cool and finish
- Transfer the pretzels to a wire rack.
- If you like a softer, richer crust, brush them with the melted butter while hot.
- Cool for at least 10 minutes before eating.
+ Show details− Hide details
Ready when: Pretzels are warm, not steaming, and the crust is glossy.
Tip: Brushing with butter softens the crust slightly. Skip it for a chewier, crisper bite.
Good to know
Tips
- Weigh the flour and water; pretzel dough is stiff and small differences change how well the shapes hold.
- Use a wide slotted spatula and work with two pretzels at a time so they keep their shape and the bath stays hot.
- For a darker, more traditional crust, spray the pretzels lightly with water before the oven, or use barley malt syrup in the dough.
- Serve warm with grainy mustard or beer cheese.
Make ahead
Overnight option: after the 1-hour stretch and fold, refrigerate the covered dough for 8–14 hours instead of the 4–5 hour room-temperature rise. Let it sit at room temperature for 30 minutes, then divide and shape as directed. Shaped, unboiled pretzels can also be refrigerated uncovered on the baking sheets for up to 4 hours before boiling.
Storage & reheating
Best the day they are baked. Keep at room temperature in a paper bag for up to 1 day (a sealed plastic bag softens the crust). Freeze cooled, unsalted-over pretzels in a zip-top freezer bag for up to 2 months. Reheat at 350°F (175°C) for 5–8 minutes (10–12 minutes from frozen) until hot and the crust is crisp again.
Substitutions
- light brown sugar → Barley malt syrup (1 tbsp / 20 g) or honey (1 tbsp / 20 g). Barley malt gives the most authentic pretzel flavor and color.
- bread flour → All-purpose flour. Pretzels will be a bit less chewy; reduce the dough water by about 1 tablespoon (15 ml).
- coarse pretzel salt or flaky sea salt → Flaky sea salt, or everything bagel seasoning. Table salt is too fine and dissolves into the wet surface; avoid it.
- unsalted butter → Neutral oil (2 tbsp / 30 ml) or lard. The pretzels will be equally tender but slightly less rich.
More yeast breads
See all →
Find more like this
- Meal
- Snack
- Diet
- VegetarianHalal
- Method
- Oven