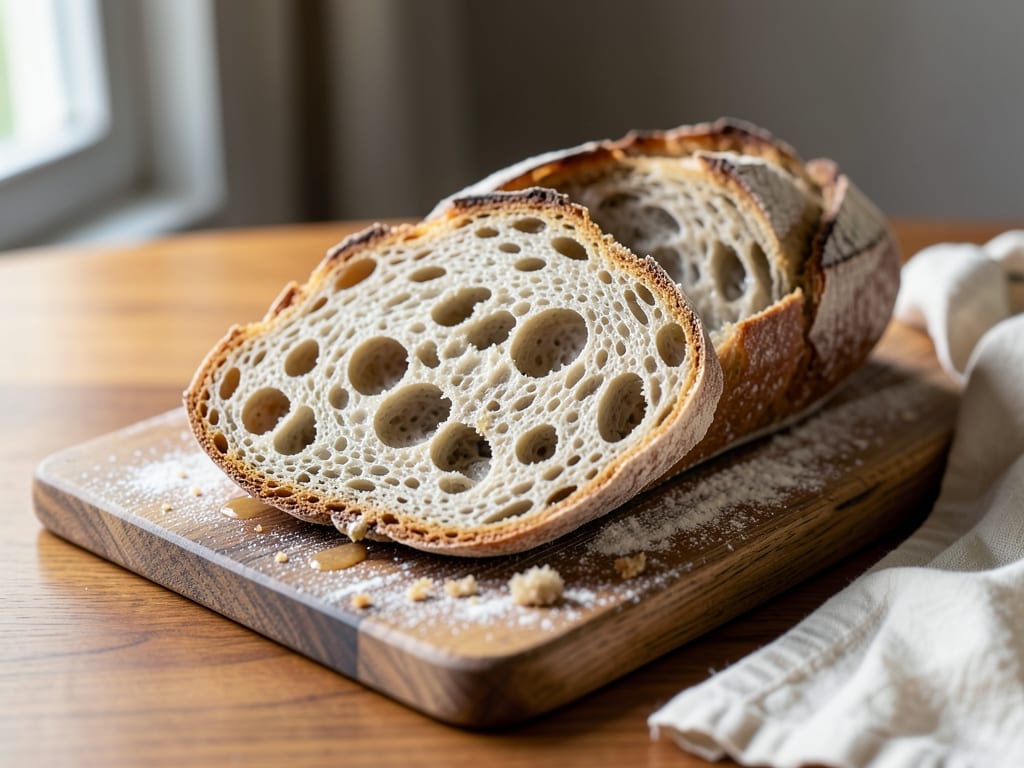
Spanish Pan de Cristal (Glass Bread)
A very wet, no-knead dough stretched thin and baked hot until the crust shatters like glass and the inside is full of big, airy holes. Fold it, chill it overnight, and bake it in a steamy oven. Serve it Spanish-style with ripe tomato and olive oil.
- Prep
- 28 min
- Cook
- 25 min
- Wait
- 13 hr 45 min
- Total
- 14 hr 38 min
- Makes
- 2 flat loaves, about 10 inches (25 cm) long (8 servings)
Steps
Before you start
- Plan ahead. The dough needs about 3 hours of folding and resting, then 8 to 12 hours in the fridge. Mix it in the afternoon and bake the next morning, or mix it in the morning and bake that evening.
- This dough is 90% hydration, so it will be very sticky and loose. That is correct. Don't add more flour to the dough. Keep a small bowl of water nearby to wet your hands.
- Use bread flour. Its higher protein content gives a wet dough enough strength to hold its shape.
- Weigh the flour and water on a scale if you can. Cup measures for flour can vary by 10% or more, and that changes the hydration a lot.
- Ideal room temperature is about 72 to 76°F (22 to 24°C). In a cooler kitchen, add 20 to 30 minutes to the room-temperature rests.
Mix flour and water
- In a large bowl, combine the bread flour and 450 ml (1⅞ cups) lukewarm water.
- Mix with a wet hand or a spatula for about 2 minutes, until no dry flour remains and the dough looks like a shaggy, very wet batter.
- Cover the bowl and let it rest for 30 minutes.
+ Show details− Hide details
Ready when: No dry flour is visible and the dough is a thick, sticky, shaggy mass
Tip: Don't skip this rest. It develops structure so you need less handling later.
Add salt and yeast
- Sprinkle the salt and yeast evenly over the dough.
- Wet your hand, then pinch and squeeze the dough repeatedly, folding it over on itself, for about 3 minutes.
- Keep going until the salt and yeast are fully worked in and the dough feels slightly smoother and more cohesive.
+ Show details− Hide details
Ready when: No grains of salt or yeast can be felt, and the dough clings together when lifted
Tip: Dip your hand in water often. A wet hand won't stick to the dough.
Stretch and fold
- Wet your hand.
- Grab one edge of the dough, stretch it up until it resists, then fold it over the center.
- Turn the bowl a quarter turn and repeat, 8 to 10 stretches in all.
- Cover the bowl.
- Repeat the whole set twice more, 30 minutes apart, so you do 3 sets over about 1 hour.
- Between sets, leave the bowl covered at room temperature.
+ Show details− Hide details
Ready when: By the third set, the dough feels smoother, tighter and puffier, and it holds a rounded shape for a moment
Tip: Stretch gently. If the dough tears, stop and let it rest 10 minutes.
Finish bulk rise
- After the third fold set, leave the covered dough at room temperature for another 60 minutes, without touching it.
+ Show details− Hide details
Ready when: Dough has grown by about 50%, is jiggly, and shows bubbles on the surface and along the sides of the bowl
Chill overnight
- Brush a 4-quart (4 L) container with the olive oil.
- Use a wet hand or scraper to move the dough into it in one piece.
- Cover and refrigerate for 8 to 12 hours.
- The cold dough is much easier to handle and develops more flavor.
+ Show details− Hide details
Ready when: Dough has roughly doubled, is full of bubbles, and domes in the container
Tip: Leave room in the container. A wet dough this size can double in volume.
Turn out the dough
- Line a baking sheet or peel with parchment paper, and dust it generously with about half of the dusting flour.
- Dust your work surface and the top of the dough with the rest.
- Use a floured bench scraper to gently ease the cold dough out of the container onto the floured surface.
+ Show details− Hide details
Ready when: Dough sits in one loose, bubbly mass with floured surfaces
Tip: Don't punch it down or knead it. Those bubbles become the big holes.
Divide and stretch
- Cut the dough in half with the scraper.
- Flour your hands and gently lift and stretch each piece into a rough rectangle about 10×5 inches (25×13 cm) and about 1 inch (2.5 cm) thick.
- Place both on the parchment, 3 inches (8 cm) apart.
- Dust the tops lightly with flour if sticky.
+ Show details− Hide details
Ready when: Two even rectangles, with bubbles still visible just under the surface
Tip: Use fingertips and flat palms. Pinching and pressing will pop the large bubbles.
Proof and preheatOven 475°F / 245°C
- Place the baking stone on the middle oven rack and a metal pan on the bottom rack.
- Preheat the oven to 475°F (245°C) for the full 45 minutes, so the stone is fully heated.
- Meanwhile, let the shaped dough rest uncovered or under a lightly floured towel.
+ Show details− Hide details
Ready when: Loaves look puffy and jiggle slightly when the baking sheet is nudged
Tip: A stone that is not fully preheated gives pale, dense loaves.
Bake with steamOven 475°F / 245°C
- Boil the water for the steam.
- Slide the parchment with the loaves onto the hot stone, using a peel or a rimless sheet.
- Carefully pour the 1 cup (240 ml) boiling water into the hot pan on the bottom rack and close the door immediately.
- Bake at 475°F (245°C) for 12 minutes.
- Carefully remove the steam pan, then bake another 10 to 13 minutes.
+ Show details− Hide details
Ready when: Crust is deep golden brown with dark blistered spots, and the loaves sound hollow when tapped on the bottom (about 205°F/96°C inside)
Tip: Stand back when pouring in the water. The steam is very hot.
Cool on a rack
- Move the loaves, still on the parchment, to a wire rack.
- Let them cool for at least 30 minutes.
- You may hear the crust crackle as it cools.
- Tear or slice with a serrated knife.
+ Show details− Hide details
Ready when: Loaves feel light, and the crust is crisp and crackly
Tip: Cutting too soon makes the crumb gummy.
Good to know
Tips
- Keep your hands wet, not floured, when working with the dough in the bowl. Flour only the surface for shaping.
- The cold fermentation is what makes the dough manageable. Don't shape it warm.
- A strong steam burst in the first 12 minutes gives a thin, glassy crust and good oven spring.
- For the classic Spanish snack, split a piece, rub with a cut ripe tomato, then drizzle with olive oil and a pinch of salt.
Make ahead
"The dough can chill in the fridge for up to 24 hours instead of 8 to 12 hours. Longer chilling gives a tangier flavor and a slightly wetter dough, so handle it with extra flour on your hands."
Storage & reheating
"Best the day it's baked. Keep at room temperature for up to 1 day, uncovered or in a paper bag, so the crust stays crisp. Freeze fully cooled loaves, wrapped well, for up to 2 months. Reheat from frozen or room temperature directly on the oven rack at 400°F (200°C) for 5 to 8 minutes, until the crust crackles again."
Substitutions
- bread flour → all-purpose flour. Use 460 g (about 1¾ cups plus 2 tbsp... use ~3¾ cups) flour for a similar feel; the dough will be looser and the crumb less chewy. Reduce water to 400 ml (1¾ cups) if it is too slack to handle.
- instant yeast → active dry yeast. Use 1¼ tsp (4 g) and stir it into the lukewarm water for 5 minutes before mixing with the flour.
- fine sea salt → kosher salt (Diamond Crystal). Use 2½ tsp (about 10 g). Weigh it, as brands differ.
- extra-virgin olive oil → neutral oil. Any neutral oil works for greasing the container.
More yeast breads
See all →
Find more like this
- Meal
- Lunch
- Cuisine
- Spanish
- Method
- Oven
- Quick & Easy
- Make Ahead