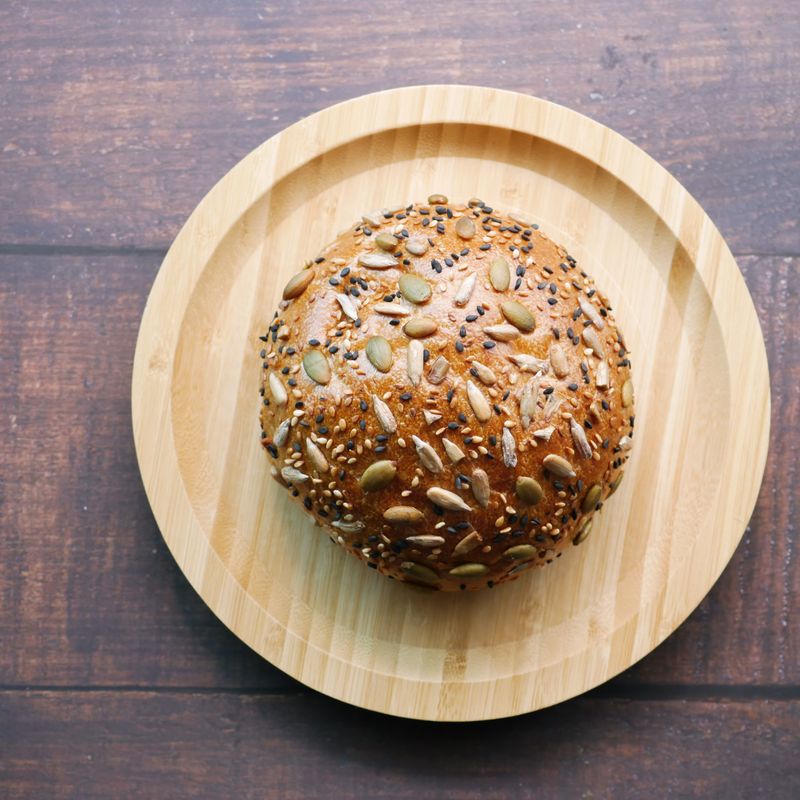
Spanish Bola Rústica (Rustic Buns)
Bola Rústica are traditional Spanish rustic round buns with a deeply scored top and a chewy, crusty exterior. Made with a blend of bread flour and whole wheat flour, these hand-shaped rolls develop a complex flavor through a long, cold fermentation. Perfect for serving alongside soups, stews, or as a sandwich roll. The dough is intentionally wetter than typical bread dough, creating an open, irregular crumb structure when baked in a hot oven with steam.
- Prep
- 20 min
- Cook
- 25 min
- Wait
- 9 hr
- Total
- 9 hr 45 min
- Makes
- 8 round buns (approximately 3.5 ounces / 100 g each)
Steps
Before you start
- Read through the entire recipe—this dough requires a long cold fermentation (8–16 hours), so plan ahead.
- Use bread flour for structure and whole wheat flour for nutty flavor and texture; do not substitute with all-purpose flour.
- Have a Dutch oven or covered baking vessel ready for steam generation during baking.
- Room temperature should be 68–72°F (20–22°C) for proper fermentation timing.
Mix the dough
- In a large mixing bowl, whisk together the bread flour (500 g) and whole wheat flour (100 g).
- Add the room-temperature water (430 ml), then sprinkle the instant yeast (1.5 g) over the surface.
- Using a bench scraper or your hand, stir and fold the mixture until all the flour is moistened and incorporated.
- The dough will look shaggy and wet—this is correct.
- It should be noticeably stickier than a typical bread dough (roughly 75% hydration).
- Cover the bowl loosely with a damp kitchen towel or plastic wrap.
+ Show details− Hide details
Ready when: All flour is fully incorporated and dough is shaggy
Tip: Do not knead at this stage. The autolyse rest will build strength without extra work.
Add salt and perform stretch-and-fold
- After the 30-minute rest, sprinkle the fine sea salt (10 g) evenly over the dough.
- Wet your hand with water and begin a series of stretch-and-fold motions: grab one side of the dough, stretch it up and fold it over the center, rotating the bowl and repeating 6–8 times.
- The dough will begin to firm up and organize.
- Cover the bowl again and rest for 30 minutes.
+ Show details− Hide details
Ready when: Dough is slightly firmer and more cohesive than before
Tip: Wet hands prevent sticking. The stretch-and-fold is gentler than traditional kneading and works beautifully with wet doughs.
First bulk fermentation
- Perform two more rounds of stretch-and-fold at 30-minute intervals (so 1 hour total from the salt addition).
- After the final fold, cover the bowl and transfer it to the refrigerator.
- Let the dough cold-ferment for 8–16 hours.
- The dough will rise very slowly and develop flavor; it does not need to double during this stage.
+ Show details− Hide details
Ready when: Dough has risen slightly and feels airy when poked
Tip: 8–16 hours in the refrigerator is ideal. Longer fermentation (up to 24 hours) deepens flavor. Do not rush this step; it is crucial for authentic texture and taste.
Remove dough and pre-shape
- Remove the dough from the refrigerator and let it sit at room temperature for 15–20 minutes to take the chill off.
- This makes it easier to handle.
- Lightly flour a work surface.
- Using a bench scraper, gently turn the dough out onto the floured surface.
- Divide it into 8 roughly equal pieces (approximately 100–105 g each).
- Pre-shape each piece into a loose round by gently folding the edges toward the center, rotating as you go.
- Do not compress; maintain airiness.
- Place each pre-shaped round on a piece of parchment paper, seam-side up, allowing space between them.
- Cover loosely with plastic wrap.
+ Show details− Hide details
Ready when: Eight round buns, seam-side up, are evenly spaced and covered
Tip: Keep the dough gentle; rough handling will deflate the gas bubbles you've spent hours developing. Handle it like a cloud.
Final proof
- Let the pre-shaped buns rest at room temperature (70–72°F / 21–22°C) for 1–2 hours.
- They should rise noticeably and feel soft and airy when gently poked.
- The finger-poke test: press your floured finger gently into the dough—the indent should slowly spring back partially but not completely.
- If they rise too fast, move them to a cooler spot; if too slow, place them in a warm (not hot) corner.
+ Show details− Hide details
Ready when: Buns are visibly risen, soft, and an indent slowly springs back halfway
Tip: Proofing time depends heavily on room temperature. Watch the dough, not the clock. Overproofing leads to deflation in the oven.
Preheat oven and scoreOven 475°F / 245°C
- About 30 minutes before the buns are fully proofed, preheat your oven to 475°F (240°C).
- Place a Dutch oven or covered heavy baking vessel inside to preheat as well.
- When the buns are ready, carefully score each one with a single deep slash across the top using a lame or sharp bread knife, held at a 45-degree angle.
- Cut about ¼ inch (6 mm) deep, creating a confident single line that will open into an ear during baking.
- Do not hesitate or saw; one quick, deep cut.
+ Show details− Hide details
Ready when: Oven reaches 475°F (240°C); Dutch oven is hot; buns are scored
Tip: A hot Dutch oven creates steam, which is essential for a crispy, blistered crust. Do not skip preheating it.
Load and bake with steamOven 475°F / 245°C
- Carefully transfer 4 scored buns (on their parchment paper) into the preheated Dutch oven, seam-side down.
- Cover with the lid.
- Bake for 12 minutes covered to trap steam.
- Remove the lid and bake for an additional 13–15 minutes until the buns are a deep golden brown.
- The crust should be crispy and slightly dark in spots.
- Internal temperature should reach 205–210°F (96–99°C).
- Remove from the oven and transfer to a cooling rack.
- Repeat with the remaining 4 buns.
+ Show details− Hide details
Ready when: Buns are deep golden brown; internal temperature is 205–210°F (96–99°C); crust sounds hollow when tapped
Tip: If your oven runs hot, you may finish in 20–22 minutes total. If the buns brown too fast, lower heat slightly and extend cooking time. The two-batch approach keeps steam in the Dutch oven consistent.
Cool before serving
- Cool the buns on a rack for at least 30 minutes before serving.
- The crumb sets as it cools; cutting into a hot bun will compress the interior.
- After cooling, the buns will develop an even crispier crust as they reach room temperature.
- Enjoy fresh, or store in an airtight container.
+ Show details− Hide details
Ready when: Buns are cool to the touch and have a firm crust
Tip: Do not wrap warm buns in a towel if you prefer a crispy crust; the steam will soften it.
Good to know
Tips
- Long, cold fermentation is the heart of this recipe. It develops flavor and creates the open crumb structure that Spanish bakers prize. Do not skip or rush it.
- Keep your hands wet, not floured, when handling this dough. Flour encourages sticking; water prevents it and helps the dough move smoothly.
- Steam is crucial for an authentic crust. If you do not have a Dutch oven, you can place a metal bowl over the buns or use a covered baking stone with a preheated pan of water on the oven floor.
- These buns are best enjoyed warm or at room temperature, alongside soups, stews, or with butter and local cheese. They are also excellent for splitting and making sandwiches.
Make ahead
You can make the dough up to 24 hours ahead by extending the cold fermentation in the refrigerator. Shape and proof on the day of baking. Alternatively, fully baked buns can be cooled, wrapped, and frozen for up to 1 month; reheat in a 350°F (175°C) oven for 8–10 minutes until warmed through.
Storage & reheating
Room temperature (in a bread box or paper bag): up to 2 days. The crust softens after 1 day; to restore crispness, reheat in a 375°F (190°C) oven for 5 minutes. Refrigerator (in an airtight container): up to 5 days; reheat as above. Freezer (in a freezer bag): up to 1 month; thaw at room temperature or reheat directly in a 350°F (175°C) oven for 8–10 minutes.
Substitutions
- whole wheat flour → Rye flour (same weight). Use light or medium rye for a subtler flavor. Rye adds earthiness and slightly more moisture; you may need to reduce water by 5–10 ml if the dough feels too slack.
- bread flour → All-purpose flour (same weight). All-purpose flour has less gluten, so the dough may be slightly softer and rise faster. Watch the proofing times closely; you may need to reduce the final proof by 15–20 minutes.
- instant yeast (or active dry yeast) → Active dry yeast (0.75 teaspoon / 2.5 g). Active dry yeast is larger and needs about 50% more by weight. Rehydrate it in a little warm water (5 minutes) before adding to the dough if you prefer.
- fine sea salt → Kosher salt (same weight, or slight increase depending on grain size). Kosher salt crystals are larger, so you may want to use 11–12 g to reach the same saltiness. Avoid iodized table salt.
More rolls & buns
See all →

Find more like this
- Meal
- Dinner
- Cuisine
- Spanish
- Method
- Oven
- Quick & Easy
- 5 Ingredients or Less