
Sourdough Tuscan Pane Toscano
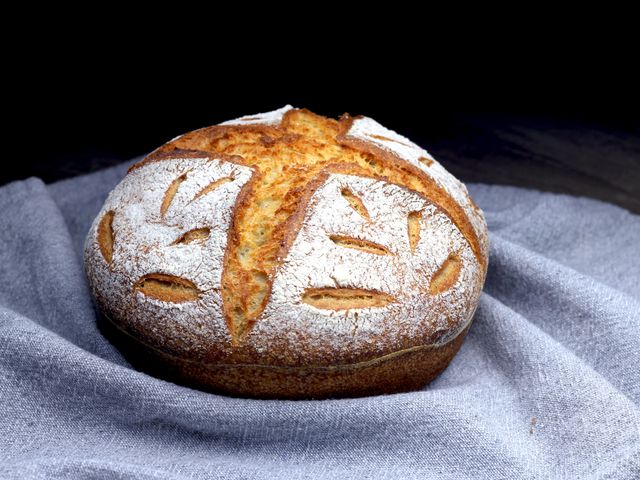
A traditional Tuscan sourdough loaf with a crackling crust and open, airy crumb. Made with just four ingredients—sourdough starter, bread flour, water, and olive oil—this rustic pane toscano relies on slow fermentation and proper hydration to develop flavor and structure. The dough ferments overnight in the fridge, creating a complex tang, then is shaped and baked in a steam-filled oven until golden and deeply caramelized.
- Prep
- 20 min
- Cook
- 50 min
- Wait
- 18 hr
- Total
- 19 hr 10 min
- Makes
- 2 loaves (12 to 14 slices total)
Steps
Before you start
- Ensure your sourdough starter is active and at peak (doubling in 4–8 hours at room temperature)
- Have bread flour and filtered or cool water ready
- Clear space in your refrigerator for an overnight bulk fermentation
- Preheat your oven and baking vessel 1 hour before shaping
Mix dough and autolyse
- In a large 3-quart bowl, combine 100 g active sourdough starter, 450 g bread flour, and 330 ml cool water (65–70°F / 18–21°C).
- Stir with a dough whisk or your hand until all dry flour is hydrated and a shaggy mass forms (about 1–2 minutes).
- Let the dough rest uncovered at room temperature (68–72°F / 20–22°C) for 30 minutes.
- This autolyse allows the flour to fully absorb water and begins gluten development.
+ Show details− Hide details
Ready when: Dough looks homogeneous and shaggy; no dry flour remains
Tip: Cool water slows fermentation and gives you more control over bulk fermentation timing. Tap water is fine if your tap is cool; if your kitchen is warm (above 75°F / 24°C), chill the water slightly.
Add salt and olive oil
- After the 30-minute rest, sprinkle 9 g fine sea salt over the dough.
- Pour 15 ml extra-virgin olive oil around the sides of the bowl.
- With wet fingers, pinch and fold the dough 6–8 times, folding the sides toward the center, rotating the bowl a quarter turn after each fold.
- The salt and oil will gradually incorporate.
- Stop when the dough feels slightly slick and the salt is mostly mixed in (about 2–3 minutes of gentle folding).
+ Show details− Hide details
Ready when: Dough is cohesive, lightly oiled, and salt is fully incorporated
Tip: Wet your fingers to prevent sticking. Don't overwork the dough at this stage; gentle folding is enough. The oil is traditional in pane toscano and adds richness to the crust and crumb.
Bulk fermentation (first part)
- Cover the bowl loosely with a damp kitchen towel or a shower cap.
- Let the dough rest at room temperature (68–72°F / 20–22°C) for 1 hour.
- Do not fold during this first hour; the dough is still developing strength and the autolyse is continuing.
+ Show details− Hide details
Tip: The timing of bulk fermentation depends on room temperature and starter strength. Warmer rooms will ferment faster; cooler rooms slower. Aim for the dough to rise about 25–30% by the end of bulk fermentation.
Coil folds (lamination)
- After 1 hour, perform coil folds (a gentler form of stretch-and-fold).
- With wet fingers, grab the dough from one side, stretch it up and over toward the center, then rotate the bowl a quarter turn.
- Repeat this motion 4 times (one full rotation of the bowl).
- The dough should be noticeably stronger and cohesive.
- This fold builds strength while keeping the dough's extensibility.
- Let it rest again for 30 minutes at room temperature.
+ Show details− Hide details
Ready when: Dough visibly tightens after folds; it holds its shape better
Tip: Coil folds are less aggressive than stretch-and-fold and work well for high-hydration doughs. If your dough feels very slack, you can do a second set of coil folds instead.
Second bulk rest
- Let the dough rest, covered, for another 3 hours at room temperature (68–72°F / 20–22°C).
- The dough should rise to about 50–75% increase in volume.
- It should feel airy, with visible bubbles on the surface and sides, but should not be overproofed (it should still spring back slowly if you poke it).
+ Show details− Hide details
Ready when: Dough has risen 50–75%; surface shows bubbles; poke springs back slowly
Tip: If your room is warm, reduce this time to 2.5–3 hours. If cool (below 68°F / 20°C), extend to 3.5–4 hours. You're looking for visual cues, not a fixed time.
Divide and pre-shape
- Turn the dough out onto a lightly floured work surface.
- Using a bench scraper, gently divide the dough in half.
- Each half should weigh about 385–400 g.
- Form each piece into a loose round by folding the edges toward the center and then gently rolling it toward you.
- Don't compress; keep it light.
- Let these pre-shapes rest on the bench for 20 minutes.
- This resting period relaxes the gluten and makes final shaping easier.
+ Show details− Hide details
Ready when: Pre-shaped dough rounds are relaxed and slightly puffed
Tip: Don't handle the dough aggressively. The bubbles you've worked so hard to build will collapse if you press too hard.
Final shape and proof
- Working with one pre-shape at a time, flip it seam-side up onto a lightly floured surface.
- Gently stretch the top edges down and toward the center in three or four folds, creating tension on the surface.
- Flip it seam-side down and, using your hands, roll the dough toward you, creating a tight, elongated oval (about 7–8 inches / 18–20 cm long).
- Place the shaped dough seam-side up in a floured banneton or a bowl lined with a floured, damp kitchen towel.
- Repeat with the second piece.
- Cover both loosely, then place them in the refrigerator for overnight cold fermentation (12–16 hours).
- The cold slows the yeast and allows the sourdough flavor to develop fully.
+ Show details− Hide details
Ready when: Dough is chilled and slightly firmer; ready to score and bake
Tip: Cold fermentation is key to authentic sourdough flavor. Don't rush this step. If you prefer to bake the same day, skip the overnight fridge and proof at room temperature for 2–3 hours (until the dough springs back slowly when poked). Refrigeration also makes scoring cleaner and easier.
Preheat oven and prepare for bakeOven 500°F / 260°C
- Remove the proofed loaves from the refrigerator about 15–20 minutes before baking.
- Place a Dutch oven (or covered baking vessel) in your oven and preheat to 500°F (260°C) for 1 hour.
- You want both the oven and the Dutch oven at temperature for maximum oven spring and crust development.
- Prepare a small bowl of water and a pastry brush or spray bottle for steaming.
+ Show details− Hide details
Ready when: Oven thermometer reads 500°F (260°C); steam is ready to deploy
Tip: A thoroughly preheated Dutch oven is critical for a strong oven spring and a crackling crust. If you don't have a Dutch oven, use a covered baking stone with a steaming tray on the bottom rack filled with boiling water.
Score and load loaf oneOven 500°F / 260°C
- Carefully remove the hot Dutch oven from the oven.
- Turn the first proofed loaf out of its banneton onto a piece of parchment paper (seam-side down).
- Using a lame or a very sharp knife, score the top with a single long slash or two diagonal slashes at a 30-degree angle, about ¼ inch (6 mm) deep.
- These cuts guide oven spring.
- Working quickly, lift the parchment and loaf and place it in the bottom of the hot Dutch oven.
- Cover with the lid.
+ Show details− Hide details
Ready when: Loaf is in the pot and the lid is secured; steam is trapped
Tip: Parchment prevents sticking and makes transfer easier. Score decisively and cleanly—hesitation results in a ragged score. The lid traps steam, which keeps the crust supple during the first part of baking.
Bake covered (steam phase)Oven 500°F / 260°C
- Bake the covered loaf at 500°F (260°C) for 20 minutes.
- The steam in the Dutch oven keeps the crust soft and allows maximum oven spring.
- You should hear and feel the loaf pushing upward and outward.
+ Show details− Hide details
Ready when: Aroma is strong and yeasty; loaf has expanded noticeably inside the pot
Tip: Resist the urge to open the pot and peek. Every time you open it, steam escapes and crust development suffers.
Uncover and bake crust colorOven 450°F / 230°C
- Remove the Dutch oven lid carefully (watch out for steam).
- Reduce the oven temperature to 450°F (232°C).
- Bake uncovered for 25–30 minutes, until the crust is a deep golden brown to dark mahogany color.
- The loaf should sound hollow when tapped on the bottom (internal temperature around 205–210°F / 96–99°C).
+ Show details− Hide details
Ready when: Crust is deep golden-brown; loaf sounds hollow when tapped; internal temp 205–210°F (96–99°C)
Tip: Lower the temperature after uncovering to prevent burning the crust while the inside finishes. A deeper crust color means better flavor development and crackle.
Cool first loaf and bake secondOven 450°F / 230°C
- Transfer the first loaf to a wire cooling rack.
- Let it cool for at least 15 minutes.
- While it cools, reheat the Dutch oven (uncovered) at 450°F (232°C) for 10 minutes.
- Shape, score, and bake the second loaf using the same process: 20 minutes covered at 500°F (260°C), then 25–30 minutes uncovered at 450°F (232°C).
+ Show details− Hide details
Ready when: First loaf is set and crust is firm; second loaf is golden and hollow-sounding
Tip: Don't skip the cooling time. The inside of the loaf continues to cook and set as it cools, and the crust finishes crisping. Slicing too soon will result in a gummy crumb.
Cool completely
- Transfer both loaves to a wire rack in a cool area.
- Allow them to cool completely, at least 1–2 hours, before slicing.
- As they cool, the crust will develop its signature crackle and snap.
- This cooling period is essential for structure; the crumb continues to set as the loaf cools.
+ Show details− Hide details
Ready when: Loaves are room temperature; crust is hard and crackles when gently squeezed
Tip: Resist the temptation to slice a warm loaf. Even if the inside looks set, a warm crumb will compress and become dense. The loaf is much easier to slice cleanly once cool.
Good to know
Tips
- Sourdough strength and fermentation speed vary widely depending on your starter's culture and your kitchen temperature. The timeline here assumes a mature starter and a room at 68–72°F (20–22°C). If your room is warmer, all timings will be faster; reduce bulk fermentation and rest periods by 30–60 minutes. If cooler, extend them.
- This dough is high-hydration (73%) for an open, rustic crumb. It will feel wet and slack at first, but trust the process. The gluten develops through gentle folding and time, not aggressive kneading.
- The overnight cold fermentation is essential to pane toscano's character. It allows lactic acid bacteria in the starter to ferment and develop complex flavors. If you must bake the same day, proof at room temperature for 2–3 hours after shaping, but the flavor will be less developed.
- A Dutch oven is the single most important tool for home-baked sourdough. The trapped steam in the first 20 minutes of baking is what creates the crispy, crackling crust and strong oven spring. Without steam, the crust will form too quickly and the loaf won't expand fully.
Make ahead
Shaped loaves can be refrigerated for up to 4 days. Fully baked loaves can be frozen, well-wrapped, for up to 2 months. To reheat a cold or frozen loaf, wrap it loosely in foil and warm in a 375°F (190°C) oven for 15–20 minutes until the crust is crisp again.
Storage & reheating
Room temperature: Keep in a paper bag or bread box for 2–3 days. Do not refrigerate raw bread; it stales faster. Once baked and cooled, store cut-side down on a cutting board or in a paper bag to keep the crust crisp. Freezer: Wrap cooled loaves tightly in plastic wrap and freeze for up to 2 months. Thaw at room temperature, then crisp in a 375°F (190°C) oven for 15–20 minutes.
Substitutions
- bread flour → all-purpose flour. All-purpose flour has slightly less protein (10–12% vs. 12–14% in bread flour), resulting in a slightly tighter crumb and less oven spring. The bake time may need to be reduced by 2–3 minutes. Results will be good but less open-crumbed than with bread flour.
- extra-virgin olive oil → mild olive oil or neutral oil (vegetable, light canola). Neutral oils work well and won't overpower the sourdough flavor. Extra-virgin olive oil is traditional and imparts a fruity, peppery note that's characteristic of pane toscano. Adjust based on your preference for olive oil intensity.
- sourdough starter, active and fed (at peak) → 1% instant yeast (2–3 g) plus 2–3 additional hours at room temperature (total bulk fermentation of 4–5 hours instead of overnight cold fermentation). This substitution abandons the slow fermentation that makes sourdough distinctive, but works in a pinch. You'll lose the complex sourdough flavor and tang. Not recommended if you have time for proper sourdough fermentation.
- fine sea salt → kosher salt (Diamond Crystal brand recommended for consistent salinity). Kosher salt crystals are larger and less dense than sea salt, so use the same weight by measure, or adjust slightly. Fine sea salt is preferred for better distribution throughout the dough.
More sourdough
See all →


Find more like this
- Meal
- Dinner
- Cuisine
- Italian
- Method
- Oven
- Quick & Easy
- 5 Ingredients or Less