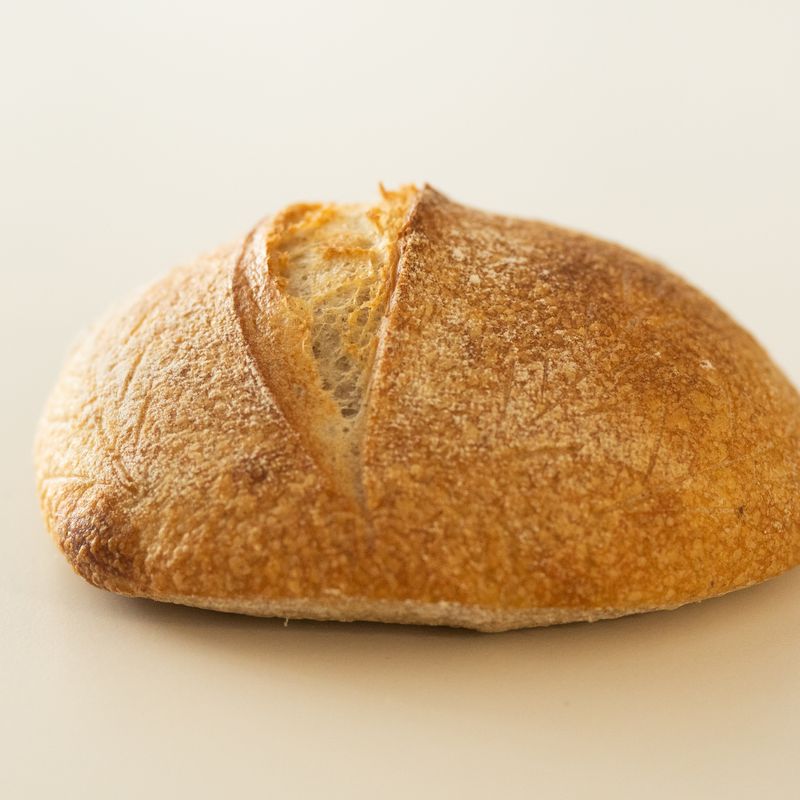
Sourdough Discard Honey Oat Breakfast Loaf
A tender, slightly sweet sourdough loaf that uses your fresh sourdough discard productively. Rolled oats add subtle texture and nuttiness, while honey provides gentle sweetness and helps keep the crumb moist. This loaf has a soft, open crumb and mild tang—perfect for breakfast toast or alongside cheese. The long, cool fermentation develops flavor while the overnight rest makes baking convenient.
- Prep
- 15 min
- Cook
- 35 min
- Wait
- 8 hr
- Total
- 8 hr 50 min
- Makes
- 1 loaf (10–12 slices)
Steps
Before you start
- Have your sourdough discard at room temperature (use discard at any stage of strength)
- Preheat your oven to 450°F (230°C) 30 minutes before baking
- Line a large bowl with a clean kitchen towel or banneton proofing basket
- Ensure your Dutch oven or covered baking vessel is oven-safe
Mix dough
- In a large bowl, combine 1 cup (240 ml) room-temperature sourdough discard, 0.75 cup (180 ml) warm water (90–95°F / 32–35°C), and 2 tablespoons (30 g) honey.
- Stir until the honey dissolves and the mixture is roughly combined.
- Add 2.5 cups (320 g) bread flour, 0.5 cup (60 g) whole wheat flour, and 0.5 cup (50 g) rolled oats.
- Mix with a wooden spoon or your hand until no dry flour remains and a shaggy dough forms.
- The dough should feel slightly sticky but cohesive.
+ Show details− Hide details
Ready when: shaggy dough with no dry flour visible
Tip: Don't overmix at this stage; you want a rough, loose dough that will develop structure during autolyse.
Autolyse rest
- Cover the bowl with a damp kitchen towel.
- Let the dough rest for 30 minutes at room temperature.
- This allows the flour to fully hydrate and develop gluten naturally, making the dough easier to handle and improving flavor.
+ Show details− Hide details
Ready when: dough looks slightly more structured and less shaggy
Tip: This rest is key to building strength without intensive kneading.
Add salt and mix
- After the autolyse, sprinkle 1.25 teaspoons (7 g) fine sea salt evenly over the dough.
- Using wet fingers or a spatula, fold the salt in by pulling the dough from the sides over the salt repeatedly, about 12–15 folds.
- The dough should come together into a smoother, more cohesive mass.
- Mix until the salt is fully incorporated and the dough feels less sticky.
+ Show details− Hide details
Ready when: salt fully incorporated, dough is smooth and holds together
Tip: Wet your fingers or use a wet spatula to prevent sticking; this keeps the dough from drying out.
Bulk fermentation with folds
- Leave the dough in the bowl, covered.
- Over the next 3–4 hours at room temperature (68–72°F / 20–22°C), perform 4–5 sets of stretch-and-fold: every 30 minutes for the first 2 hours, then every 45 minutes.
- For each fold, wet your hand, grab one side of the dough, stretch it up and fold it over the center.
- Rotate the bowl 90° and repeat from all four sides.
- The dough should grow noticeably, become less sticky, and show visible bubbles near the surface.
+ Show details− Hide details
Ready when: dough is puffy, holds a wet fingerprint slowly, bubbles visible at surface
Tip: If your room is cooler (60–65°F / 16–18°C), allow up to 5 hours and space folds 45 minutes apart. Oat content slows fermentation slightly.
Pre-shape and rest
- Turn the dough out onto a lightly floured surface.
- Using a bench scraper, gently pre-shape it into a loose round by dragging it toward you in one or two motions, building surface tension.
- Place it seam-side up in your floured proofing basket or a bowl lined with a well-floured towel.
- Cover loosely with plastic wrap or a damp towel.
- Let rest for 20 minutes at room temperature.
+ Show details− Hide details
Ready when: dough is relaxed but still holds its shape; no overly tight springs back
Tip: Flour your proofing basket or towel generously to prevent sticking during the long cold proof.
Shape the loaf
- Flour the top of the dough lightly and turn it out onto your work surface seam-side down.
- Fold the top third of the round down and press gently.
- Fold the left and right sides in about 1 inch, then fold the dough in half toward you, sealing each fold gently with the edge of your hand.
- Roll it toward you, using gentle tension to create a smooth surface.
- Flip seam-side up and place back into the proofing basket.
+ Show details− Hide details
Ready when: loaf is round or oval, seams are sealed and tight
Tip: Shape firmly enough to create tension (which helps structure and oven spring), but not so aggressively that you deflate all the gas.
Cold ferment overnight
- Cover the proofing basket with plastic wrap.
- Place it in the refrigerator for 12–18 hours at 38–40°F (3–4°C).
- This long, cool fermentation develops deeper flavor, makes scoring easier, and gives you flexibility in baking time.
- The dough will not rise dramatically in the fridge—it just needs to become slightly puffy.
+ Show details− Hide details
Ready when: dough is chilled through, slightly puffy but not doubled; poke test: indentation slowly springs back halfway
Tip: You can bake straight from the fridge—no need to bring to room temperature. This is the convenience of cold fermentation.
Preheat oven and prepare Dutch ovenOven 450°F / 230°C
- About 30 minutes before baking, preheat your oven to 450°F (230°C).
- Place your Dutch oven or covered baking vessel (4–5 quart / 4–5 L) inside the oven to preheat as well.
- An extremely hot vessel creates steam and oven spring, which gives you a beautiful crust and open crumb.
+ Show details− Hide details
Ready when: oven fully preheated and Dutch oven is very hot (carefully feel the outside edge)
Tip: If your oven cools quickly when you open it, ensure the Dutch oven is truly hot before adding the dough.
Score and loadOven 450°F / 230°C
- Remove the Dutch oven carefully using oven mitts.
- Turn the cold dough out of its proofing basket onto parchment paper, seam-side down.
- Using a sharp bread lame, serrated knife, or clean razor blade, score the top with a single diagonal slash about 0.5 inch (1.3 cm) deep and 5 inches (13 cm) long.
- Optionally, sprinkle 1 tablespoon (10 g) rolled oats on top for a rustic finish.
- Carefully transfer the loaf (still on parchment) into the preheated Dutch oven.
- Be mindful of steam.
+ Show details− Hide details
Ready when: loaf is loaded, score is clean and deep
Tip: A cold dough from the fridge is easier to score without dragging. Move quickly to trap heat in the Dutch oven.
Bake coveredOven 450°F / 230°C
- Cover the Dutch oven with its lid.
- Place it back in the 450°F (230°C) oven.
- Bake covered for 20 minutes.
- The lid traps steam, which helps the bread rise and develop a tender crust without browning too fast.
+ Show details− Hide details
Ready when: bread has risen noticeably and is pale to light golden underneath the lid
Tip: Do not peek during this phase; every time you open the oven or lid, you release steam and heat.
Bake uncovered until goldenOven 425°F / 220°C
- Carefully remove the Dutch oven lid using an oven mitt (steam will escape).
- Reduce heat to 425°F (218°C).
- Continue baking uncovered for 13–15 minutes, until the loaf is a deep golden-brown color on all sides.
- The bottom should feel hard and hollow when tapped.
- If using a thermometer, the internal temperature should be 205–210°F (96–99°C).
+ Show details− Hide details
Ready when: deep golden-brown crust on all sides, bottom hollow-sounding when tapped, internal temp 205–210°F (96–99°C)
Tip: Whole wheat and oats darken faster than white bread. If the crust feels pale at 12 minutes, give it another minute or two, but watch closely.
Cool completely
- Remove the loaf from the oven and turn it out of the Dutch oven onto a wire rack or clean surface.
- Let it cool undisturbed for at least 1 hour (preferably 2) before slicing.
- This allows the crumb to set fully.
- If you slice too early, the interior will appear gummy and dense.
- You can test doneness by pressing the side of the loaf gently—it should feel very firm and sound hollow.
+ Show details− Hide details
Ready when: loaf is cool to the touch and very firm; crumb is set and not dense or gummy when a small corner is tested
Tip: This patience pays off. A properly cooled sourdough has the best texture and flavor.
Good to know
Tips
- This recipe welcomes weak or unfed sourdough discard. You don't need to time it to peak activity—the long bulk and cold fermentation will develop plenty of flavor. If your discard is truly recent (just fed) and very active, reduce bulk fermentation time by 30–60 minutes.
- The cold ferment is your friend. Baking straight from the fridge gives you excellent oven spring, easier scoring, and deeper flavor. You can also extend the cold ferment to 24 hours for even more tang and complexity.
- If your dough feels dry or stiff at any point, add water 1 tablespoon (15 ml) at a time during the salt fold. Oats absorb more water than plain white flour, so this recipe is more forgiving than traditional white sourdough.
- For a softer crust, brush the hot loaf immediately after baking with a little butter or milk; for a crisp crust, let it cool uncovered on a rack and store it in a paper bag.
Make ahead
You can shape and refrigerate the dough up to 24 hours before baking. For maximum convenience, mix the dough in the evening, perform folds the next morning or afternoon, shape that evening, and bake the following morning straight from the cold ferment. The loaf can also be frozen whole for up to 3 months after it is completely cool; thaw at room temperature and refresh briefly in a 350°F (175°C) oven.
Storage & reheating
Store at room temperature for up to 3 days wrapped in a clean kitchen towel or paper bag (not plastic, which traps steam and softens the crust). Toast day-old slices for best texture and flavor. Refrigerate in a sealed container or bag for up to 5 days; always refresh slices before eating. Freeze whole loaves or sliced portions in a freezer bag for up to 3 months. Thaw at room temperature (2–3 hours), then warm in a 350°F (175°C) oven for 10–12 minutes to restore crust and crumb.
Substitutions
- bread flour → all-purpose flour. Use 100% all-purpose flour instead of the bread flour. The loaf will be slightly less open-crumbed but still tender and flavorful. Reduce the water slightly to 0.7 cup (170 ml) if the dough feels very sticky.
- whole wheat flour → spelt flour or rye flour. Substitute 1:1 for whole wheat. Spelt adds sweetness; rye adds earthy depth and darkness. Both absorb water slightly differently, so adjust water by 1–2 tablespoons (15–30 ml) if the dough feels too wet or dry.
- rolled oats (old-fashioned) → steel-cut oats or old-fashioned oat groats. Use the same weight. Steel-cut oats are chewier; oat groats add crunch. Reduce the water to 0.65 cup (155 ml) since steel-cut oats absorb more liquid. Both will give a coarser texture.
- honey → maple syrup or agave nectar. Use the same weight. Maple syrup adds deeper, earthier sweetness; agave is milder and less viscous. Both ferment similarly. You can also use brown sugar (15 g) for a less sweet result with molasses notes.
More yeast breads
See all →


Find more like this
- Meal
- Breakfast
- Method
- Oven
- Quick & Easy
- Make AheadFreezer Friendly