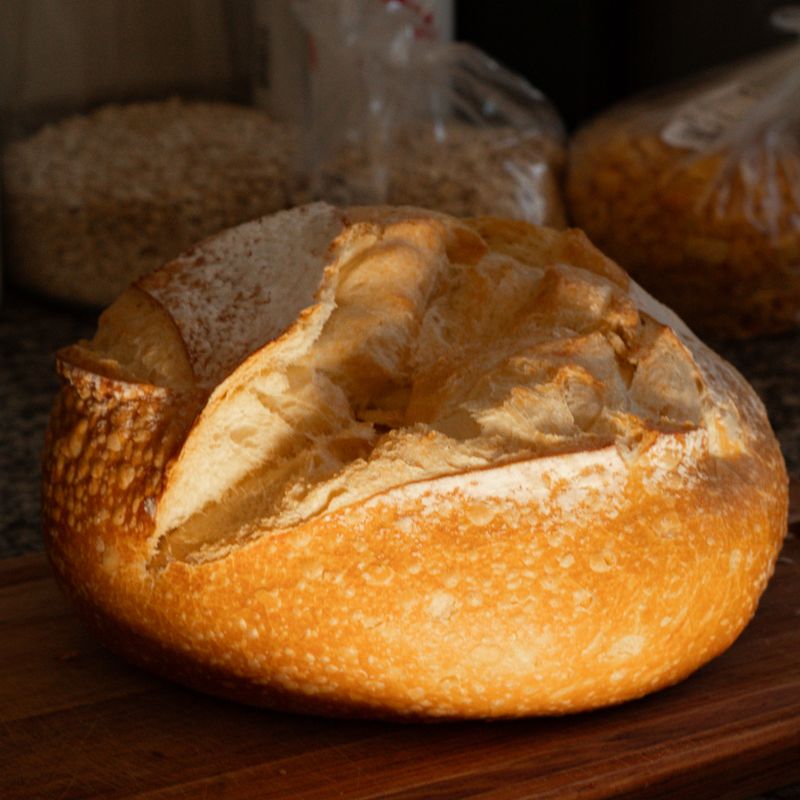
Sourdough Crusty Batard
A rustic French-style oval loaf with a crackling crust and open, tangy crumb. This recipe uses a long cold fermentation to develop flavor and requires no commercial yeast. The dough proofs overnight in the fridge, then bakes on a hot stone or in a Dutch oven for maximum oven spring and crust development.
- Prep
- 20 min
- Cook
- 35 min
- Wait
- 1 days
- Total
- 1.1 days
- Makes
- 1 loaf (about 450g, 10–12 slices)
Steps
Before you start
- Your sourdough starter should be active, bubbly, and at peak rise (fed 4–8 hours prior) before mixing
- If using a baking stone, place it on the middle rack and preheat the oven to 500°F (260°C) for at least 45 minutes
- Clear at least 24 hours in your schedule: mixing takes 20 minutes, bulk fermentation is 4–5 hours, then cold proof overnight (8–16 hours)
- Have a banneton or bowl lined with a floured kitchen towel ready for the final proof
Mix the dough
- In a large bowl, whisk together 350g bread flour and 235ml cool water until all flour is moistened and no dry bits remain.
- Cover with a towel and let rest at room temperature for 30 minutes (this is the autolyse, which improves extensibility and gluten development).
- After 30 minutes, add 100g active sourdough starter and 7g salt.
- Mix with a wet hand or bench scraper, squeezing the dough together until the starter and salt are fully incorporated.
- The dough will feel shaggy and loose; this is normal.
+ Show details− Hide details
Ready when: Starter and salt are fully mixed in; no white streaks remain
Tip: Cool water keeps the dough temperature lower, which slows fermentation and improves flavor development during bulk fermentation
Bulk fermentation and coil folds
- Leave the dough in the bowl, covered, at room temperature (68–72°F / 20–22°C).
- Perform a set of coil folds every 30 minutes for the first 2 hours: wet your hand, grab the dough from one side, lift it up and over itself in the bowl, rotate the bowl 90°, and repeat.
- You'll do 4 sets of folds total over 2 hours.
- After the folds are complete, let the dough rest, covered, for another 2–3 hours until it rises by 50–75% and jiggles slightly when you move the bowl.
- The dough is ready when you can see bubbles on the surface and pressing a finger into the dough leaves a small indent that doesn't immediately spring back.
+ Show details− Hide details
Ready when: Dough has risen 50–75%, is bubbly on top, and finger-poke leaves a small indent that springs back slowly
Tip: Do not do traditional stretch-and-folds; coil folds are gentler and better suited to high-hydration sourdough. If your kitchen is cool (below 68°F), bulk fermentation may take up to 5 hours—extend time by feel, not by clock.
Pre-shape and bench rest
- Lightly flour a clean counter.
- Turn the dough out onto the counter (do not punch it down excessively).
- Use a bench scraper to gently gather the dough toward you, creating tension on the surface, and shape it loosely into a round or oval.
- Let it rest, uncovered, for 15–20 minutes.
- During this bench rest, the dough will relax and spread slightly.
+ Show details− Hide details
Ready when: Dough looks slightly flattened and shows no resistance when gently poked
Tip: Minimal flour on the counter prevents the dough from sticking while allowing it to develop surface tension.
Final shape into batard
- With the pre-shaped dough in front of you, fold the top third down toward the center and press firmly to seal.
- Fold the new top third down and seal again.
- Now roll the dough tightly toward you, using the heel of your hand to build tension with each turn, until you have a tight log about 9 inches (23 cm) long.
- Seam-side up, place the batard seam-side down into a floured banneton or into a bowl lined with a well-floured kitchen towel.
- The seam should face downward so the smooth side is on top when you turn it out to score.
+ Show details− Hide details
Ready when: Batard is a tight oval, seam side is down, and dough holds its shape
Tip: Tension on the surface helps the loaf rise up and out rather than spreading; this creates the characteristic ear when scored.
Cold proof overnight
- Cover the banneton loosely with a plastic bag or cover and place it in the refrigerator at 38–40°F (3–4°C).
- The dough will proof slowly overnight for 8–16 hours.
- You can proof for as little as 8 hours (less sour flavor, milder taste) or as long as 16 hours (more sour, deeper flavor).
- Most home bakers find 10–12 hours to be ideal.
+ Show details− Hide details
Tip: Cold fermentation is not optional—it dramatically improves flavor and makes the dough easier to score. Do not skip or rush this step.
Preheat oven and prepare baking surfaceOven 500°F / 260°C
- Remove the dough from the fridge and let it sit at room temperature while you preheat.
- Place a Dutch oven (with lid) or a baking stone on the middle oven rack and preheat to 500°F (260°C) for at least 45 minutes.
- If using a baking stone, place a metal baking pan on the lower rack to catch any water drips from steam.
- The oven must be very hot so the cold dough springs dramatically on contact.
+ Show details− Hide details
Ready when: Oven reaches 500°F and maintains it steadily
Tip: A preheated Dutch oven traps steam around the loaf, which is crucial for a crispy, blistered crust. If using a stone, you'll spray the oven walls with water for steam.
Score the loaf
- Invert the banneton onto a sheet of parchment paper so the smooth side of the dough is now facing up.
- Using a very sharp lame or serrated knife held at a 30–45° angle, make a single confident score down the length of the batard, about ¼ inch (6 mm) deep.
- You can make one long slash or two shorter parallel slashes.
- Score decisively; hesitant cuts don't open as well.
- The score is where the loaf will "ear" (expand upward).
+ Show details− Hide details
Ready when: Score is clearly visible, about ¼ inch deep, and the dough does not spring back over the cut
Tip: A dull blade will drag and tear the dough instead of slicing cleanly. If using a serrated knife, use a rocking motion; if using a lame, draw it quickly in one motion.
Load and bake with steamOven 500°F / 260°C
- If using a Dutch oven: Carefully remove it from the oven, place the parchment with the scored loaf inside, and cover with the hot lid.
- Return to the oven and bake at 500°F (260°C) for 20 minutes covered.
- If using a baking stone: Carefully slide the loaf (on parchment) directly onto the stone.
- Immediately pour about 1 cup (240 ml) of boiling water into the hot baking pan on the lower rack, or spray the oven walls with water 3 times in quick succession.
- Bake at 500°F (260°C) for 20 minutes with steam.
+ Show details− Hide details
Ready when: Loaf is pale to light golden, steam has been trapped in the oven (if using stone, water has evaporated or is very low)
Tip: Do not open the oven during the first 20 minutes or you will release all the steam. If using a stone, stand back after adding water to avoid steam burns.
Uncover and finish bakingOven 450°F / 230°C
- If using a Dutch oven, carefully remove the lid (watch for hot steam).
- If using a stone, the steam phase is now complete.
- Lower the oven temperature to 450°F (232°C) and continue baking for another 12–15 minutes, until the loaf is deep golden brown on top and bottom.
- The loaf is done when it sounds hollow when tapped on the bottom and the internal temperature reaches 205–210°F (96–99°C) if you use a thermometer.
+ Show details− Hide details
Ready when: Loaf is deep golden brown, sounds hollow when tapped on the bottom, and internal temperature is 205–210°F (96–99°C)
Tip: If the crust is browning too fast before the inside is done, lower the temperature to 425°F (218°C) and extend time by 3–5 minutes. Every oven is different.
Cool completely
- Remove the loaf from the oven and place it on a wire cooling rack.
- Do not slice it yet—the interior is still steaming and will continue to cook.
- Let the loaf cool completely for at least 1 hour at room temperature.
- If you slice too early, the inside will be gummy.
- For the best crumb structure and easiest slicing, wait 2–3 hours.
+ Show details− Hide details
Ready when: Loaf is cool to the touch and no longer steaming
Tip: Cooling is not optional. Cutting into a hot loaf collapses the crumb and turns it dense and gluey.
Good to know
Tips
- Levain strength matters: If your starter smells alcoholic or looks mostly liquid on top, it may be underripe. Always feed it 4–8 hours before mixing and use it at peak rise—the dough won't develop properly with a weak or declining starter.
- Hydration is 67% (235ml water ÷ 350g flour), which is moderate for sourdough and ideal for beginners. The dough will be slightly sticky but manageable. If your kitchen is very humid, reduce water to 225ml; if very dry, add 5–10ml more.
- Temperature control: Bulk fermentation time depends heavily on room temperature. At 72°F (22°C), bulk takes 3.5–4.5 hours. At 68°F (20°C), it may take 5–6 hours. Use the loaf's appearance (risen 50–75%, bubbly) rather than the clock.
- Scoring technique: A sharp blade and quick, confident motion are non-negotiable. A dull blade will tear the dough and prevent proper ear development. If you don't have a lame, sanitize a new razor blade or use a very sharp serrated bread knife.
Make ahead
You can retard the batard in the fridge for up to 24 hours before baking. Longer cold fermentation (16+ hours) develops more sour flavor but doesn't affect the loaf's structure. You can also freeze the unbaked, shaped dough directly from the fridge: wrap it well in plastic, freeze for up to 1 month, then thaw in the fridge overnight and bake the next day as normal. Baked loaves keep at room temperature for 3–4 days, but are best within 24 hours.
Storage & reheating
Room temperature (48–72 hours): wrap the cooled loaf loosely in a kitchen towel or store it cut-side down on a cutting board to keep the crust crispy. Refrigerator (up to 1 week): wrap in plastic wrap or a bread bag to prevent drying. To refresh: wrap in foil and warm in a 350°F (175°C) oven for 10 minutes. Freezer (up to 3 months): wrap tightly in plastic wrap and foil. Thaw at room temperature for 2–3 hours, then refresh in a 350°F (175°C) oven for 15 minutes if desired.
Substitutions
- bread flour → all-purpose flour. All-purpose flour will work but has less protein, resulting in a slightly less open crumb and less oven spring. Use the same weight. The bake time may be 2–3 minutes shorter.
- active sourdough starter → 100g ripe sourdough starter made with whole wheat or rye flour. This adds deeper, more complex flavor and slightly darker crust color. Use the same weight; no change to water or salt.
- cool water → 235ml of the water replaced with 20–50g whole wheat or rye flour and 215–235ml water. Substituting 5–15% of the bread flour weight with whole wheat or rye flour adds nutty flavor and slightly darker crumb. Whole grains absorb more water, so increase hydration slightly (add 10–15ml water) if the dough feels stiff.
- fine sea salt → kosher salt or sea salt flakes. Kosher salt is less dense; use 8–9g. Fleur de sel or other finishing salts can be sprinkled on top before scoring for a rustic appearance, but the bulk of the salt should still be mixed in.
More sourdough
See all →



Find more like this
- Meal
- Dinner
- Method
- Oven
- Quick & Easy
- 5 Ingredients or LessMake Ahead