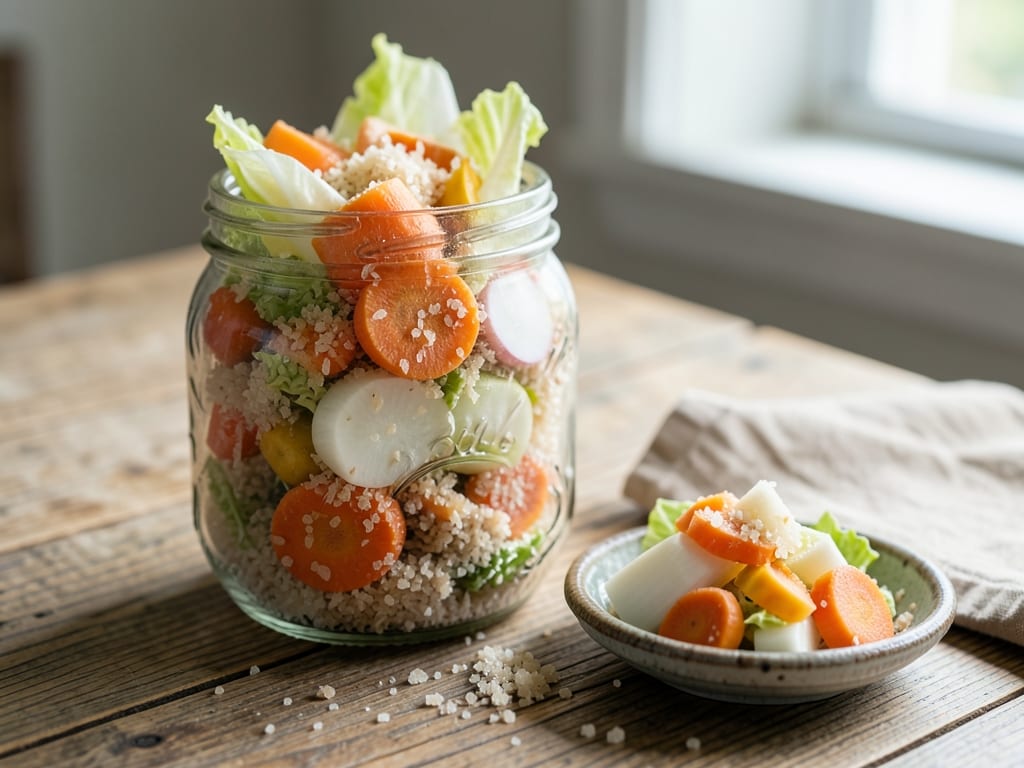
Nukazuke (Japanese Rice Bran Pickles)
Crunchy, tangy Japanese pickles made by burying vegetables in a living bed of salted, fermented rice bran (nukadoko). This recipe walks you through building the bed, conditioning it with scrap vegetables, and pickling carrot and daikon.
- Prep
- 40 min
- Cook
- 5 min
- Wait
- 8 days
- Total
- 8 days
- Makes
- About 1.5 lb (700 g) pickled vegetables per batch, plus 1 nukadoko bed (about 2 quarts / 2 L) for ongoing use
Steps
Before you start
- Plan for about 8 days: the bed needs roughly 7 days of daily stirring with scrap vegetables before it is ready, then your first real pickles take 8–24 hours.
- Buy fresh rice bran (nuka) from a Japanese grocer or health-food store. Raw bran is best; if you only find toasted (iri-nuka), use it as is. Smell it first: it should be nutty, not rancid.
- Use a non-reactive container (glass, enamel, food-grade plastic or ceramic) with a lid. Never use bare metal. Wash it and your hands well, and remove rings and watches before stirring.
- Use filtered or boiled-and-cooled water if your tap water is heavily chlorinated.
- Keep the bed at 68–77°F (20–25°C) and stir once or twice daily. In hot weather, or if you will be away, keep it in the fridge and stir about twice a week.
Make the salt brine
- Combine the 4 cups (950 ml) water and ½ cup (130 g) sea salt in a small saucepan.
- Heat over medium heat, stirring, for about 3 minutes just until the salt dissolves; do not boil.
- Remove from the heat and let the brine cool completely to room temperature, about 45 minutes.
+ Show details− Hide details
Ready when: Salt is fully dissolved and the brine feels neutral, not warm, to the touch
Tip: Hot brine will cook the bran and kill the fermentation, so be sure it is fully cool.
Toast the bran
- If your bran is raw, toast it in a dry large skillet over medium-low heat for about 5 minutes, stirring constantly, until it smells nutty and feels dry and slightly warm.
- Spread on a tray and cool completely, about 15 minutes.
- Skip this if using pre-toasted bran.
+ Show details− Hide details
Ready when: Fragrant, nutty aroma and a slightly deeper color; no browning or scorching
Tip: Toasting reduces odor and the chance of mold or insects in a new bed.
Mix the bran bed
- Place the cooled bran in the large bowl.
- Pour in the cooled brine in 3 additions, kneading with clean hands after each.
- Continue kneading for 3 minutes until the mixture feels like damp sand and holds together when squeezed in your fist without dripping water.
+ Show details− Hide details
Ready when: Texture like soft, wet sand or thick miso; a squeezed handful holds its shape with no dripping
Tip: If too wet, stir in 2 tablespoons more bran; if crumbly, add 1 tablespoon water at a time.
Add the aromatics
- Tuck the kombu strips, whole chiles and sliced ginger into the bran and press the bed into the container.
- Pack firmly to remove air pockets, then smooth the surface.
- Wipe the inside rim and lid clean with a damp paper towel.
+ Show details− Hide details
Ready when: Bed is level, packed firmly, and rim is clean
Tip: Bran on the rim can grow mold, so wipe it every time.
Condition with scraps
- Bury the cabbage leaves or vegetable peels completely in the bed, pressing them in about 2 inches (5 cm) deep.
- Cover and keep at 68–77°F (20–25°C).
- Once or twice a day for 7 days, stir the bed thoroughly from the bottom up with clean hands, re-bury the scraps, and smooth and press the surface.
- Replace the scraps with fresh ones on day 3 and day 5, discarding the old ones.
+ Show details− Hide details
Ready when: Bed smells pleasantly sour and tangy like yogurt and nutty miso, with no musty, rotten or alcohol smell
Tip: A thin layer of white film is harmless kahm yeast, so stir it in; pink, green, black or fuzzy growth means discard the whole bed.
Salt-rub the vegetables
- After day 7, discard the scraps and squeeze the liquid from them back into the bed.
- Rub the carrots and daikon sticks with the 1 tablespoon salt for about 1 minute until they feel slightly softened and glossy.
- Let sit 10 minutes, then wipe off the excess salt and moisture with a paper towel.
+ Show details− Hide details
Ready when: Vegetables look slightly wet and shiny; the carrot bends a little
Tip: Pat dry. Excess water from vegetables will thin the bed over time.
Bury and pickle
- Make a deep hollow in the bed, lay in the carrots and daikon so they do not touch each other, and cover completely with at least 1 inch (2.5 cm) of bran.
- Press the surface flat, wipe the rim, cover, and leave at room temperature for 8–12 hours for thin pieces.
- Thicker pieces may need up to 24 hours.
- In the fridge, allow 2–3 days.
+ Show details− Hide details
Ready when: Pickles taste pleasantly sour and lightly salty yet still crunchy, with a slightly translucent look
Tip: Taste a piece after 8 hours, then adjust time to your preference.
Rinse and serve
- Pull the vegetables out, scraping the bran back into the container.
- Rinse them quickly under cold running water, pat dry, and slice the carrots and daikon into bite-size pieces about ¼ inch (6 mm) thick.
- Serve right away.
- Smooth the bed, wipe the rim, and re-cover.
+ Show details− Hide details
Ready when: Pieces are clean of bran and crisp when sliced
Tip: Slice just before serving. Cut pickles lose crunch and turn sour faster.
Maintain the bed
- Stir the bed daily at room temperature.
- After each batch of pickles, add 2 tablespoons bran and 1 teaspoon salt to replace what clings to the vegetables, then stir.
- If the bed becomes soupy, press a paper towel onto it to absorb liquid, or add a little bran.
+ Show details− Hide details
Ready when: Bed stays damp-sand textured with a sweet-sour fermented smell
Tip: Skipping stirring for several days lets undesirable mold grow, so refrigerate the bed if you will be away.
Good to know
Tips
- Always use clean hands; oils and soap residue, or other foods can spoil the bed.
- The bed gets better with age. Early batches taste mild, and flavor deepens after a few weeks.
- Sour, sharp, or very salty pickles mean they were left in too long; shorten the time or rinse more thoroughly.
- Save carrot tops, daikon peels, and broccoli stems for conditioning or for extra pickling.
Make ahead
"Build the nukadoko up to 2 weeks in advance. Once conditioned, keep it going indefinitely with regular stirring, or refrigerate and stir twice weekly. Pickled vegetables can be made a day ahead and kept in the fridge."
Storage & reheating
Finished pickles (rinsed, uncut): refrigerate in an airtight container up to 3 days; serve cold or at room temperature. The bran bed: room temperature with daily stirring, or refrigerated with stirring twice weekly, for months if properly maintained. To pause for 2–3 weeks, freeze the bed in a sealed bag, then thaw in the fridge and stir well before using again. Pickles are not reheated.
Substitutions
- raw rice bran (nuka) → Pre-mixed nukadoko kit or toasted rice bran. Convenient and already salted; follow the package directions and skip additional salt.
- carrots → Cucumber, eggplant, or turnip. Cucumbers need only 4–6 hours; eggplant works well with a rub of salt and a pinch of alum-free color aid, like rusty nails, optional.
- dried kombu → Dried shiitake mushroom. Adds umami to the bed when kombu is not available.
- dried red chile → Black peppercorns (1 teaspoon). Also discourages pests and mold.
More pickles & chutneys
See all →
Find more like this
- Meal
- Lunch
- Cuisine
- Japanese
- Main ingredient
- Carrots
- Method
- Stovetop
- Quick & Easy
- Make Ahead