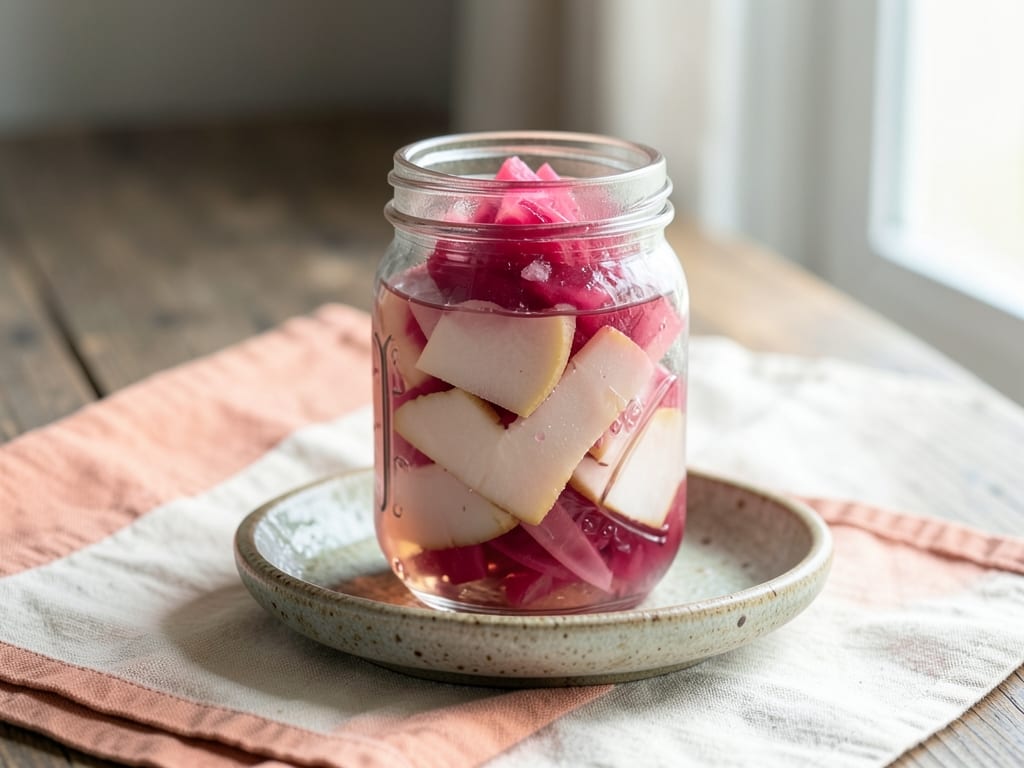
Gari (Japanese Pickled Sushi Ginger)
Delicate, pale pink-tinged slices of young ginger are salted to mellow their bite, then steeped in a sweet-tart rice vinegar brine. Crisp, clean and refreshing, this is the classic sushi companion, and it takes less than 30 minutes of hands-on work.
- Prep
- 20 min
- Cook
- 5 min
- Wait
- 2 days
- Total
- 2.1 days
- Makes
- About 1 pint (480 ml) jar, 16 servings of 2 tablespoons
Steps
Before you start
- Choose young ginger if you can: it has thin, pale, almost translucent skin with pink tips, and is tender with little fiber. Mature ginger works, but peel it more thoroughly and slice it thinner.
- Wash a 1-pint (480 ml) jar and lid in hot soapy water and rinse well. It must be clean, and the lid should be non-reactive (glass or plastic-lined) because vinegar corrodes bare metal.
- Plan ahead: the ginger is best after 2 days in the fridge and keeps improving for a week.
- A mandoline or very sharp knife is needed for paper-thin slices. Use the hand guard.
Prep the ginger
- Scrub the ginger under cold water.
- Scrape off the thin skin with the edge of a spoon, which follows the knobs better than a peeler.
- Trim any dry or fibrous spots.
- Weigh out 8 ounces (225 g).
+ Show details− Hide details
Ready when: Skin is gone and the ginger looks pale yellow and smooth.
Tip: Old ginger with tough skin may need a peeler.
Slice paper-thin
- Using a mandoline set to about 1/32 inch (1 mm), or a very sharp knife, slice the ginger lengthwise, with the grain running along the slice's length, into thin, wide ribbons.
- Use the hand guard.
+ Show details− Hide details
Ready when: Slices are thin enough to see light through and bend without snapping.
Tip: Slicing against the fibers across the knob gives short, tough pieces. Slice along the grain for tender ribbons.
Salt the ginger
- Toss the slices in a medium bowl with 1 teaspoon (6 g) salt.
- Let stand 30 minutes at room temperature to draw out moisture and harsh heat.
+ Show details− Hide details
Ready when: Slices look slightly wilted with liquid pooled in the bowl.
Blanch and drain
- Bring a small saucepan of water to a boil.
- Drain the ginger in a colander, then add it to the boiling water for 30 seconds only.
- Drain well and spread on a clean towel.
- Pat dry, then squeeze gently to remove excess water.
+ Show details− Hide details
Ready when: Ginger is slightly softened and bright, and no longer smells sharply raw.
Tip: Don't blanch longer than 30 seconds or the ginger loses its crunch.
Make the brine
- In the same cleaned saucepan, combine the rice vinegar, sugar, water and 1/2 teaspoon (3 g) salt.
- Warm over medium heat, stirring, for 2 to 3 minutes until the sugar and salt dissolve completely.
- Remove from the heat before it boils hard.
+ Show details− Hide details
Ready when: Liquid is clear with no visible sugar crystals when you tilt the pan.
Tip: Vinegar fumes are strong. Ventilate the kitchen.
Pack the jar
- Pack the dry ginger loosely into a clean 1-pint (480 ml) jar.
- Tuck in the beet slice, if using, against the glass.
- Pour the warm brine over the ginger so every slice is submerged, leaving about 1/2 inch (1 cm) headspace.
+ Show details− Hide details
Ready when: All ginger is covered by liquid.
Tip: Use only a thin slice of beet. A larger piece turns the ginger deep magenta.
Cool to room temperature
- Leave the jar uncovered, or with the lid set on loosely, for about 1 hour until the brine reaches room temperature.
- The ginger may start to blush pale pink if you used the beet.
- Then seal tightly.
+ Show details− Hide details
Ready when: Jar feels neutral, not warm, to the touch.
Chill and cure
- Refrigerate for at least 48 hours before serving.
- Shake the jar gently once a day.
- The flavor mellows and turns sweet-tart, and the color becomes a soft blush.
+ Show details− Hide details
Ready when: Slices are tender yet crisp, taste balanced sweet and tangy, and no longer burn sharply.
Tip: You can sample after 24 hours, but it will taste sharper.
Good to know
Tips
- Slice along the grain with a mandoline for the thinnest, most tender slices.
- Do not skip the 30-second blanch. It tames harsh heat without making the ginger soft.
- Keep the ginger submerged under the brine at all times so it stays crisp and safe to store.
- Save the leftover brine: it is great for quick-pickling cucumbers or sliced radishes, or for seasoning sushi rice.
Make ahead
"Make up to 1 week ahead. The flavor is best after 2 to 7 days in the fridge."
Storage & reheating
"Refrigerate in the sealed jar, with the ginger submerged in brine, for up to 3 months. Do not leave at room temperature for more than a few hours. Not recommended for freezing, as the texture turns limp. Serve straight from the fridge, using a clean utensil each time."
Substitutions
- unseasoned rice vinegar → apple cider vinegar or white wine vinegar (5% acidity). Flavor will be a bit fruitier or sharper, less delicate.
- granulated sugar → honey or maple syrup (3 tablespoons / 60 ml). Adds flavor and slight color. Dissolves easily.
- raw beet → 1 small slice of pickled red cabbage or 1 teaspoon red shiso juice, or omit. Color only. Omitting gives pale yellow ginger, which is just as authentic.
- young ginger → mature ginger. Peel thoroughly, slice extra thin, and extend the salting to 45 minutes. It will be spicier and fibrous.
More pickles & chutneys
See all →
Find more like this
- Meal
- Lunch
- Cuisine
- Japanese
- Method
- Stovetop
- Quick & Easy
- 5 Ingredients or LessEasyMake Ahead