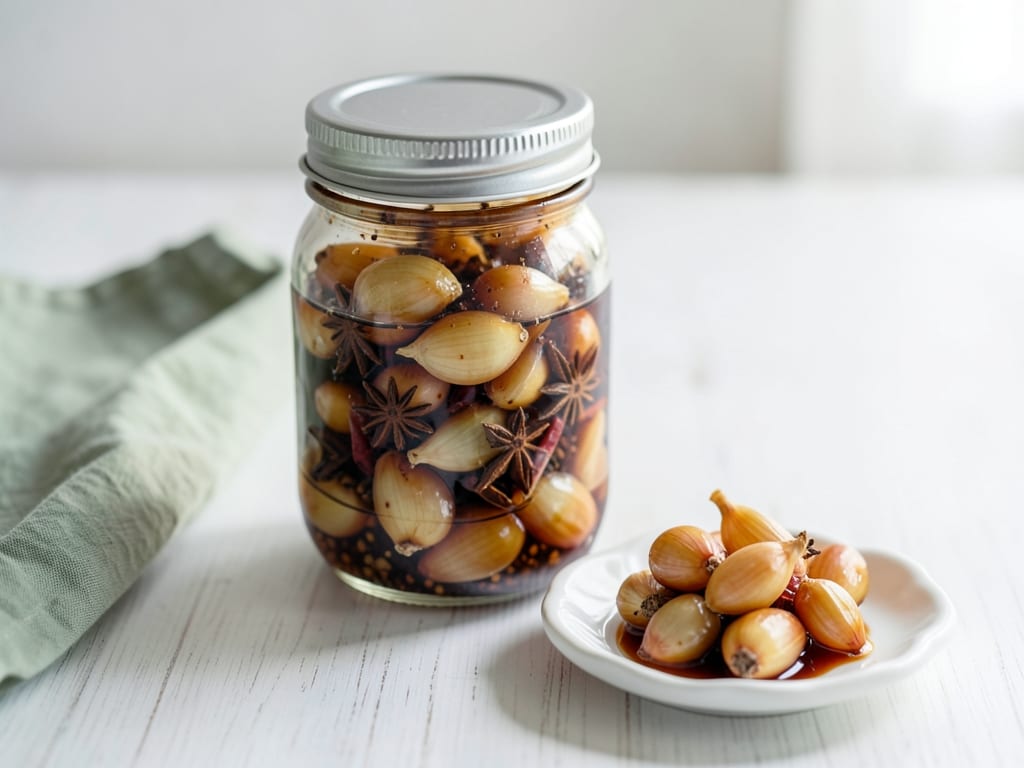
Chinese Sweet and Sour Pickled Garlic (Tang Cu Suan)
Crisp whole garlic cloves cured in a glossy brine of Chinese black vinegar, rock sugar and soy sauce. After two weeks in the fridge they turn mellow, tangy and lightly sweet. Serve them with dumplings, noodles or rich braised meats.
- Prep
- 40 min
- Cook
- 10 min
- Wait
- 14 days
- Total
- 14.1 days
- Makes
- 1 quart (1 L) jar, about 12 servings of 6–8 cloves
Steps
Before you start
- Plan ahead: the garlic needs at least 14 days in the fridge before it tastes mellow. It is best at 3–4 weeks.
- Buy firm, fresh garlic heads with tight skins and no green sprouts or soft spots. You need about 8 large heads to get 350 g (12 oz) of peeled cloves.
- Use Zhenjiang (Chinkiang) black vinegar if you can. Its malty, smoky flavor is what makes this recipe distinctive.
- This is a refrigerator pickle, not a canning recipe. Keep it cold at all times.
Soak and peel garlic
- Break the garlic heads into cloves and put them in a bowl of cold tap water for 10 minutes to loosen the skins.
- Use a paring knife to slice off the hard root end of each clove, then slip off the skins.
- Discard any cloves that are soft, bruised or sprouting.
- You should have about 350 g (12 oz) of peeled cloves.
+ Show details− Hide details
Ready when: Cloves are fully peeled, clean and white with no brown spots.
Tip: Trim only the root end and leave the clove intact. Cut cloves go soft in the brine.
Sterilize the jar
- Wash the 1-quart (1 L) jar and lid in hot soapy water and rinse well.
- Fill the jar with boiling water from a kettle, leave it for 1 minute, then pour the water out.
- Set the jar upside down on a clean towel to air-dry.
+ Show details− Hide details
Ready when: The jar is hot to the touch and has no water pooled inside.
Tip: Handle the hot jar with a towel and stand it on a dry surface so it does not crack.
Blanch the garlic
- Bring about 2 quarts (2 L) of tap water to a rolling boil in the medium pot over high heat.
- Add the peeled cloves and boil for exactly 30 seconds.
- Drain at once in a strainer and rinse under cold running water for 30 seconds to stop the cooking.
- Spread the cloves on a clean towel and let them air-dry for 10 minutes.
+ Show details− Hide details
Ready when: Cloves look slightly translucent at the edges but are still firm and crisp when pressed.
Tip: Don't blanch longer than 30 seconds. Longer blanching turns the cloves soft instead of crunchy.
Simmer the brine
- In the small saucepan, combine the black vinegar, rice vinegar, water, rock sugar, soy sauce and salt.
- Set over medium heat and stir occasionally.
- Bring to a gentle simmer, which takes about 3 minutes, then simmer for 4–5 minutes, stirring, until all the rock sugar has dissolved.
+ Show details− Hide details
Ready when: The brine is dark and clear, with no sugar crystals on the bottom of the pan when you scrape it with a spoon.
Tip: Open a window or run the fan. Hot vinegar fumes are sharp.
Cool the brine
- Take the pan off the heat and let the brine cool for about 45 minutes, until it is lukewarm or at room temperature.
- Add the garlic only after the brine has cooled.
+ Show details− Hide details
Ready when: The side of the pan feels barely warm, no hotter than body temperature.
Tip: Pouring hot brine over the garlic will soften it. Cooling the brine keeps the cloves crunchy.
Pack the jar
- Put the star anise and dried chilies, if using, in the bottom of the sterilized jar.
- Add the dry garlic cloves, packing them in snugly but without crushing them.
- Pour the cooled brine over the garlic until the cloves are completely covered, leaving ½ inch (1 cm) of headspace.
- Tap the jar on the counter to release air bubbles, then seal the lid.
+ Show details− Hide details
Ready when: All the garlic sits below the surface of the liquid.
Tip: If a few cloves float, push them down with a clean spoon. Garlic exposed to air can spoil.
Cure in the fridge
- Refrigerate the jar for at least 14 days, and ideally 3–4 weeks.
- Gently turn the jar upside down on days 2 and 5 to redistribute the brine.
- The garlic will go from sharp and spicy to mellow, sweet and tangy.
+ Show details− Hide details
Ready when: The cloves taste tangy, sweet and savory with only a mild garlic bite. They stay crunchy and the brine is deep brown.
Tip: Don't worry if some cloves turn blue or green. This is a harmless reaction between garlic compounds and acid, and the flavor is unaffected.
Good to know
Tips
- Dry the blanched garlic well. Wet cloves dilute the brine and weaken its preserving power.
- Keep the garlic fully submerged. If cloves keep floating, cut a small round of parchment paper to press them down.
- Save the leftover brine. It makes a great dipping sauce for dumplings, or you can add a spoonful to noodles or stir-fries.
- Slice the pickled cloves thinly to eat with rich dishes such as braised pork belly, or serve them whole with congee and dumplings.
Make ahead
"This recipe is made ahead by design. The garlic needs at least 14 days in the fridge, and the flavor keeps improving until about week 4."
Storage & reheating
"Refrigerator: keep covered in the brine at all times for up to 3 months. Serve straight from the jar, cold or at room temperature, and use a clean utensil each time. Room temperature: serve for up to 2 hours, then return the jar to the fridge. Freezer: not recommended because the cloves turn soft. Discard if the garlic smells off or feels slimy, or if the brine turns cloudy or moldy."
Substitutions
- Chinese black vinegar (Zhenjiang) → additional unseasoned rice vinegar plus 1 tbsp (15 ml) balsamic vinegar. This gives a similar darkness and mild sweetness, but not the malty, smoky depth of Zhenjiang vinegar.
- yellow rock sugar → granulated sugar, 75 g (⅓ cup). Use a little less than the rock sugar by weight. The brine will taste slightly less rounded.
- light soy sauce → tamari. Makes the recipe gluten-free if the vinegars are also gluten-free.
- star anise → 1 small cinnamon stick. Adds a warm spice note in place of the anise.
More pickles & chutneys
See all →
Find more like this
- Meal
- Dinner
- Cuisine
- Chinese
- Method
- Stovetop
- Quick & Easy
- EasyMake Ahead