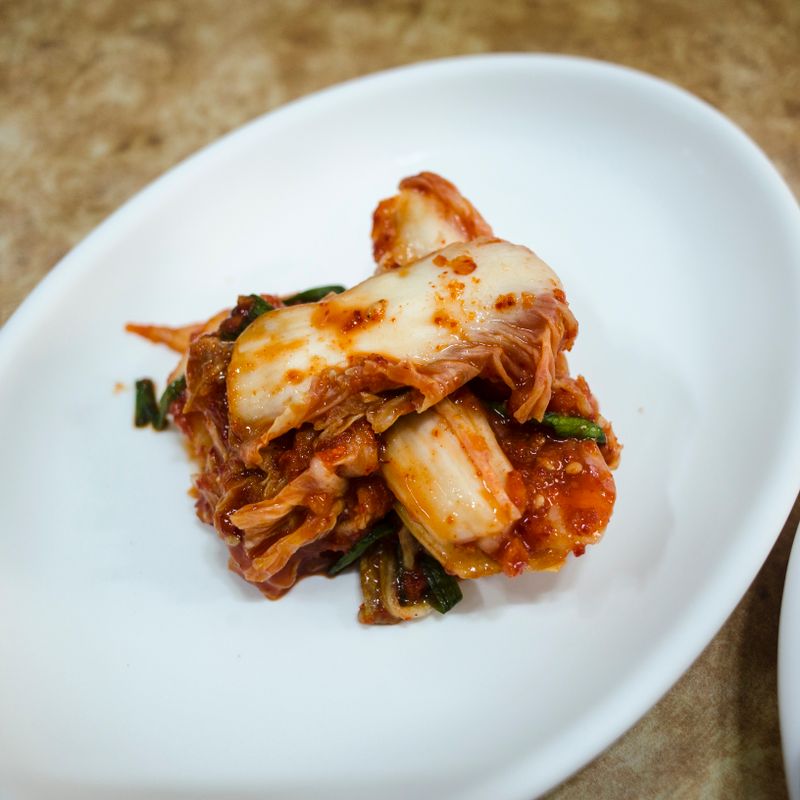
Budget Batch Fermented Cabbage Kimchi
A traditional Korean lacto-fermented kimchi made with napa cabbage, daikon radish, garlic, and gochugaru. This budget-friendly version uses simple pantry staples and ferments at room temperature for 3–5 days to develop complex, tangy, spicy flavor. Perfect for beginners: no special equipment needed, forgiving fermentation, and keeps for weeks in the refrigerator.
- Prep
- 25 min
- Cook
- —
- Wait
- 3 days
- Total
- 3 days
- Makes
- About 2 quarts (2 L) fermented kimchi
Steps
Before you start
- Use a clean 2-quart (2 L) glass jar or food-grade container.
- Ensure all cutting boards, knives, and utensils are clean to avoid unwanted bacteria.
- Room temperature should be 65–75°F (18–24°C) for steady fermentation; cooler ferments slower, warmer ferments faster.
- Have sea salt or kosher salt on hand (avoid iodized salt, which can interfere with fermentation).
Salt the cabbage
- Cut the cored napa cabbage into 2-inch (5 cm) pieces and place in a large bowl.
- Sprinkle 3 tablespoons (45 g) of salt evenly over the cabbage.
- Using clean hands or gloves, massage the salt into the leaves for 2–3 minutes until the cabbage releases its liquid and begins to soften.
- This salting draws out the vegetable's water, which becomes the natural brine for fermentation.
+ Show details− Hide details
Ready when: Cabbage is softened and pools of liquid have formed at the bottom of the bowl
Tip: Use non-iodized salt; iodized salt can cloud the brine and inhibit fermentation.
Prepare the paste base
- In a small bowl, combine the minced garlic (6 cloves, about 30 g), gochugaru (3 tablespoons / 25 g), 2 teaspoons (10 g) salt, and the optional fish sauce (1 tablespoon / 15 ml) and sugar (½ teaspoon / 2 g).
- Add 2–3 tablespoons of the liquid that has accumulated from the salted cabbage and stir until a thick, spreadable paste forms.
- If using fish sauce, it will add umami depth; skip it for a vegetarian version.
+ Show details− Hide details
Ready when: Paste is smooth, thick, and evenly colored deep red
Tip: If the paste is too thick and won't spread easily, add another tablespoon of cabbage liquid.
Mix daikon into cabbage
- Add the daikon radish matchsticks (8 oz / 225 g) to the salted cabbage in the bowl.
- Gently toss to distribute the daikon throughout.
- The radish adds crunch and a subtle sweet-peppery note that balances the fermentation.
+ Show details− Hide details
Ready when: Daikon is evenly mixed with cabbage
Tip: Don't squeeze or crush the daikon; keep it whole so it stays crisp during fermentation.
Coat vegetables with paste
- Pour the garlic-gochugaru paste over the cabbage and daikon mixture.
- Using clean hands, gloves, or a spoon, thoroughly coat every piece of cabbage and daikon, working the paste down into the layers.
- The goal is an even, visible red coating on all vegetables.
- This typically takes 2–3 minutes of gentle mixing.
+ Show details− Hide details
Ready when: Every piece of vegetable is coated in red paste; no white areas remain visible
Tip: Work gently but thoroughly—uncoated pieces are more prone to mold.
Pack into the jar
- Transfer the coated cabbage and daikon to the clean 2-quart (2 L) glass jar, pressing down firmly with clean hands or a spoon as you fill.
- Pack it tightly, working the vegetables toward the bottom until you reach about 1 inch (2.5 cm) from the rim.
- The vegetables should be compressed enough that their liquid rises to cover the top layer.
+ Show details− Hide details
Ready when: Vegetables are tightly packed; brine covers the top of the vegetables with at least ½ inch (1 cm) clearance below the lid
Tip: Vegetables must stay submerged—exposure to air invites mold. If brine doesn't quite cover the vegetables, dissolve 1 teaspoon salt in ¼ cup cooled water and pour in just enough to submerge.
Add water brine if needed
- If the cabbage liquid has not fully covered all the vegetables (the top should be submerged by at least ½ inch / 1 cm), dissolve ½ teaspoon salt in ¼ cup (60 ml) of the cooled filtered water and pour it over the vegetables.
- This ensures all pieces remain submerged throughout fermentation, preventing exposure to air that could encourage mold.
+ Show details− Hide details
Ready when: Brine level reaches at least ½ inch (1 cm) above the highest vegetable piece
Tip: Only add water if needed; most of the brine will come from the cabbage's released liquid.
Ferment at room temperature (3–5 days)
- Cover the jar loosely with its lid (do not seal tightly—gases need to escape).
- Place it on a kitchen counter or pantry shelf away from direct sunlight, at room temperature (65–75°F / 18–24°C).
- After 24 hours, you will notice bubbling and a sour aroma developing.
- Open the lid daily (or every other day) to release built-up gas and check that the vegetables remain submerged.
- If any float to the surface, press them down gently with a clean spoon.
+ Show details− Hide details
Ready when: Brine is cloudy, bubbles are visible, and the smell is distinctly tangy and fermented (not rotten or musty)
Tip: If white mold appears on the surface, skim it off immediately and ensure vegetables are submerged; if black or fuzzy mold appears throughout, discard the batch.
Taste and decide on doneness
- On day 3, open the jar and taste a small piece of cabbage.
- The flavor should be tangy, spicy, and savory—not salty or crunchy like fresh cabbage, but not mushy either.
- If you prefer a more sour, complex flavor, continue fermenting until day 5.
- For a milder, crisper result, move to the next step on day 3.
+ Show details− Hide details
Ready when: Cabbage is tender but still has a slight bite; flavor is tangy, spicy, and umami-forward
Tip: Fermentation speed depends on room temperature. At 65°F (18°C), allow 5–7 days; at 75°F (24°C), 3–4 days are often sufficient.
Transfer to cold storage
- Once satisfied with the flavor, seal the jar with its lid and move it to the refrigerator (below 40°F / 4°C).
- The cold dramatically slows fermentation, halting further flavor development and preserving the texture.
- The kimchi will keep for 2–3 weeks in the refrigerator, though it often lasts longer; the flavor actually deepens slightly over the first week in the fridge.
+ Show details− Hide details
Ready when: Jar is sealed and in the refrigerator; temperature is below 40°F (4°C)
Tip: Never leave kimchi at room temperature longer than 5–7 days unless you want it very sour and vinegary.
Good to know
Tips
- Keep the vegetables submerged in brine throughout fermentation—mold grows only on surfaces exposed to air. If they float, press them down daily or use a small glass weight inside the jar.
- Fermentation speed varies widely by room temperature. Use this guide: 65°F (18°C) = 5–7 days, 70°F (21°C) = 3–5 days, 75°F (24°C) = 2–4 days. You cannot ferment in temperatures below 55°F (13°C).
- Taste frequently (day 2 onward) to find your preferred sourness. There is no 'wrong' doneness—it is purely a matter of preference.
- Fermented kimchi brine is liquid gold: it is probiotic and flavorful. Use it in dressings, stews, marinades, or drink a spoonful straight for digestive benefits.
Make ahead
Kimchi is a make-ahead dish by nature. You can also prepare the paste and cut the cabbage and daikon up to 8 hours ahead, storing them separately in the refrigerator; bring to room temperature before mixing and fermenting.
Storage & reheating
Room temperature (65–75°F / 18–24°C): Ferments actively for 3–5 days; do not store longer than 1 week at room temperature or flavor becomes very sour and vinegary. Refrigerator (below 40°F / 4°C): Keeps for 2–3 weeks and up to 1 month; flavor deepens in the first week. Freezer (0°F / –18°C): Freezes well for up to 3 months in an airtight jar or freezer bag; thaw in the refrigerator and use within 1–2 weeks of thawing. To reheat, serve chilled straight from the jar or warm briefly in a pan over medium heat for use in cooked dishes.
Substitutions
- Korean red chili flakes (gochugaru) → cayenne pepper or red chili powder (use 2 tablespoons / 15 g—it is spicier). Gochugaru is traditional and gives authentic fruity heat; cayenne is hotter and more one-note but works in a pinch.
- daikon radish → green onion (scallion), cut into 2-inch pieces, or additional napa cabbage. Daikon adds crunch and subtle sweetness; green onion is milder and slightly oniony; both work well and keep fermentation predictable.
- fish sauce (optional but traditional) → soy sauce (use 1 tablespoon / 15 ml) or miso paste (dissolve ½ tablespoon / 8 g in the paste). Fish sauce adds umami; soy and miso are vegetarian alternatives with similar savory depth.
- sea salt or kosher salt → kosher salt or pickling salt (measured by weight at 45 g). Sea salt, kosher salt, and pickling salt all work; avoid iodized table salt, which clouds brine and interferes with fermentation.
More pickles & chutneys
See all →

Find more like this
- Cuisine
- Korean
- Main ingredient
- Cabbage
- Quick & Easy
- EasyFreezer FriendlyBudget