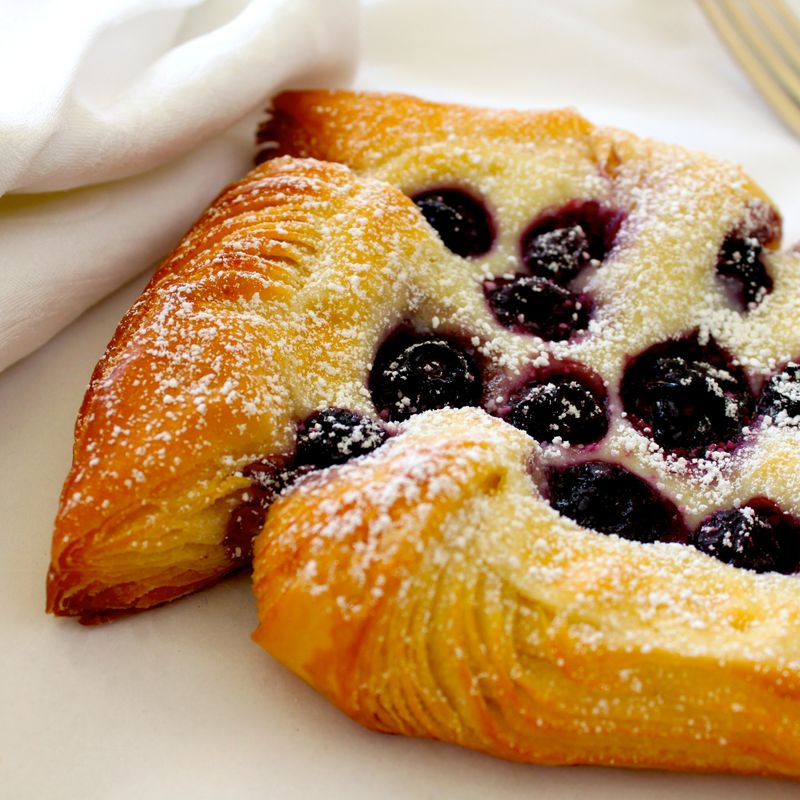
Vegan Blueberry Cream Cheese Danish
Delicate, buttery vegan Danish pastries made with a laminated dough folded to create 27 crispy layers. Each pastry is filled with a smooth blend of vegan cream cheese sweetened with maple syrup and studded with fresh blueberries, topped with whole berries, and finished with a maple-vanilla glaze. These require patience and technique but reward you with authentic Scandinavian pastry that's entirely plant-based.
- Prep
- 1 hr 5 min
- Cook
- 20 min
- Wait
- 4 hr 15 min
- Total
- 5 hr 40 min
- Makes
- 8 pastries
Steps
Before you start
- Make sure all vegan butter is well-chilled (straight from the fridge) for lamination; soften only the 50 g for the initial dough
- Choose a vegan butter with at least 80% fat content (such as Earth Balance sticks or Miyoko's), not spreads
- Read through all the lamination steps before starting; three letter-folds create 27 layers of dough
- Ensure your work surface stays cool; chill counter or use a marble slab if your kitchen is warm
Mix the dough
- In a large bowl, whisk together flour (300 g), sugar (25 g), salt (6 g), and instant yeast (5 g).
- Make a well in the center and pour in the warmed non-dairy milk (120 ml, 110°F / 43°C) and softened vegan butter (50 g).
- Using a wooden spoon or the dough hook of a stand mixer, mix until a shaggy dough forms with no dry flour visible.
+ Show details− Hide details
Ready when: All dry flour is incorporated; dough looks rough but cohesive
Tip: Use milk that's warm but not hot (around 110°F / 43°C); if it's too hot, it will kill the yeast
Knead until smooth
- If using a stand mixer, continue on medium speed for 8–10 minutes.
- If kneading by hand, knead on the counter for 12–15 minutes.
- The dough should be smooth, elastic, and slightly tacky to the touch, but not sticky.
+ Show details− Hide details
Ready when: Dough springs back when poked; it's smooth, elastic, and barely sticky
Tip: Don't over-knead; the dough will be further developed and strengthened during lamination
First rise
- Shape the dough into a ball and place it in a lightly oiled bowl.
- Cover with a damp kitchen towel or plastic wrap.
- Let rise at room temperature (about 70°F / 21°C) for about 60 minutes until the dough is puffy and increases by about 50%, but is not yet doubled.
+ Show details− Hide details
Ready when: Dough has expanded by 50%; when poked, it springs back slowly
Tip: A shorter first rise is better for Danish dough than a full double; you want it puffy but still manageable
Prepare for lamination
- Pat the risen dough into a rough 8×6-inch (20×15 cm) rectangle on a sheet of parchment paper.
- In a separate work area, place the cold vegan butter (225 g) between two sheets of parchment paper.
- Using a rolling pin, pound the butter with firm, even strokes until it forms a uniform 7×5-inch (18×13 cm) slab, about ¼ inch (6 mm) thick.
- The butter should be cold and pliable but not cracking.
- Return the butter slab to the refrigerator for 10–15 minutes.
+ Show details− Hide details
Ready when: Butter is an even slab, cold but not rock-hard; dough is at room temperature
Tip: The butter must be soft enough to fold without cracking but cold enough that it doesn't merge with the dough
Lock in butter (first fold)
- Remove the dough from parchment and place on a lightly floured surface.
- Roll out to a 12×8-inch (30×20 cm) rectangle.
- Remove the cold butter slab from the fridge and peel away the top layer of parchment.
- Invert the butter onto the center of the dough, leaving about 1 inch (2.5 cm) of exposed dough on all sides.
- Peel away the remaining parchment from the butter.
- Fold the exposed dough edges up and over the butter, sealing it in completely on all sides (like wrapping a package).
- Gently roll the sealed packet out to a 12×8-inch (30×20 cm) rectangle.
- Fold the dough in thirds like a business letter: fold the short right edge to the center, then fold the left edge over it.
- You now have one complete 'book fold.' Wrap in plastic and refrigerate for 20 minutes.
+ Show details− Hide details
Ready when: Dough is folded into thirds with butter sealed inside; dough is cool to the touch
Tip: If you see butter starting to poke through, stop and chill for 10 minutes before continuing; this prevents the layers from merging
Second fold
- Remove dough from the refrigerator.
- Orient it so the fold opening faces to your left (this keeps folds even).
- Roll out to a 12×8-inch (30×20 cm) rectangle again.
- Fold in thirds (book fold): right third to center, then left third over it.
- Wrap and refrigerate for 20 minutes.
+ Show details− Hide details
Ready when: Dough is folded in thirds; you can see faint layers when you look at the edge
Tip: Always orient the fold opening the same way to create even layers; rotating creates uneven folds
Third fold
- Repeat the second fold: remove from fridge, orient with fold opening to the left, roll to 12×8 inches (30×20 cm), fold in thirds.
- Wrap and refrigerate for 20 minutes.
- After this fold, you have completed three 'book folds,' which creates 27 layers of laminated dough.
+ Show details− Hide details
Ready when: Dough shows clear, delicate layers at the edge
Tip: Three folds are sufficient for Danish pastry; more folds risk breaking down the butter layers
Rest before shaping
- Remove the dough from the refrigerator and let it rest at room temperature for 15–20 minutes.
- It should be cool but no longer stiff and brittle; it should bend and roll without tearing.
+ Show details− Hide details
Ready when: Dough is cool but pliable; it bends without cracking
Tip: Don't let it warm up too much; if the dough becomes soft and the butter starts to show, return it to the fridge for 5 minutes
Cut and shape pastries
- On a piece of parchment paper, roll out the dough to a 16×8-inch (40×20 cm) rectangle, about ¼ inch (6 mm) thick.
- Using a sharp knife, cut the dough into 8 rectangles (each about 4×4 inches / 10×10 cm).
- Place each rectangle on a parchment-lined baking sheet, spacing them 2 inches (5 cm) apart.
- Using your fingertips, gently press down the center of each pastry to create a shallow well, leaving a ½-inch (1.25 cm) border on all sides.
- Lightly score each corner of the rectangle with the back of a knife to encourage the corners to puff up during baking.
+ Show details− Hide details
Ready when: 8 evenly-sized rectangles with shallow wells in the center and scored corners
Tip: Press gently to create the well; pressing too hard will break the delicate laminated layers and prevent good puff
Final riseOven 400°F / 205°C
- Cover the pastries loosely with plastic wrap or a damp kitchen towel.
- Let them proof at room temperature (about 70°F / 21°C) for 60–75 minutes until visibly puffy and increased by about 50%.
- You can gently poke one; it should spring back slowly.
- In the last 15 minutes of proofing, preheat the oven to 400°F (200°C).
+ Show details− Hide details
Ready when: Pastries are visibly puffy; a gentle poke springs back slowly
Tip: Over-proofed pastries collapse in the oven; slightly under-proofed is better than over-proofed
Fill and glaze pastries
- While the pastries proof, make the filling: In a bowl, whisk together vegan cream cheese (200 g), 2 tbsp (30 ml) maple syrup, and 1 tsp (5 ml) vanilla extract until smooth.
- Gently fold in ¾ cup (about 120 g) of the fresh blueberries, crushing them slightly as you fold (this prevents them from rolling out during baking).
- If using cornstarch, mix it in with the cream cheese before adding berries.
- Make the egg wash by whisking 1 tbsp (15 ml) aquafaba with 1 tbsp (15 ml) water until frothy.
- When pastries are proofed, lightly brush each one with the egg wash using a pastry brush.
- Spoon about 1.75 tbsp (25 g) of the cream cheese-blueberry mixture into the well of each pastry, filling it gently and not overfilling.
- Top each pastry with 3–4 of the remaining whole fresh blueberries.
+ Show details− Hide details
Ready when: Each pastry is filled with no spillage and topped with 3–4 whole berries
Tip: Don't overfill; the filling can leak out the sides during baking and burn on the sheet. Fill only the central well
Bake until goldenOven 400°F / 205°C
- Place the baking sheet(s) in the preheated 400°F (200°C) oven.
- Bake for 18–22 minutes until the pastries are puffed and the top is light to deep golden brown.
- The bottoms should be deep golden and crispy.
- The berries on top may caramelize slightly.
- Do not open the oven door before 15 minutes have passed.
+ Show details− Hide details
Ready when: Pastries are puffed and golden brown on top; bottoms are deep golden and crispy; berries are slightly caramelized
Tip: If the pastries are browning too quickly, tent loosely with foil for the last 5 minutes. If pale at 18 min, bake 2–3 minutes longer
Cool on rack
- Remove the baking sheet from the oven and let the pastries cool on the sheet for 5 minutes (they will continue to firm up slightly).
- Using a spatula, transfer each pastry to a cooling rack.
- Let cool for about 10 minutes until they are warm but no longer steaming.
+ Show details− Hide details
Ready when: Pastries are still warm, no longer steaming, structure is firm
Tip: Cool on a rack, not on the sheet, so the bottoms don't get soggy from steam
Apply maple glaze
- While the pastries are still warm but not hot, whisk together 3 tbsp (45 ml) maple syrup, 1 tbsp (15 ml) water, and ½ tsp (2 ml) vanilla extract until smooth.
- Using a small spoon or piping bottle, drizzle the glaze over the cooled pastries in thin lines, letting it pool slightly in the centers.
- Let the glaze set for 10 minutes before serving.
- The glaze will firm up slightly as it cools.
+ Show details− Hide details
Ready when: Glaze is smoothly drizzled, has set slightly, and is no longer wet or dripping
Tip: Glaze while pastries are still slightly warm so it adheres well; don't wait until they're completely cold or the glaze won't stick
Good to know
Tips
- Vegan butter texture is critical: choose brands with high fat content (at least 80%) like Earth Balance sticks or Miyoko's. Spreads and whipped butters won't laminate properly.
- Keep your work surface, rolling pin, and hands cool. If your kitchen is warm (above 75°F / 24°C), work in a cooler room or chill tools frequently.
- The lamination process is where 80% of the pastry quality is determined. Patience and temperature control matter more than speed.
- If filling leaks during baking, it's usually because the well was overfilled or the pastries over-proofed. Slightly under-proofed pastries are more forgiving.
Make ahead
Shaped (unfilled) pastries can be frozen for up to 2 months before the final proof. Thaw in the refrigerator overnight, then proceed with proofing, filling, and baking. Alternatively, the laminated dough can be made 1 day ahead, wrapped well, and refrigerated; bring to room temperature before shaping.
Storage & reheating
Room temperature: Store in an airtight container for up to 2 days. Refrigerator: In an airtight container for up to 4 days; reheat in a 300°F (150°C) oven for 5 minutes if desired. Freezer: Wrap cooled pastries individually in plastic wrap, then place in a freezer bag for up to 3 months. Thaw at room temperature for 1–2 hours, or reheat from frozen in a 300°F (150°C) oven for 8–10 minutes.
Substitutions
- vegan cream cheese (such as Kite Hill or cashew-based brands) → Regular (dairy) cream cheese. Use the same amount (200 g). Bring to room temperature before mixing. Not vegan, but a traditional choice.
- unsweetened non-dairy milk (such as oat or almond) → Regular dairy milk or water. Use the same amount (120 ml), warmed. The dough will have a slightly richer flavor with dairy milk.
- fresh blueberries (or frozen, thawed) → Fresh raspberries, blackberries, or mixed berries. Use the same total weight (150 g). Softer berries may release more juice, so use the cornstarch.
- pure maple syrup → Agave nectar, brown rice syrup, or simple syrup. Use the same amount. Maple syrup has a distinct flavor; substitutes will change the taste profile.
More pastries
See all →


Find more like this
- Meal
- Breakfast
- Main ingredient
- Cream Cheese
- Diet
- VegetarianHalal
- Method
- Oven