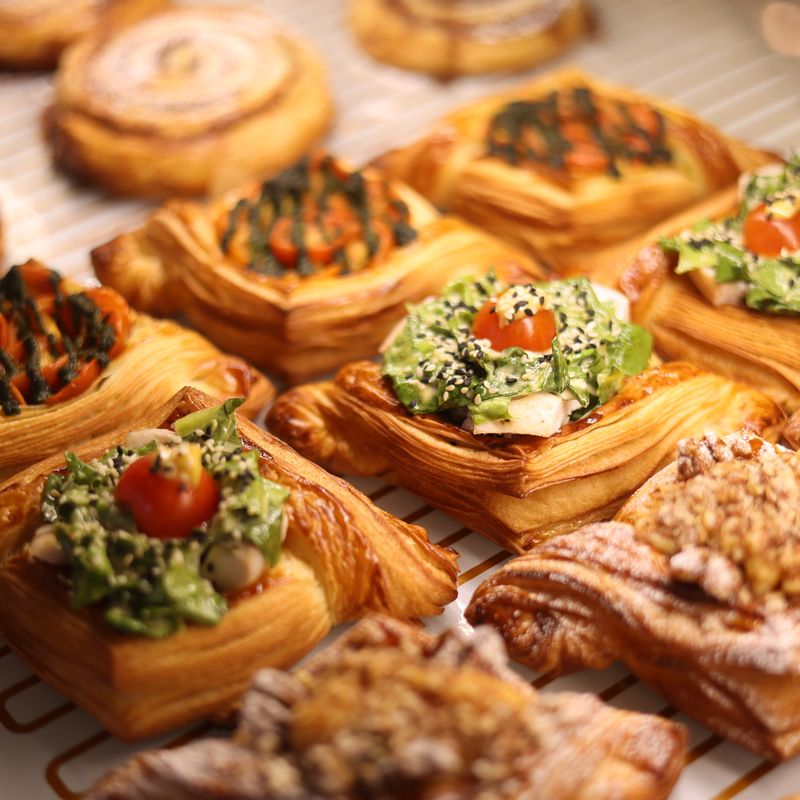
Black Sesame Danish Pastry
Buttery laminated Danish pastry filled with glossy black sesame paste and topped with sesame seeds. The delicate, flaky layers of this Scandinavian-style pastry provide a beautiful contrast to the rich, earthy black sesame filling. Perfect for a special breakfast or elegant pastry board.
- Prep
- 2 hr 10 min
- Cook
- 20 min
- Wait
- 7 hr 10 min
- Total
- 9 hr 40 min
- Makes
- 12 Danish pastries
Steps
Before you start
- Ensure the lamination butter is very cold (chill for at least 2 hours before starting)
- Warm the milk to exactly 110°F (43°C) so it activates the yeast without killing it
- Clear a clean, cool work surface for laminating—laminated doughs are sensitive to heat
- Have parchment paper and two baking sheets ready
Mix the basic dough
- In a large bowl or the bowl of a stand mixer, whisk together the flour, sugar, salt, and yeast.
- In a separate small bowl, whisk the egg, warmed milk, softened butter, and vanilla until combined.
- Pour the wet ingredients into the dry ingredients.
- Stir or mix on low speed with the dough hook for 2 minutes until the dough just comes together.
- Increase to medium speed and knead for 5–7 minutes until the dough is smooth and slightly elastic.
- The dough should feel soft but not sticky; add another tablespoon of flour if it's very sticky.
+ Show details− Hide details
Ready when: Dough is smooth, slightly elastic, and pulls away from the sides of the bowl
Tip: Don't overknead; the dough will develop more gluten during the lamination process.
First rise
- Shape the dough into a ball and place it in a lightly oiled bowl.
- Cover loosely with plastic wrap or a damp kitchen towel.
- Let it rise at room temperature (around 70–72°F / 21–22°C) for 1 to 1.5 hours, until it has increased by about 50% (not fully doubled; you want it still slightly firm for lamination).
- The dough should look puffy and will spring back slowly when poked.
+ Show details− Hide details
Ready when: Dough has increased by about 50%, feels puffy, and springs back slowly when poked
Tip: If your kitchen is cold, place the bowl in an oven with just the light on, or on top of the refrigerator.
Prepare dough for lamination
- Turn the dough out onto a lightly floured work surface.
- Gently flatten it into a 7×7 inch (18×18 cm) square, being careful not to deflate it completely.
- If the dough springs back and resists, let it rest for 5 minutes, then try again.
- Wrap it loosely in plastic wrap and refrigerate for 20 minutes to firm it up slightly and make it easier to laminate.
+ Show details− Hide details
Ready when: Dough is cool to the touch and slightly firmer
Tip: Chill your work surface and rolling pin in the freezer if your kitchen is warm.
Prepare lamination butter
- While the dough chills, remove the very cold butter from the refrigerator.
- Place it between two sheets of parchment paper.
- Using a rolling pin or the heel of your hand, pound and roll the butter until it forms a 6×6 inch (15×15 cm) square that is about 0.25 inch (6 mm) thick.
- It should be cold and pliable but not crumbly or soft.
- If it becomes too soft, return it to the freezer for a few minutes and try again.
- Keep it between the parchment sheets until ready to use.
+ Show details− Hide details
Ready when: Butter forms a 6×6 inch square and is pliable but still cold
Tip: The butter temperature is crucial—if it is too warm, it will smudge into the dough instead of creating distinct layers; if it is too cold, it will break apart.
Lock in the butter
- Remove the dough from the fridge and place it on a lightly floured work surface.
- Roll it out gently to a 10×10 inch (25×25 cm) square.
- Peel the parchment from the butter and place the butter square in the center of the dough.
- Fold all four corners of the dough over the butter to meet in the center, like an envelope, gently pressing the edges together to seal them.
- The butter should be completely enclosed.
+ Show details− Hide details
Ready when: Butter is completely enclosed in dough with sealed edges
Tip: If the dough tears, press it back together gently; small tears will not ruin the lamination.
First set of book folds
- Lightly flour the work surface.
- Using a rolling pin, gently roll the butter packet into a 10×15 inch (25×38 cm) rectangle, using even, firm pressure.
- The dough will resist—this is normal.
- Fold the rectangle into thirds like a letter: fold the bottom third up over the middle third, then fold the top third down to cover it.
- You should now have a 5×10 inch (13×25 cm) package with three distinct layers.
- Wrap it in plastic wrap and refrigerate for 30 minutes.
+ Show details− Hide details
Ready when: Dough is folded into thirds and feels cold
Tip: To keep track of folds, make a small mark on the edge of the dough with your finger—this prevents rolling in the same direction twice, which weakens the lamination.
Second set of book folds
- Remove the dough from the fridge and unwrap it.
- Place it on a lightly floured surface with the open edges facing you (so the folded edges are on the left and right sides).
- Roll it out again to a 10×15 inch (25×38 cm) rectangle.
- Fold it into thirds the same way: bottom third up, top third down.
- Wrap it in plastic and refrigerate for 30 minutes.
+ Show details− Hide details
Ready when: Dough is folded into thirds and feels cold
Final rest (optional overnight)
- After the second set of folds, wrap the dough carefully in plastic wrap and place it in the refrigerator.
- Let it rest for at least 2 hours, or preferably overnight (up to 24 hours).
- This long rest allows the gluten to fully relax and the butter layers to set completely, making the pastries extra flaky.
+ Show details− Hide details
Ready when: Dough is chilled and feels firm
Tip: If making ahead, you can stop here and refrigerate overnight or even freeze for up to a month.
Roll out and cut pastries
- Remove the dough from the fridge and place it on a lightly floured work surface.
- Let it sit for 5 minutes if it is very stiff.
- Roll it out gently to about 0.2 inch (5 mm) thick and approximately 12×16 inches (30×40 cm).
- Using a sharp knife or pastry cutter, cut the dough into 12 squares of approximately 4×4 inches (10×10 cm) each.
- If using a knife, cut with a quick, downward motion rather than sawing—this prevents compressing the layers.
+ Show details− Hide details
Ready when: Dough is rolled thin and cut into 12 even squares
Tip: Use a very sharp knife and cut in one quick motion. Sawing will compress the layers and prevent them from puffing up properly during baking.
Fill and shape Danish pastries
- In a small bowl, stir together the black sesame paste, honey, and a pinch of salt (about 0.25 tsp) until smooth.
- Spread about 1.5 teaspoons (7 grams) of the filling in the center of each dough square.
- Fold each corner toward the center, overlapping them slightly to partially cover the filling—this creates the classic Danish shape.
- Press the corners lightly so they adhere to the filling.
- Arrange the shaped pastries on two parchment-lined baking sheets, spacing them about 2 inches (5 cm) apart.
+ Show details− Hide details
Ready when: All 12 pastries are shaped and arranged on baking sheets
Tip: Do not overfill the pastries or the filling may leak out during baking.
Final proof
- Cover the pastries loosely with plastic wrap or a damp kitchen towel.
- Let them proof at room temperature for 1 to 1.5 hours.
- They should puff up noticeably and feel light and airy when you gently poke them.
- The pastries will look visibly thicker and more delicate.
+ Show details− Hide details
Ready when: Pastries are visibly puffed and feel light when gently poked
Tip: If your kitchen is cold, place the baking sheets inside a turned-off oven or a large covered box to create a warm environment.
Egg wash and sesame toppingOven 375°F / 190°C
- About 15 minutes before baking, preheat the oven to 375°F (190°C).
- In a small bowl, whisk together the egg and water until smooth.
- Gently brush the egg wash over the top of each pastry, being careful to avoid brushing the exposed black sesame filling in the center (which can brown too quickly).
- Sprinkle sesame seeds generously over the top of each pastry.
- If using sanding sugar for extra sparkle, sprinkle a small amount over the seeds.
+ Show details− Hide details
Ready when: Egg wash is evenly applied and sesame seeds are in place
Tip: If egg wash is applied too early, it may dry out before baking; apply it just before putting the pastries in the oven.
Bake until goldenOven 375°F / 190°C
- Bake at 375°F (190°C) for 18–22 minutes until the pastries are deep golden brown on top.
- You should see visible flaky, crispy layers around the edges, and the pastries should feel firm to a light touch.
- Rotate the baking sheets halfway through baking (around the 10-minute mark) for even browning.
- If the sesame seeds are browning too quickly, tent the pastries loosely with aluminum foil.
+ Show details− Hide details
Ready when: Pastries are deep golden brown, with visible crispy edges and flaky layers
Tip: Do not open the oven frequently—each opening drops the temperature and can prevent proper puffing.
Cool completely
- Remove the pastries from the oven and transfer them to a wire rack using a spatula.
- Let them cool for at least 15–20 minutes before serving.
- As they cool, the pastries will firm up and the layers will set.
- They can be served warm or at room temperature.
+ Show details− Hide details
Ready when: Pastries are cooled to warm or room temperature
Tip: If serving later, store in an airtight container once cooled completely.
Good to know
Tips
- Temperature control is critical: Laminated doughs are very sensitive to temperature. If your kitchen is warm, work quickly and chill the dough and tools frequently. On hot days, place the work surface and rolling pin in the freezer for 15 minutes before laminating.
- Mark your folds: Before refrigerating between folds (Steps 6–7), make a small indentation on the edge of the dough with your finger to track which direction you should roll next. This prevents rolling in the same direction twice, which weakens the lamination.
- Black sesame paste quality matters: Buy black sesame paste from an Asian market or specialty store, not black sesame tahini, which has a different texture. If you cannot find it, white sesame paste (tahini) is an excellent substitution, though the flavor will be milder.
- The final rest is essential: The 2-hour (or overnight) rest after lamination is not optional—it allows the gluten to relax completely and the butter layers to solidify, resulting in a much flakier pastry. Rushing or skipping this step will give you dense pastries instead of the delicate, flaky ones you want.
Make ahead
The laminated dough can be prepared through Step 8 and refrigerated for up to 24 hours, or frozen for up to 1 month (thaw overnight in the fridge before rolling). Shaped pastries can be frozen before proofing; bake directly from frozen, adding 5–10 extra minutes to the baking time. Baked pastries can be frozen for up to 3 months; thaw at room temperature and reheat gently at 300°F (150°C) for 10 minutes.
Storage & reheating
Room temperature: Store in an airtight container for up to 2 days. They will soften slightly; refresh in a 300°F (150°C) oven for 5–7 minutes. Refrigerator: Keep in an airtight container for up to 4 days. Reheat at 300°F for 5–7 minutes before serving. Freezer: Wrap individually in plastic wrap or freezer paper, then place in a freezer bag for up to 3 months. Thaw at room temperature, then reheat at 300°F for 10 minutes.
Substitutions
- Black sesame paste → White or hulled sesame paste (tahini). Use the same amount, but reduce honey to 2 tbsp as white sesame paste is less rich. The flavor will be milder and more delicate.
- Honey → Agave nectar or maple syrup. Use equal amounts. Both have similar sweetness and moisture content.
- Instant yeast → Active dry yeast. Use the same weight (5g), but dissolve it in the warm milk for 5 minutes before mixing with the dough. The rise may take 15–20 minutes longer.
- Sesame seeds (white, black, or mixed) → Chopped pistachios, sliced almonds, or black poppy seeds. Use the same amount (0.33 cup / 50g). These will add different texture and flavor—pistachios add earthiness, almonds add crunch, poppy seeds stay similar in appearance.
More pastries
See all →




Find more like this
- Meal
- Breakfast
- Diet
- VegetarianHalal
- Method
- Oven
- Quick & Easy
- Make Ahead