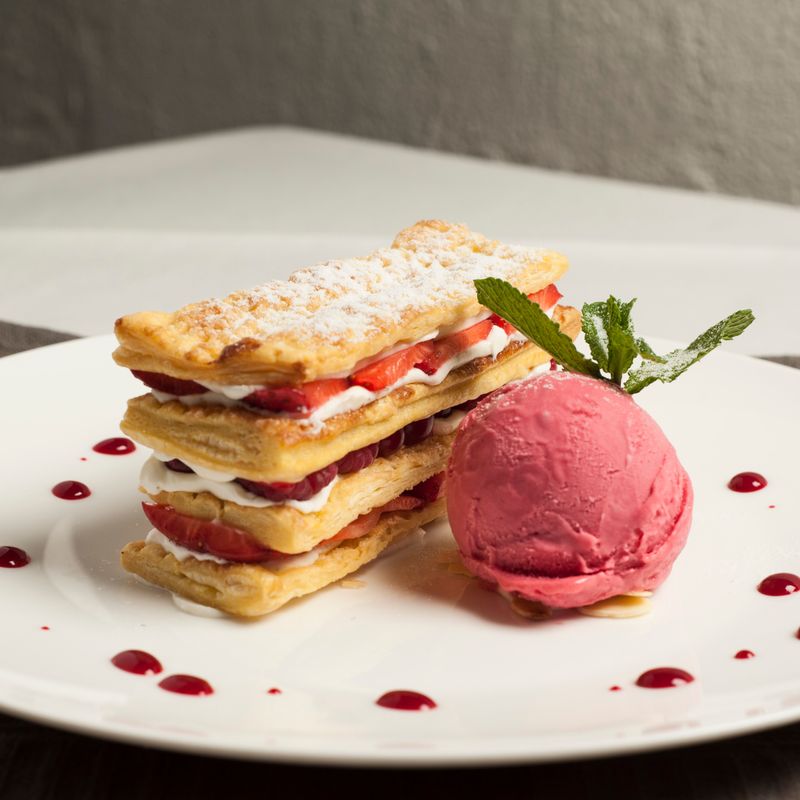
Mille-Feuille with Vanilla Pastry Cream
An elegant French pastry of alternating layers of crispy, puffed pastry and smooth vanilla pastry cream, topped with a snowy dusting of powdered sugar. This iconic dessert looks impressive but is surprisingly achievable at home when using store-bought puff pastry. The pastry cream requires attention to prevent scrambling, but once mastered, it's a foundation for many French desserts. Serve within a few hours of assembly for the best contrast between creamy filling and crispy pastry.
- Prep
- 50 min
- Cook
- 25 min
- Wait
- 2 hr 20 min
- Total
- 3 hr 35 min
- Makes
- 1 mille-feuille (6–8 slices)
Steps
Before you start
- If using frozen puff pastry, allow it to thaw at room temperature for 15 minutes before cutting
- Have an instant-read thermometer ready to ensure the pastry cream reaches 170°F (77°C) for food safety
- Plan to assemble the mille-feuille no more than 1–2 hours before serving, or the pastry will absorb moisture and lose its crispness
- You can overlap steps: while the pastry cream chills (the longest passive step), prep and bake the puff pastry
Heat milk for creamOven 180°F / 80°C
- Pour 2 cups (480 ml) whole milk into a medium saucepan.
- Heat over medium heat, stirring occasionally, for about 5 minutes until steaming and a thermometer reads 180°F (82°C).
- Do not boil the milk, as this can affect the flavor of the pastry cream.
+ Show details− Hide details
Ready when: Milk is steaming, reaches 180°F (82°C)
Tip: Don't let the milk boil or you'll scald it, which will make the cream taste slightly burnt
Whisk yolks with sugar
- In a separate medium bowl, whisk 6 large egg yolks with 1/2 cup (100g) granulated sugar for about 2 minutes until the mixture is pale, thick, and forms a ribbon when you lift the whisk.
- This aerates the eggs and ensures the sugar dissolves.
+ Show details− Hide details
Ready when: Mixture is pale, thick, and forms a ribbon
Tip: Don't skip this step—properly whisked yolks result in a smooth, creamy pastry cream
Add flour to yolks
- Add 3 tablespoons (24g) all-purpose flour to the egg mixture and whisk until completely smooth with no lumps visible, about 1 minute.
+ Show details− Hide details
Ready when: No lumps visible, mixture is smooth
Temper eggs with hot milk
- Slowly pour the hot milk into the egg and flour mixture while whisking constantly.
- This gradual heating prevents the eggs from scrambling.
- Once the mixtures are combined, pour the entire mixture back into the saucepan.
+ Show details− Hide details
Ready when: Smooth and fully combined
Tip: Pour slowly and whisk constantly—this step is crucial to avoiding scrambled eggs
Cook cream to thicknessOven 170°F / 75°C
- Place the saucepan over medium heat and cook, stirring constantly with a whisk (especially the corners and edges), for 4–6 minutes until the mixture is thick enough to coat the back of a spoon and registers 170°F (77°C) on an instant-read thermometer.
- The cream will go from loose to noticeably thicker.
+ Show details− Hide details
Ready when: Reaches 170°F (77°C) and coats the back of a spoon
Tip: Keep stirring constantly—the bottom burns easily if left unattended, which ruins the whole batch
Add butter and vanilla
- Remove from heat.
- Stir in 3 tablespoons (43g) cold butter (cut into small pieces), 2 teaspoons (10 ml) vanilla extract, and 0.125 teaspoon (0.6g) fine sea salt.
- Stir until the butter is fully melted and the mixture is completely smooth.
+ Show details− Hide details
Ready when: Butter is fully melted and mixture is smooth
Strain and chill cream
- Pour the pastry cream through a fine sieve into a bowl to remove any small lumps.
- Press plastic wrap directly on the surface of the cream (not on the bowl) to prevent a skin from forming.
- Refrigerate for at least 2 hours, or place in the freezer for 45 minutes until well chilled and firm.
+ Show details− Hide details
Ready when: Cream is cold, thick, and holds its shape
Tip: The plastic wrap touching the surface is essential—it prevents an unappetizing skin from forming on top of the cream
Preheat oven and gather suppliesOven 400°F / 205°C
- Preheat your oven to 400°F (200°C) and position racks in the upper and lower third.
- Line 2 large baking sheets with parchment paper.
+ Show details− Hide details
Ready when: Oven reaches 400°F (204°C)
Cut puff pastry to size
- If your puff pastry sheets were frozen, thaw at room temperature for 15 minutes.
- Unfold or lay out the 2 puff pastry sheets (about 1 pound / 450g total).
- Using a sharp knife, cut them into 3 rectangles of approximately 3×10 inches (or the largest rectangle that fits on your baking sheets, leaving 1 inch from the edges).
- Aim for uniform thickness and size.
+ Show details− Hide details
Ready when: Pastry is cut into 3 even rectangles
Tip: Keep pastry cold while cutting; if it becomes warm and sticky, refrigerate for a few minutes before proceeding
Prick and bake pastryOven 400°F / 205°C
- Place the 3 pastry rectangles on the prepared baking sheets.
- Using a fork, prick the entire surface of each pastry sheet all over to prevent excessive puffing into a balloon (you want some puff, but not too much).
- Bake for 20–25 minutes at 400°F (200°C) until deep golden brown and crispy throughout.
+ Show details− Hide details
Ready when: Deep golden brown, crispy throughout, and smells buttery
Tip: Pricking the pastry helps keep it flatter and easier to layer, while still giving it some desirable puff
Cool baked pastry
- Remove the baking sheets from the oven.
- Let the pastry cool on the baking sheets for 10 minutes, then transfer to a wire cooling rack to cool completely, about 20 minutes total.
- The pastry should be completely cool and crispy before assembly.
+ Show details− Hide details
Ready when: Pastry is cool to the touch and completely crispy
Layer pastry and cream
- Place one cooled pastry rectangle on a clean cutting board or serving plate.
- Using an offset spatula or table knife, spread about half of the chilled pastry cream evenly over it in a layer about 1/4 inch thick.
- Place the second pastry rectangle gently on top, pressing very lightly to secure.
- Spread the remaining pastry cream evenly over this second layer in an even 1/4-inch layer.
- Top with the third pastry rectangle, pressing gently to anchor it.
+ Show details− Hide details
Ready when: All three layers are stacked with cream evenly distributed between them
Tip: Work quickly so the pastry doesn't absorb moisture from the cream and become soft. If your workspace is warm, refrigerate the assembled mille-feuille for 30 minutes before serving to re-crisp the pastry
Dust with powdered sugar
- Sift 1/2 cup (60g) powdered sugar evenly over the top pastry layer using a fine sieve or sifter.
- Aim for an even, generous coating.
+ Show details− Hide details
Ready when: Even coating of powdered sugar across the top
Slice and serve
- Using a sharp serrated knife or a hot knife (dipped in hot water and dried), carefully slice the mille-feuille into 6–8 equal pieces.
- Wipe the blade clean with a damp towel between cuts to prevent pastry crumbs from dragging across the cream and marring the appearance.
- Serve immediately or within 1–2 hours for the best contrast between crispy pastry and smooth cream.
+ Show details− Hide details
Ready when: Mille-feuille is sliced into clean, even portions
Tip: A serrated knife or a knife that's been dipped in hot water works best—both prevent the delicate pastry from shattering
Good to know
Tips
- Keep the pastry cream smooth by stirring constantly while cooking over medium heat. The bottom of the pan is where lumps form first; pay special attention to the edges and don't leave it unattended for even a moment.
- Chill the pastry cream thoroughly so it's stiff enough to support the pastry layers without oozing out. If it seems too soft, refrigerate for another 30 minutes before assembly.
- Do not assemble more than 1–2 hours before serving. The crispy pastry is the star of this dessert and softens quickly in contact with moist cream. For best results, assemble no more than 1 hour before eating.
- A serrated or very sharp knife is essential for slicing without shattering the pastry. Run a serrated knife under hot water, dry it quickly, and cut decisively with a gentle sawing motion. Clean the blade between each cut for pristine, elegant slices.
Make ahead
The pastry cream can be made up to 1 day ahead and stored covered in the refrigerator. The baked pastry sheets can be made up to 1 day ahead and stored in an airtight container at room temperature. Assemble the mille-feuille no more than 1–2 hours before serving for optimal pastry crispness.
Storage & reheating
Room temperature (once assembled): Best served within 1–2 hours; after this, the pastry absorbs moisture and softens. Refrigerator: Store leftover mille-feuille in an airtight container for up to 1 day, though pastry texture will soften. Freezer: Unbaked puff pastry sheets freeze for up to 3 months. Baked (unfilled) pastry sheets freeze in an airtight container for up to 2 weeks; thaw at room temperature and re-crisp in a 300°F oven for 5 minutes before assembly.
Substitutions
- vanilla extract → 1/4 teaspoon vanilla powder or seeds from 1/2 vanilla bean. Vanilla powder or fresh vanilla bean provides a more intense flavor and slight visual specks in the cream. Use the same amount by volume or add bean seeds directly to the hot milk.
- puff pastry sheets → Homemade puff pastry made from scratch. For advanced bakers, homemade puff pastry delivers superior flavor and texture but requires several hours and careful lamination. This substitution increases the difficulty to Hard.
- whole milk → Store-bought pastry cream (about 1.5 pounds / 680g total) in place of homemade. High-quality store-bought pastry cream is a reasonable shortcut. Skip Steps 1–7 and proceed directly to assembly.
- powdered sugar → Unsweetened cocoa powder, or a combination of both. Cocoa powder provides elegant dark contrast and subtle chocolate flavor. For a more dramatic finish, spread a thin layer of white fondant icing over the pastry before dusting with cocoa or drizzling with melted chocolate.
More pastries
See all →


Find more like this
- Meal
- Dessert
- Cuisine
- French
- Main ingredient
- Eggs
- Diet
- VegetarianHalal
- Quick & Easy
- Make Ahead