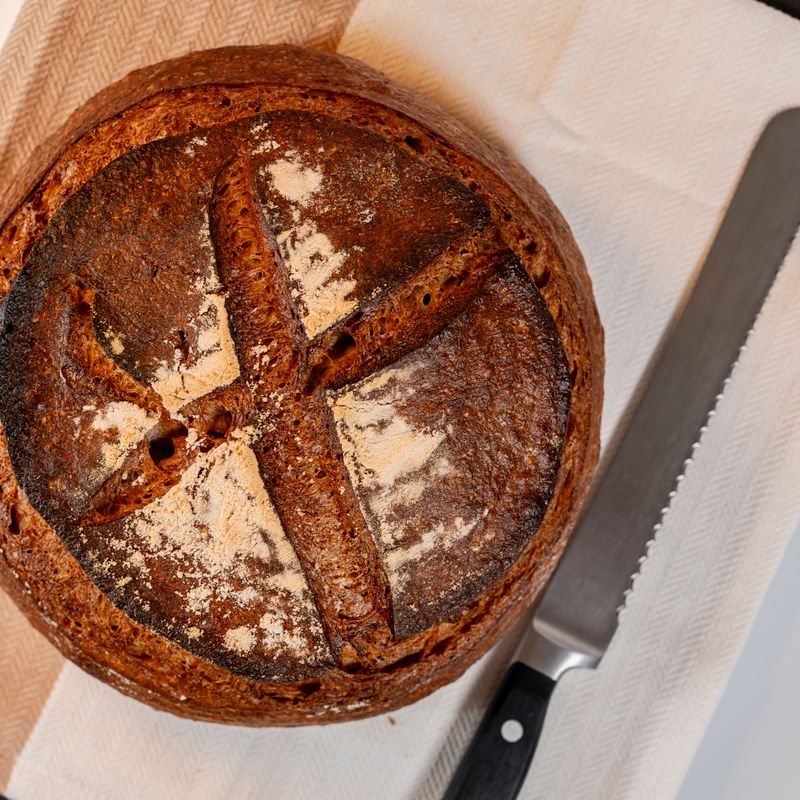
Sourdough Kamut Spelt Blend Loaf
A rustic, flavorful sourdough made with a blend of nutty Kamut (Khorasan wheat) and delicate spelt flour. The sourdough starter provides complex sourness and tang while the ancient grains add depth, subtle sweetness, and a tender, open crumb. This recipe employs a 30-minute autolyse, stretch-and-fold bulk fermentation, and a long overnight cold proof for maximum flavor development. The result is a beautiful, rustic loaf with a dark, crispy crust and beautiful oven spring.
- Prep
- 20 min
- Cook
- 45 min
- Wait
- 20 hr
- Total
- 21 hr 5 min
- Makes
- 1 loaf (8–10 slices)
Steps
Before you start
- Feed your sourdough starter 4–6 hours before mixing so it is actively bubbly and nearly doubled in volume
- Ensure your kitchen is between 68–72°F (20–22°C) for predictable fermentation timing
- Have a banneton or proofing bowl lined with a well-floured cloth ready before bulk fermentation begins
- Preheat your Dutch oven as instructed in the baking step
Autolyse the flours
- Combine the Kamut flour and spelt flour with 250 ml (8.5 oz) of room-temperature water in a large bowl.
- Stir vigorously with a dough whisk or wet hand until all dry flour is fully hydrated and no lumps remain.
- Cover the bowl with a towel or plastic wrap and let rest undisturbed for 30 minutes at room temperature.
- This autolyse period allows the ancient grains to fully absorb water and begin developing gluten structure, resulting in a stronger dough and better extensibility.
+ Show details− Hide details
Ready when: All flour is fully hydrated with no dry, white bits visible
Tip: Autolyse is optional but highly recommended for Kamut and spelt, as these ancient grains develop gluten more slowly than all-purpose flour and benefit greatly from this rest
Mix in starter and salt
- Pour the remaining 100 ml (3.4 oz) of room-temperature water and the 100 g of active sourdough starter onto the autolysed dough.
- Using a wet hand or dough whisk, pinch and squeeze the ingredients together, working from the sides of the bowl toward the center until the starter is fully distributed throughout the dough with no visible streaks (2–3 minutes).
- Sprinkle the 10 g of fine sea salt evenly over the top of the dough.
- Continue mixing with a wet hand using pinching and folding motions, working the salt throughout the dough until it is completely dissolved and no white specks are visible (about 1–2 minutes).
- The finished dough should feel slightly sticky and cohesive but not sloppy.
+ Show details− Hide details
Ready when: Starter is evenly distributed with no visible streaks; salt is fully dissolved
Tip: Avoid aggressive mixing at this stage; gentle folding preserves the delicate structure you've begun to develop during autolyse
Bulk ferment with stretch and folds
- Let the mixed dough rest for 15 minutes in the covered bowl.
- Then perform 4 sets of stretch and folds over the next 2 hours, spacing each set 30 minutes apart.
- For each set: wet your hand, grasp one side of the dough at the bowl's edge, gently pull it upward and fold it over the center of the mass, then rotate the bowl 90° and repeat from all four cardinal directions (total time per set: 2–3 minutes).
- After the fourth and final stretch and fold, cover the bowl and let the dough ferment undisturbed for another 2–2.5 hours until it shows 30–50% volume increase and jiggles gently when you lightly shake the bowl.
- The dough should smell pleasantly sour and display visible bubbles on the surface.
+ Show details− Hide details
Ready when: 30–50% volume increase; dough jiggles when bowl is gently shaken; visible bubbles; pleasant sour aroma
Tip: Ancient grains (Kamut and spelt) can over-ferment more quickly than all-purpose flour; rely on visual and tactile cues—the jiggle test and bubble visibility—rather than time alone, as fermentation speed varies with room temperature
Preshape and rest
- Lightly dust your work surface with flour.
- Turn the fermented dough out onto the surface (use minimal flour; the slight stickiness helps with handling and prevents tearing).
- Using a bench scraper, gently shape the dough into a loose round by repeatedly pulling the edges toward the center, working your way around the mass.
- You are not aiming for a tight, final shape at this stage—just a rough round that collects the dough.
- Let this preshape rest on the counter for 20 minutes, uncovered or lightly covered with a towel.
- This rest allows the gluten to relax slightly, making the final shaping much easier and preventing excessive degassing.
+ Show details− Hide details
Ready when: Dough has visibly relaxed and is less taut than immediately after preshaping
Tip: Handle gently during and after preshaping to preserve the air bubbles and open crumb you've worked to develop during fermentation
Final shape and cold proof
- Flip the preshape over so the smoother, top side is facing down on the work surface.
- Using both hands, pull the far edge of the dough toward you and fold it firmly into the center, then press down gently to seal.
- Rotate the dough 90° and repeat, working your way around the entire mass until you've created a taut round with all seams sealed underneath.
- Roll the shaped dough gently on the counter under your palms, applying light downward pressure, to build additional surface tension.
- Carefully place the loaf seam-side up into a well-floured banneton (proofing basket) or into a bowl lined with a heavily floured cloth.
- Cover loosely with a plastic bag or wrap to prevent the surface from drying out.
- Place in the refrigerator for 12–16 hours (overnight and into the next morning).
- During this long, cold fermentation, the dough continues to develop flavor slowly while the cold temperature stiffens the dough, making it much easier to score cleanly.
+ Show details− Hide details
Ready when: Dough is cold to the touch; a gentle finger poke springs back very slowly
Tip: If your refrigerator is very cold (below 2°C / 35°F), 14–16 hours is ideal; if it runs closer to 4°C (39°F), start checking the dough at 12 hours by performing the poke test
Preheat and scoreOven 500°F / 260°C
- About 45 minutes before baking, place your Dutch oven (or covered baker) inside the oven and preheat to 500°F (260°C).
- The pot must be fully preheated and very hot.
- Remove the cold loaf from the refrigerator and carefully invert it onto a piece of parchment paper so the seam-side is now down and the smoother, rounded top faces upward.
- Using a very sharp bread lame, knife, or clean razor blade held at a 30–45° angle to the surface, score the loaf with a single, confident diagonal slash about ½ inch (1.3 cm) deep.
- A swift, unhesitating motion produces the cleanest cut and the most dramatic oven spring.
+ Show details− Hide details
Ready when: Dutch oven is very hot (use caution); oven has reached 500°F (260°C)
Tip: Score immediately before placing the loaf in the oven; a cold loaf holds its shape better than room-temperature dough, and the cold dough's score will open more dramatically once exposed to oven heat
Bake covered with steamOven 500°F / 260°C
- Carefully transfer the scored loaf (still on parchment paper) into the preheated Dutch oven.
- Cover immediately with the lid (it is fine if parchment edges extend outside the pot).
- Bake at 500°F (260°C) for exactly 20 minutes.
- The covered pot traps steam around the loaf, which creates an attractive, dark, crispy crust and allows the loaf to rise dramatically (oven spring) without the crust setting.
- Do not open the oven or remove the lid during this phase; breaking the steam seal will deflate the loaf and compromise the rise.
+ Show details− Hide details
Ready when: 20 minutes have elapsed; loaf is visibly expanded
Tip: Resist the urge to peek; the steam environment is critical to achieving an impressive crust and maximum oven spring
Finish baking and coolOven 450°F / 230°C
- Carefully remove the Dutch oven lid (watch for escaping steam) and reduce the oven temperature to 450°F (232°C).
- Continue baking uncovered for 22–28 minutes until the loaf is deep golden brown on all sides, including the scored area.
- A pale crust indicates more time is needed.
- If you have an instant-read thermometer, insert it into the thickest part of the loaf; the internal temperature should reach 205–210°F (96–99°C) when finished.
- Transfer the loaf from the Dutch oven to a cooling rack using tongs (discard or compost the parchment paper).
- Allow the loaf to cool completely at room temperature for at least 1 hour before slicing.
- During cooling, the interior continues to cook and the crumb sets; slicing too early results in a gummy, unpleasant texture.
+ Show details− Hide details
Ready when: Deep golden-brown to dark mahogany crust on all sides; hollow sound when tapped on the bottom; internal temperature 205–210°F (96–99°C); loaf is cool to the touch
Tip: Cool the loaf on a rack, not on a countertop, so air circulates underneath and the crust remains crispy rather than steaming and softening
Good to know
Tips
- Sourdough starter vigor is crucial: use a starter that is visibly bubbly, smells pleasantly sour and yeasty, and has nearly doubled in volume within 4–6 hours of feeding. A weak or young starter will slow fermentation and result in a flat, dense loaf.
- Temperature control determines fermentation speed: if your kitchen is cool (below 65°F / 18°C), extend bulk fermentation by 30–60 minutes; if very warm (above 75°F / 24°C), reduce bulk fermentation by 30 minutes and watch closely for over-fermentation.
- Ancient grains absorb water more slowly than all-purpose flour and are more prone to over-fermentation; always rely on the visual jiggle, bubble size, and aroma cues rather than strict timing, as fermentation speed varies significantly with room temperature and starter strength.
- The 30-minute autolyse is not optional for this recipe: Kamut and spelt flour benefit significantly from this dedicated hydration and rest period, which allows them to fully develop gluten structure without the stress of mixing with salt and starter simultaneously.
Make ahead
The shaped dough can be wrapped tightly, refrigerated, and baked up to 18 hours later. Longer cold fermentation (16–18 hours) will produce a more sour, complex loaf. You can also freeze the shaped, unbaked loaf for up to 2 weeks; bake directly from frozen, adding 5–10 minutes to the initial covered baking time.
Storage & reheating
Room temperature: Store in a paper bag with the cut side down on the counter for up to 3 days. Leave loosely covered to allow the crust to stay crispy; do not store in a sealed plastic bag or the crust will soften. Refrigerator: Wrap tightly in plastic wrap or a bag and refrigerate for up to 5 days. To refresh, wrap in foil and warm at 325°F (163°C) for 12–15 minutes. Freezer: Wrap in plastic wrap and then foil, and freeze for up to 1 month. Thaw at room temperature for 2–3 hours, then reheat as described for refrigerated loaf.
Substitutions
- Kamut flour → All-purpose bread flour or all-purpose flour. Reduces the nutty, ancient-grain flavor and the subtle sweetness but produces a more neutral, traditional sourdough. Use equal weight. Bulk fermentation and cold proof may be 30 minutes shorter, as all-purpose flour ferments faster than Kamut.
- Spelt flour → Rye flour or whole-wheat flour. Rye adds deeper earthiness and a more sour tang; whole-wheat adds nuttiness. Begin with half the amount (2.2 oz / 60 g) to avoid drying out the crumb, and add 10–15 ml extra water if the dough feels stiff.
- Active sourdough starter → Instant active dry yeast (7 g / 2.25 tsp). If you do not maintain a sourdough culture, instant yeast will work, though you'll lose the complex sour flavor. Reduce bulk fermentation to 3–4 hours and overnight proof to 8–10 hours. The resulting loaf will be milder and less complex.
- Water → 325 ml (11 oz) water when using yeast instead of sourdough starter. Reduce water slightly to compensate for yeast's different fermentation behavior. Adjust by feel; the dough should feel slightly tacky but not soupy.
More yeast breads
See all →

Find more like this
- Meal
- Breakfast
- Cuisine
- Italian
- Method
- Oven
- Quick & Easy
- 5 Ingredients or LessMake Ahead