
Rosemary Garlic Focaccia
A tall, airy focaccia with a crisp, golden olive-oil crust, a chewy open crumb, and fragrant rosemary and garlic baked into deep dimples. The dough is wet and gentle to handle, relying on simple folds instead of kneading.
- Prep
- 32 min
- Cook
- 24 min
- Wait
- 2 hr 55 min
- Total
- 3 hr 51 min
- Makes
- 1 focaccia (12 squares), baked in a 9×13-inch pan
Steps
Before you start
- Plan on about 4 hours start to finish; most of it is hands-off resting between short folds.
- Weigh the flour and water with a kitchen scale if you can. The dough is high-hydration (80%) and cup measures can make it too dry or too sticky.
- Use water that feels just warm on your wrist (about 100°F / 38°C). Hot water can damage the yeast.
- Strip the rosemary leaves from the stems and peel the garlic before you begin so the topping is quick to assemble later.
Mix the shaggy dough
- In a large bowl, stir the lukewarm water, honey, and instant yeast together with a spatula.
- Add the bread flour, fine sea salt, and 2 tablespoons (30 ml) olive oil.
- Mix, scraping the sides of the bowl, for about 2 minutes until no dry flour remains and you have a sticky, shaggy dough.
- Wet your hand and squeeze and fold the dough in the bowl a few times to finish.
- Cover the bowl and let it rest for 30 minutes.
+ Show details− Hide details
Ready when: No dry flour streaks remain; dough looks sticky, rough, and slightly puffy after resting
Tip: Do not add extra flour. The dough is meant to be very wet; wet hands prevent sticking.
First stretch and fold
- With a wet hand, grab one edge of the dough, stretch it up until it resists, and fold it over to the center.
- Turn the bowl a quarter turn and repeat 3 more times (4 folds total).
- Re-cover and rest for 30 minutes.
+ Show details− Hide details
Ready when: Dough feels smoother and tighter, and holds a rounder shape after the fold
Second stretch and fold
- Repeat the same 4 stretch-and-folds with a wet hand.
- Cover and rest for another 30 minutes.
- You should start to see bubbles on the surface and along the sides of the bowl.
+ Show details− Hide details
Ready when: Dough is noticeably puffier and bubbles are visible
Third fold and rise
- Do a final set of 4 stretch-and-folds, then cover and let the dough rise for 30 minutes more.
- By the end it should have grown by about 1½ times, look bubbly, and jiggle when you shake the bowl.
+ Show details− Hide details
Ready when: Dough is domed, airy, and jiggly with bubbles at the edges
Tip: If your kitchen is cool (under 68°F / 20°C), allow an extra 15–30 minutes until the dough looks puffy.
Oil pan and proof
- Pour 3 tablespoons (45 ml) olive oil into a 9×13-inch (23×33 cm) pan and tilt to coat the bottom and sides.
- Use a wet spatula to ease the dough out of the bowl into the pan, turning it once to coat both sides in oil.
- Gently nudge it toward the corners without tearing it; if it springs back, stop and let it rest 10 minutes, then try again.
- Cover loosely and let it proof for 40 minutes, until puffy and filling the pan to the corners.
+ Show details− Hide details
Ready when: Dough reaches all four corners, is bubbly, and a fingertip press leaves a slow-filling dent
Tip: Use plenty of oil. It fries the bottom crust and gives focaccia its crisp edges.
Preheat and flavor the oilOven 450°F / 230°C
- About 20 minutes before the proof ends, place a rack in the lower third of the oven and preheat to 450°F (230°C).
- In a small bowl, stir the minced garlic and chopped rosemary into 2 tablespoons (30 ml) olive oil and let it sit while the oven heats.
+ Show details− Hide details
Ready when: Oven reaches 450°F (230°C) and the oil smells strongly of rosemary and garlic
Tip: Mixing the garlic into oil protects it from scorching in the hot oven.
Dimple and top
- Oil your fingertips and press straight down into the dough, all the way to the bottom of the pan, making deep dimples about 1 inch (2.5 cm) apart across the surface.
- Spoon the garlic-rosemary oil over the top, letting it pool in the dimples and pushing the garlic and rosemary down into the holes so they are covered with oil.
- Sprinkle evenly with the flaky sea salt.
+ Show details− Hide details
Ready when: Surface is covered in deep dimples holding small pools of oil
Tip: Be firm when dimpling. Shallow dimples puff back out and you lose the classic texture.
Bake until goldenOven 450°F / 230°C
- Bake in the lower third of the 450°F (230°C) oven for 22 to 25 minutes.
- The top should be deep golden brown with darker spots on the peaks, and the edges should sizzle and look crisp.
- Rotate the pan front to back after 15 minutes if your oven browns unevenly.
+ Show details− Hide details
Ready when: Deep golden top, crisp edges, and an internal temperature of 205–210°F (96–99°C); bottom is golden when lifted
Tip: If the garlic or rosemary darkens too quickly, tent the pan loosely with foil for the last 5–8 minutes.
Cool and serve
- Immediately run a knife around the edge, then slide the focaccia out of the pan onto a wire rack so the bottom stays crisp.
- Let it cool for at least 15 minutes, then cut into 12 squares with a serrated knife and serve warm or at room temperature.
+ Show details− Hide details
Ready when: Bottom feels crisp when tapped and the loaf is warm, not hot, to the touch
Tip: Leaving it in the pan traps steam and softens the bottom crust.
Good to know
Tips
- Wet hands, not flour, are the key to handling a sticky, high-hydration dough.
- Judge the dough by look and feel rather than time alone: it should be bubbly, airy, and jiggly before it goes into the oven.
- Press the dimples all the way down to the pan; pooled oil in them gives a crisp, flavorful, confit-like finish.
- Slide the loaf out of the pan to cool on a rack so the underside stays crisp.
Make ahead
"For deeper flavor, after the third fold place the covered dough in the fridge for 8 to 24 hours. Then transfer to the oiled pan, let it sit at room temperature for 1½ to 2 hours until puffy, and continue with the topping and baking steps."
Storage & reheating
"Room temperature: wrap or cover loosely and keep up to 2 days. Fridge: not recommended as it dries the crumb, but fine up to 4 days in an airtight container. Freezer: wrap squares tightly and freeze up to 2 months. Reheat from room temperature or frozen in a 350°F (175°C) oven for 8–12 minutes (about 5–8 minutes if fresh) until crisp and warmed through."
Substitutions
- bread flour → all-purpose flour. Works, but the crumb will be a little less chewy; reduce water to 375 ml (1½ cups plus 1 tbsp) as AP flour absorbs less.
- instant yeast → active dry yeast. Use the same amount (1¼ tsp / 4 g), dissolve it in the warm water with the honey, and let it sit 5–10 minutes until foamy before adding flour.
- fresh rosemary leaves → fresh thyme leaves or 2 tsp dried rosemary. Dried herbs are more concentrated, so use less; crumble them into the oil.
- honey → granulated sugar. Use 1 tsp (4 g); it just helps feed the yeast and browning.
More yeast breads
See all →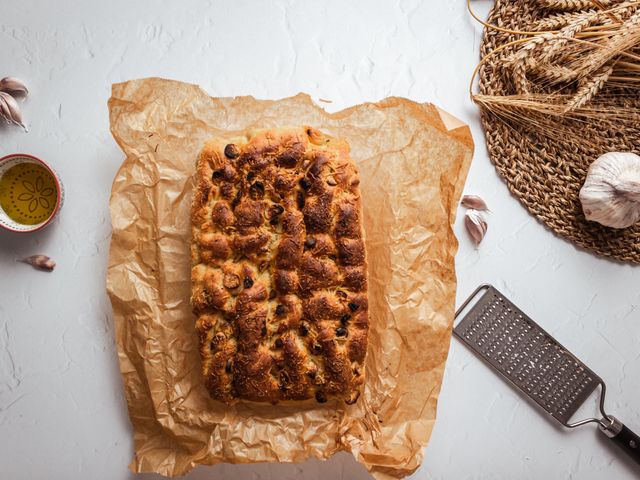
Find more like this
- Meal
- Dinner
- Cuisine
- Italian
- Method
- Oven
- Quick & Easy
- EasyMake Ahead