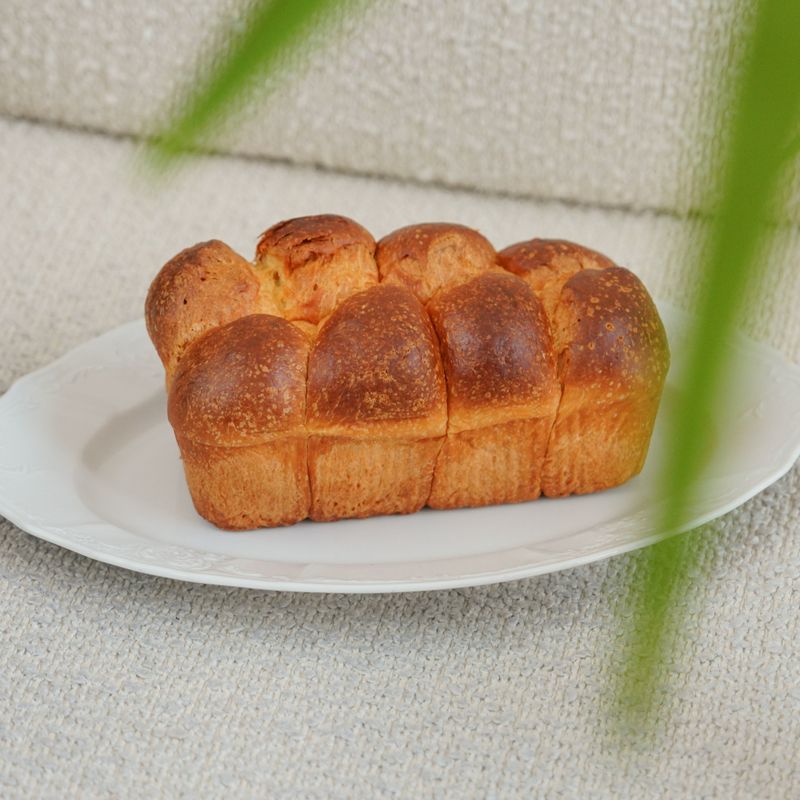
Classic French Brioche Loaf
A rich, tender, golden brioche loaf made with bread flour, eggs, milk and plenty of butter. The dough rests overnight in the fridge, which gives deep flavor and makes the sticky dough easy to shape. Eight little dough balls bake into a pull-apart top with a shiny, mahogany crust and a feathery crumb.
- Prep
- 50 min
- Cook
- 38 min
- Wait
- 11 hr 40 min
- Total
- 13 hr 8 min
- Makes
- 1 loaf (10 slices)
Steps
Before you start
- Plan ahead: the dough needs a 1-hour rise, then an 8–12 hour chill (overnight), then about 90 minutes of proofing in the pan before baking.
- Take the butter out of the fridge about 30 minutes before you start. It should be cool but pliable (around 65°F / 18°C): it should bend without cracking or looking greasy.
- Use cold eggs and cold milk straight from the fridge. The dough warms up a lot during long mixing, and cold ingredients keep it manageable.
- This recipe is written for a stand mixer with a dough hook. The dough is very sticky and soft, so kneading by hand is not recommended.
- Weigh the ingredients with a kitchen scale if you can. Brioche is sensitive to the flour-to-egg ratio.
Mix the dough
- In the bowl of a stand mixer fitted with the dough hook, combine the bread flour, sugar, salt and yeast.
- Add the beaten eggs and cold milk.
- Mix on low speed (speed 1–2) for about 3 minutes, stopping to scrape down the bowl once, until no dry flour remains and the dough looks shaggy.
+ Show details− Hide details
Ready when: No dry flour is left in the bowl and the dough forms a rough, sticky mass.
Tip: Keep the salt and yeast on opposite sides of the flour when you add them so they do not touch directly.
Develop the gluten
- Increase the speed to medium-low (speed 3–4) and knead for 8–10 minutes.
- Stop and scrape the bowl and hook every 3 minutes.
- The dough will start very sticky, then gradually come together.
+ Show details− Hide details
Ready when: The dough is smooth, elastic and slaps the sides of the bowl, pulling away from the sides although it still sticks a little at the bottom.
Tip: Do not add extra flour. Brioche is supposed to be soft and sticky at this stage.
Beat in the butter
- With the mixer on medium-low, add the cubed butter 2–3 cubes at a time, waiting until each addition is mostly absorbed before adding more.
- This takes about 6 minutes.
- Once all the butter is in, scrape down the bowl and continue mixing on medium for 4–6 minutes.
- The dough will look slick and torn at first, then come back together.
+ Show details− Hide details
Ready when: The dough is glossy, smooth and pulls cleanly from the sides of the bowl. A small piece stretches into a thin, translucent windowpane without tearing immediately. It should feel cool to warm, no hotter than about 78°F (26°C).
Tip: If the dough feels warm or greasy and soupy, stop the mixer and refrigerate the whole bowl for 15 minutes, then continue.
First rise
- Scrape the dough into a large, lightly buttered or oiled bowl (about 4 quarts / 4 L).
- Cover tightly with plastic wrap.
- Let it rise at room temperature (70–75°F / 21–24°C) for 1 hour.
+ Show details− Hide details
Ready when: The dough looks puffy and has grown by about half (it will not quite double).
Tip: Do not let it rise longer than 90 minutes. A dough that is too warm is harder to chill and shape.
Chill overnight
- Gently press down on the dough with your fingertips to deflate it, then fold the edges into the center, turn it over and re-cover the bowl tightly.
- Refrigerate for 8–12 hours (4 hours at the very least).
+ Show details− Hide details
Ready when: The dough is firm, cold and noticeably puffier, and it feels like soft modeling clay.
Tip: Cover the bowl tightly. A dry skin on the dough will leave streaks in the finished loaf.
Shape the loaf
- Grease the inside of a 9×5-inch (23×13 cm) loaf pan generously with the 1 tablespoon softened butter.
- Turn the cold dough onto a very lightly floured surface.
- Weigh it and divide into 8 equal pieces (about 120 g each) with a bench scraper.
- Working one at a time, flatten a piece slightly, fold the edges into the center, then roll it under your cupped palm to make a smooth, tight ball.
- Place the balls in the pan in 2 rows of 4, seam-side down, touching lightly.
+ Show details− Hide details
Ready when: All 8 balls are smooth and taut on top and fill the bottom of the pan in two neat rows.
Tip: Work quickly while the dough is cold. If it softens and becomes sticky, put it back in the fridge for 10 minutes.
Final proof
- Cover the pan loosely with greased plastic wrap or a clean towel.
- Let the dough proof at room temperature (72–75°F / 22–24°C) for 90 minutes to 2 hours.
- About 20 minutes before the end, place a rack in the lower third of the oven and preheat to 350°F (175°C).
+ Show details− Hide details
Ready when: The dough has swollen into one mass and domed about 1 inch (2.5 cm) above the rim of the pan. When you poke it gently, the dent springs back slowly.
Tip: Under-proofed brioche bakes up dense. If your kitchen is cool, it may take up to 2½ hours, so judge by the dough, not the clock.
Brush with egg washOven 350°F / 175°C
- Whisk the egg with the 1 tablespoon milk in a small bowl until completely smooth.
- Using a pastry brush, brush the entire top of the loaf with a thin, even coat of wash, taking care not to let it pool in the creases or drip down the sides of the pan.
+ Show details− Hide details
Ready when: The surface is evenly glossy with no puddles in the creases.
Tip: Egg that pools between the dough balls and the pan can glue the loaf in place, so brush lightly.
Bake the briocheOven 350°F / 175°C
- Bake at 350°F (175°C) for 35–40 minutes.
- After about 20 minutes, when the top is deep golden, tent the loaf loosely with aluminum foil to prevent over-browning.
- Continue baking until done.
+ Show details− Hide details
Ready when: The crust is a deep golden-brown, the loaf sounds hollow when you tap the bottom, and an instant-read thermometer in the center reads 190°F (88°C).
Tip: Do not open the oven in the first 15 minutes, as the loaf may collapse.
Cool the loaf
- Let the loaf rest in the pan on a wire rack for 10 minutes.
- Run a thin knife around the edges, turn the loaf out onto the rack, and stand it upright.
- Cool for at least 1 hour before slicing.
+ Show details− Hide details
Ready when: The loaf feels barely warm or at room temperature on the bottom.
Tip: Slicing while hot squashes the crumb. Use a serrated knife and a gentle sawing motion.
Good to know
Tips
- Be patient with the mixer. The dough looks like a mess when the butter goes in but it does come together; stopping early gives a heavy loaf.
- A dough thermometer helps. If the dough goes above 78°F (26°C), chill it briefly before continuing so the butter does not melt out.
- For a sparkly crust, sprinkle the egg-washed top with pearl sugar before baking.
- For even slices, use a serrated knife and cut the loaf the next day if you can wait.
Make ahead
"The dough can be kept in the fridge after its first rise for up to 24 hours before shaping. Alternatively, wrap the shaped, unproofed loaf (in the pan) tightly and freeze for up to 1 month. Thaw overnight in the fridge, then proof at room temperature until domed, about 2–3 hours, before baking."
Storage & reheating
Room temperature: wrap well or keep in an airtight bag for up to 3 days. Fridge: not recommended, as it dries the crumb out faster. Freezer: slice, wrap tightly and freeze for up to 2 months. Toast slices straight from frozen, or warm a whole loaf wrapped in foil at 300°F (150°C) for 10–15 minutes to refresh it.
Substitutions
- bread flour → all-purpose flour. The loaf will be slightly softer and less chewy. Hold back about 1 tablespoon of the eggs if the dough looks very wet.
- instant yeast → active dry yeast. Use the same amount, but dissolve it in the 3 tablespoons of milk warmed to about 100°F (38°C) for 5 minutes before adding it to the flour. Add it with the eggs.
- whole milk → heavy cream or water. Use the same amount. Cream gives a slightly richer crumb, while water gives a slightly crisper crust.
- unsalted butter → European-style unsalted butter (82–84% fat). Higher-fat butter gives a more flavorful, silkier crumb. Use the same weight.
More yeast breads
See all →

Find more like this
- Meal
- Breakfast
- Cuisine
- French
- Diet
- VegetarianHalal
- Method
- Oven
- Quick & Easy
- Make Ahead