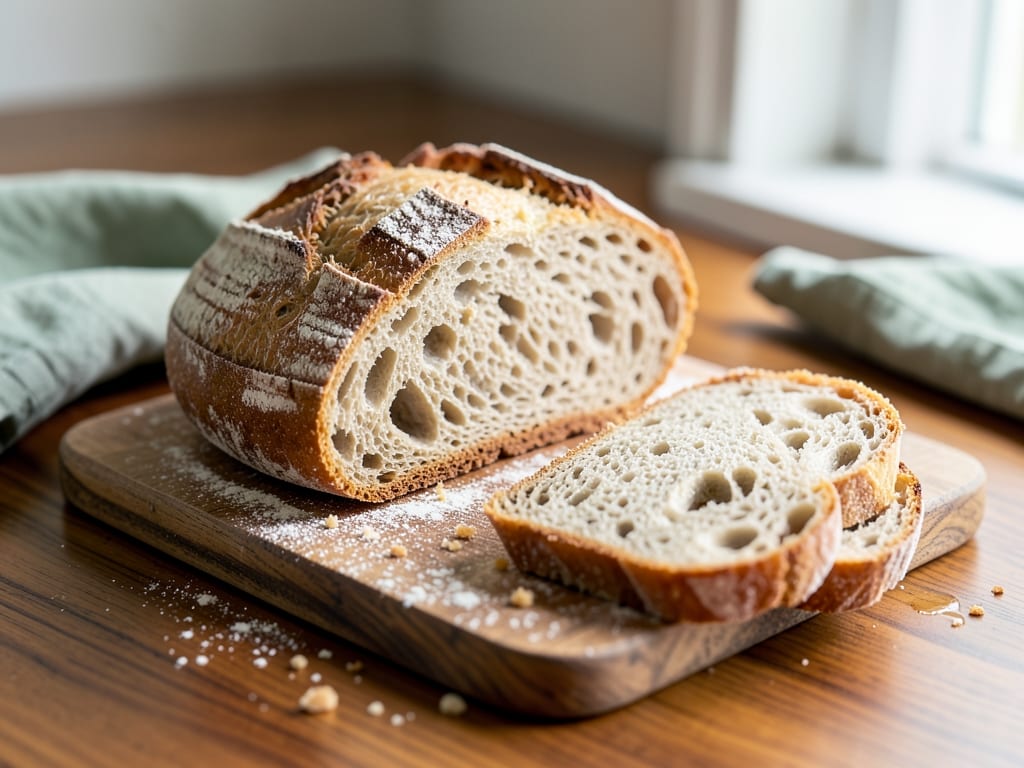
Sourdough Ciabatta
A very wet, open-crumbed Italian loaf with a crisp, flour-dusted crust and a tangy, tender interior. A gentle stretch-and-fold method builds structure without kneading, and a little olive oil keeps the crumb soft.
- Prep
- 31 min
- Cook
- 25 min
- Wait
- 4 hr 45 min
- Total
- 5 hr 41 min
- Makes
- 2 loaves (about 10 × 4 inches / 25 × 10 cm each; 8 servings total)
Steps
Before you start
- Feed your starter 4–8 hours ahead (equal weights starter, flour and water) so it is bubbly and has at least doubled. Use it at its peak.
- This dough is 80% hydration and very sticky. Keep a small bowl of water nearby to wet your hands, and don't add extra flour to the dough itself.
- Plan about 5½–6 hours from mixing to bread. Your kitchen should be around 75–78°F (24–26°C); a cooler kitchen will need a longer bulk rise.
- Start preheating the oven during the final proof (step 6) so the baking stone or sheet is fully hot.
Mix and rest flour
- In a large bowl or container, stir together the bread flour and lukewarm water with a wet hand or spatula until no dry flour remains and the mixture looks shaggy.
- Cover and let it rest.
+ Show details− Hide details
Ready when: No dry flour pockets; dough is a thick, shaggy batter
Tip: Use a clear container if possible so you can track the rise later.
Add starter, salt, oil
- Dollop the starter, salt and olive oil over the dough.
- With wet fingers, squeeze and pinch the dough for about 3 minutes, folding it over itself, until the starter and salt are fully worked in and the dough feels cohesive but still loose and sticky.
- Cover.
- Note the time: this is the start of the bulk rise.
+ Show details− Hide details
Ready when: No streaks of starter remain and the dough clings together as one mass
Tip: Wet your hands often; dry hands will glue themselves to this dough.
Stretch and fold series
- Do 4 sets of stretch and folds, 30 minutes apart (the first set is 30 minutes after step 2).
- For each set, wet your hand, grab one edge of the dough, stretch it up until it resists, and fold it over to the other side.
- Rotate the bowl a quarter turn and repeat 3 more times (4 folds per set).
- Cover between sets.
- The dough will become smoother, stronger and puffier with each set.
+ Show details− Hide details
Ready when: By the fourth set the dough is smooth, elastic and holds a slightly domed shape
Tip: If the dough tears while stretching, stop and let it rest 10 more minutes.
Finish bulk rise
- Leave the dough, covered, undisturbed at 75–78°F (24–26°C) for another 90 minutes (about 3 hours of total bulk).
- It is ready when it has grown about 50–75% in volume, the surface is domed and jiggly, and you see bubbles along the edges and through the sides of the container.
+ Show details− Hide details
Ready when: Risen 50–75%, jiggly, with visible bubbles at the edges
Tip: In a cool kitchen this can take up to 1 hour longer; judge by the dough, not the clock.
Divide and shape
- Generously flour your work surface with bread flour (about ¼ cup/30 g) and dust the top of the dough.
- Use a wet or floured bench scraper to gently release the dough and turn it out without deflating it.
- Cut it in half to make two rough rectangles.
- For each piece, gently stretch to about 10 × 5 inches (25 × 12 cm), then fold it in thirds like a letter, tucking the ends under.
- Dust the top lightly.
+ Show details− Hide details
Ready when: Two slack, pillowy rectangles about 10 × 4 inches (25 × 10 cm)
Tip: Handle gently: the trapped bubbles are what give ciabatta its open crumb.
Final proof and preheatOven 475°F / 245°C
- Dust a sheet of parchment (or a couche) with semolina and lift each loaf onto it, seam side down, about 3 inches (8 cm) apart, using floured hands and the scraper.
- Cover loosely with a floured towel.
- Meanwhile, place the baking stone or an upside-down baking sheet on the middle oven rack and a metal pan on the bottom rack, and preheat the oven to 475°F (245°C) for at least 45 minutes.
+ Show details− Hide details
Ready when: Loaves look puffy and a floured fingertip leaves a dimple that springs back slowly
Tip: A well-preheated surface gives the best oven spring.
Bake with steamOven 475°F / 245°C
- Dimple the loaves lightly with floured fingertips, pressing without deflating them.
- Slide the parchment with loaves onto the hot stone or baking sheet.
- Carefully pour 1 cup (240 ml) of boiling water into the preheated pan on the bottom rack and close the door immediately.
- Bake at 475°F (245°C) for 25 minutes, rotating the pan halfway, until the crust is deep golden brown and the loaves sound hollow when tapped on the bottom.
+ Show details− Hide details
Ready when: Deep golden crust, hollow sound when tapped, internal temperature 205–210°F (96–99°C)
Tip: Wear oven mitts and stand back when adding boiling water; the steam is intense.
Cool completely
- Transfer the loaves to a wire rack and let cool for at least 30 minutes before slicing, so the crumb finishes setting and doesn't turn gummy.
- Brush off excess flour and serve.
+ Show details− Hide details
Ready when: Loaves feel just barely warm and the crust crackles when pressed
Tip: Use a serrated knife and a gentle sawing motion; for sandwiches, slice horizontally.
Good to know
Tips
- Weigh ingredients on a scale; a few tablespoons of extra water or flour changes this very wet dough dramatically.
- Don't skip the steam: it keeps the crust flexible so the loaves can expand fully before the crust sets.
- Use a wet scraper and wet hands when handling dough, but floured hands and surfaces when shaping.
- If the loaves spread flat, your starter may have been past its peak or the bulk rise ran too long; shorten it next time.
Make ahead
"After the stretch-and-fold series and 30 minutes of bulk rest, cover the dough and refrigerate for 8–14 hours. Shape straight from the fridge, then proof 45–60 minutes and bake as directed for a tangier flavor."
Storage & reheating
"Room temperature: 2 days in a paper bag or loosely wrapped in a clean towel (a sealed bag softens the crust). Fridge: not recommended, as it stales bread faster. Freezer: slice, wrap tightly and freeze up to 3 months. Reheat from frozen or day-old in a 375°F (190°C) oven for 8–10 minutes to re-crisp the crust."
Substitutions
- bread flour → All-purpose flour. Absorbs less water; reduce water to about 310 ml (1⅓ cups) and expect a slightly less chewy, less open crumb.
- semolina flour → Rice flour or extra bread flour. Rice flour prevents sticking best; extra bread flour works but may scorch slightly.
- extra-virgin olive oil → Neutral oil such as avocado oil. Keeps the crumb soft but loses the fruity olive flavor.
- bread flour → Replace 100 g (¾ cup) with whole wheat flour. Adds nuttiness; add 1–2 tablespoons more water since whole wheat is thirstier.
More yeast breads
See all →

Find more like this
- Meal
- Dinner
- Cuisine
- Italian
- Method
- Oven
- Quick & Easy
- 5 Ingredients or Less