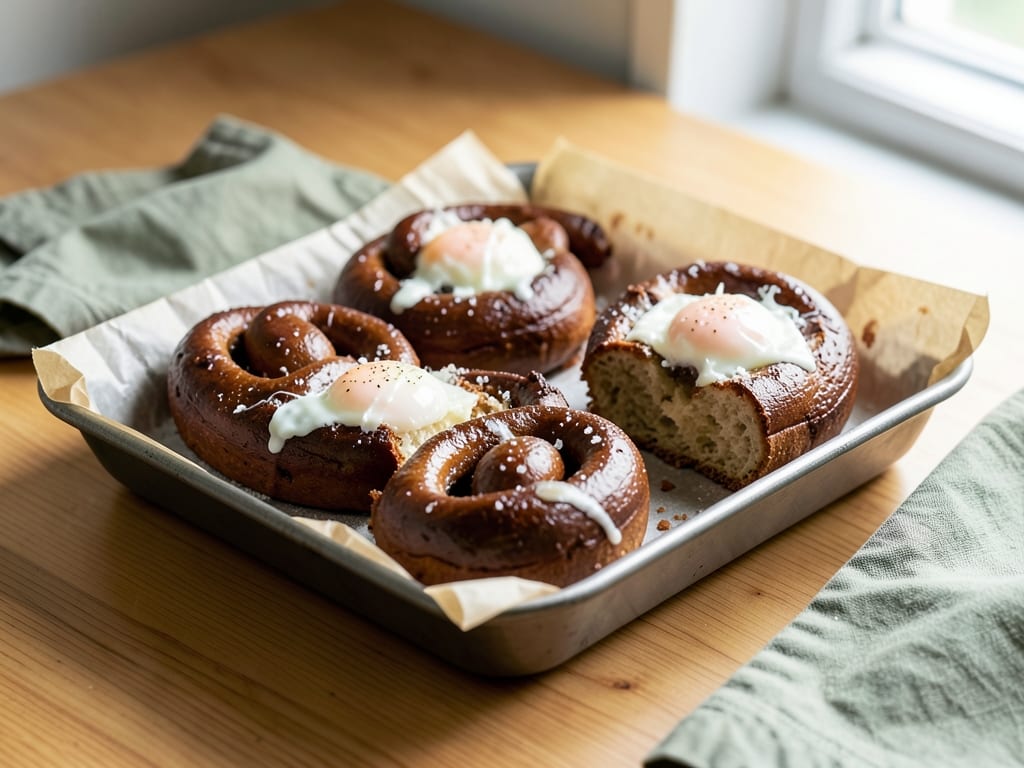
Soft Bakery-Style Pretzel Buns
Deep mahogany, chewy-crusted German-style buns with a tender, buttery crumb. A quick baking-soda bath gives them true pretzel flavor, and they're sturdy enough for burgers, sausages, and sandwiches.
- Prep
- 40 min
- Cook
- 22 min
- Wait
- 1 hr 35 min
- Total
- 2 hr 37 min
- Makes
- 8 buns (about 4 inches / 10 cm wide)
Steps
Before you start
- Soften the 4 tablespoons of butter for the dough at room temperature for about 1 hour, so it blends in easily.
- Warm the milk to 105–110°F (40–43°C), which feels just pleasantly warm. Hotter milk can kill the yeast.
- Use bread flour for the best chew. All-purpose flour works but gives a softer, less chewy bun.
- Open a window or turn on the vent fan. The baking-soda bath gives off a faint alkaline smell.
- Wear gloves or use a spider/slotted spatula for the bath. Baking-soda water can irritate bare skin, so don't dip your hands into it.
Mix the dough
- In the bowl of a stand mixer, stir together the bread flour, instant yeast, brown sugar, and fine salt.
- Pour in the warm milk.
- With the dough hook on low speed, mix for 2 minutes until a shaggy dough forms and no dry flour remains at the bottom of the bowl.
+ Show details− Hide details
Ready when: No dry flour remains and the dough looks rough and shaggy.
Tip: Keep the salt and yeast on opposite sides of the bowl when adding them so the salt doesn't sit directly on the yeast.
Knead in butter
- With the mixer on low, add the softened butter a piece at a time, waiting until each piece is mostly absorbed before adding the next.
- Increase to medium-low and knead for 7–8 minutes.
- (By hand, knead on a lightly floured counter for 10–12 minutes.)
+ Show details− Hide details
Ready when: The dough is smooth, slightly tacky but not sticky, and pulls away from the sides of the bowl. A small piece stretches into a thin, translucent window without tearing.
Tip: If the dough sticks heavily to the bowl, add flour 1 tablespoon at a time. Too much flour makes dense buns.
First rise
- Shape the dough into a ball.
- Rub the oil around a large bowl, add the dough, and turn it once to coat.
- Cover with a damp towel or plastic wrap and leave it in a warm spot (75–80°F / 24–27°C) for 60 minutes.
+ Show details− Hide details
Ready when: The dough has doubled in size and a floured fingertip pressed in 1/2 inch leaves a dent that springs back slowly.
Tip: In a cool kitchen, put the covered bowl in the oven with just the light on.
Divide and shape
- Line two baking sheets with parchment.
- Turn the dough onto an unfloured counter and press out the large bubbles.
- Weigh the dough and divide it into 8 equal pieces (about 110 g / 4 oz each).
- Shape each into a tight ball: cup your hand over the piece and roll it in small circles against the counter until the top is smooth and taut.
- Place 4 buns on each sheet, spaced at least 3 inches (8 cm) apart.
+ Show details− Hide details
Ready when: Each ball is smooth and taut on top with the seam pinched closed underneath.
Tip: An unfloured counter gives the dough some grip, which helps you form a tight ball.
Rest and preheatOven 425°F / 220°C
- Cover the shaped buns loosely with a towel and let them puff for 15 minutes.
- Meanwhile, arrange one oven rack in the upper third and one in the lower third, and preheat the oven to 425°F (220°C).
+ Show details− Hide details
Ready when: The buns look slightly puffy but are not doubled.
Tip: Don't let them over-proof. Over-proofed buns turn fragile and collapse in the bath.
Bring bath to boil
- Pour the 8 cups of cold water into a wide, deep pot and bring it to a gentle boil over high heat, about 8–10 minutes.
- Remove the pot from the heat and slowly stir in the baking soda; it will foam up.
- Return the pot to medium heat so the water stays at a gentle simmer.
+ Show details− Hide details
Ready when: The baking soda is fully dissolved and the water holds a gentle simmer with small bubbles.
Tip: Always add baking soda off the heat. Added to boiling water, it foams over the pot.
Boil the buns
- Gently lower 2 buns at a time into the simmering bath, top side down.
- Cook for 30 seconds, then flip with the slotted spatula and cook 30 seconds more.
- Lift each bun out, let it drain for a few seconds, and set it back on the parchment, top side up.
- Repeat with the remaining buns, keeping them 3 inches (8 cm) apart.
+ Show details− Hide details
Ready when: The buns look slightly puffed, wet, and a bit glossy, with a slightly wrinkled surface.
Tip: Don't crowd the pot. Crowding drops the water temperature and makes the buns stick to each other or the pot.
Glaze, slash, and salt
- Whisk the egg yolk with the 1 tablespoon of water.
- Brush the tops and sides of the buns generously with the egg wash.
- Using a sharp knife or razor blade, cut a 1/4-inch (6 mm) deep cross or single slash across each top.
- Sprinkle each bun with a pinch of the coarse salt, about 1/4 teaspoon each.
+ Show details− Hide details
Ready when: The tops are evenly shiny with egg wash, and the cuts are clearly open.
Tip: Slash right after boiling while the surface is wet and firm. A wet knife drags, so use a quick, confident stroke.
Bake the bunsOven 425°F / 220°C
- Bake at 425°F (220°C) for 16–18 minutes, swapping the pans between racks and rotating them front to back after 8 minutes, until the buns are deep mahogany brown.
+ Show details− Hide details
Ready when: The crust is deep mahogany brown, and an instant-read thermometer in the center reads 200°F (93°C). The bottoms sound hollow when tapped.
Tip: If the tops brown before the centers reach 200°F (93°C), tent loosely with foil for the last few minutes.
Brush and cool
- Immediately brush the hot buns with the melted butter.
- Transfer them to a wire rack and cool for at least 20 minutes before slicing.
+ Show details− Hide details
Ready when: The buns feel just warm, not hot, and the crust is glossy and dry to the touch.
Tip: Slicing too soon makes the crumb gummy. Wait until the buns are only slightly warm.
Good to know
Tips
- Weigh the flour. Cup measuring can vary by 30 g or more and change the texture of the dough.
- Use a stainless steel or enameled pot for the bath. Aluminum reacts with baking soda, turning dark and giving the buns a metallic taste.
- For a deeper brown, bake the buns in the upper third of the oven for the final 3 minutes.
- For hot dog buns or sliders, divide the dough into 12 pieces and bake 12–14 minutes.
Make ahead
"After shaping (step 4), cover the buns tightly and refrigerate on the baking sheets for up to 12 hours. Let them stand at room temperature for 30 minutes, then boil, glaze, and bake as directed; add 1–2 minutes to the baking time if needed. Chilled buns are also easier to handle in the bath. You can also bake the buns fully a day ahead and reheat them."
Storage & reheating
"Room temperature: store in a paper bag or loosely covered for up to 1 day; the crust softens in airtight containers. Fridge: not recommended, since it dries the crumb. Freezer: wrap individually and freeze for up to 3 months. Reheat at 350°F (175°C) for 8–10 minutes from thawed, or 12–15 minutes from frozen, until the crust crisps."
Substitutions
- bread flour → all-purpose flour, same weight (500 g). The buns will be a bit softer and less chewy. Reduce the milk by 1–2 tablespoons if the dough feels too wet.
- instant yeast → active dry yeast, 2¼ tsp (7 g). Dissolve it in the warm milk with the sugar and wait 5–10 minutes until foamy before adding to the flour.
- pretzel salt or coarse flaky salt → flaky sea salt, or sesame or poppy seeds. Pretzel salt does not melt in the oven. Flaky salt works well but use a lighter hand.
- whole milk → warm water, 300 ml. This makes a slightly crisper, less rich crumb. Any plant milk also works.
More rolls & buns
See all →

Find more like this
- Diet
- VegetarianHalal
- Quick & Easy
- Make AheadFreezer Friendly