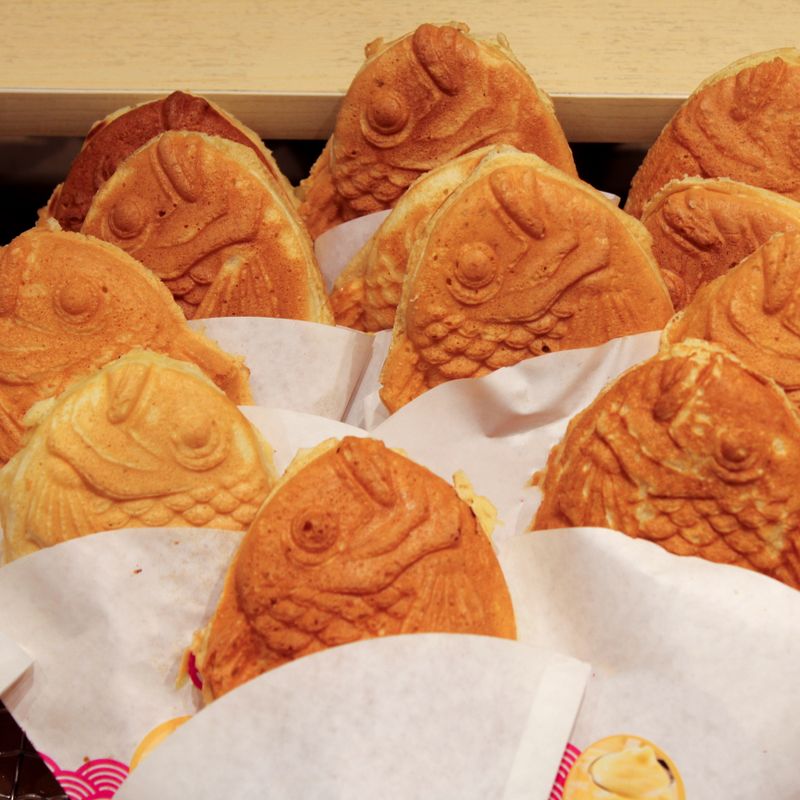
Japanese Taiyaki Fish-Shaped Pastry with Filling
Taiyaki are delightful Japanese fish-shaped pastries with a crispy golden exterior and warm, sweet filling. This recipe teaches you to make the cake-like batter from scratch and fill them with classic red bean paste, creating a snack or dessert that's charming and deeply satisfying. You'll need a taiyaki pan—a specialized molded pan—but the reward is pastries with a tender cake crumb and a slight snap on the edges.
- Prep
- 20 min
- Cook
- 20 min
- Wait
- 15 min
- Total
- 55 min
- Makes
- 12 taiyaki pastries
Steps
Before you start
- Preheat your taiyaki pan over medium heat for 5 minutes so it is hot and even
- Have your red bean paste at room temperature and ready to portion
- Read through the batter consistency notes—it should be like thin pancake batter
- Gather a small brush or spoon for oiling the pan between batches
Combine dry ingredients
- In a medium mixing bowl, whisk together the cake flour, baking powder, and fine salt.
- Set aside.
- This combines the leavening evenly so the batter rises uniformly.
+ Show details− Hide details
Ready when: Flour mixture is lump-free and light
Tip: Sifting the dry ingredients is optional but makes for an even lighter taiyaki
Whisk wet ingredients
- In a small mixing bowl, whisk together the room-temperature eggs, granulated sugar, whole milk, and vanilla extract until smooth and well combined.
- The eggs should be fully incorporated and the sugar mostly dissolved.
+ Show details− Hide details
Ready when: Mixture is smooth, sugar is mostly dissolved
Tip: Room-temperature eggs mix more smoothly and create a more uniform batter
Make the batter
- Pour the wet ingredients into the dry ingredients.
- Stir gently with a whisk until just combined—the batter should be smooth and flow like thin pancake batter.
- Do not overmix; a few small flour streaks are fine.
- Overmixing develops gluten and makes the taiyaki tough.
+ Show details− Hide details
Ready when: Batter is smooth and pourable, no lumps
Tip: If the batter is too thick, whisk in 1–2 tbsp milk until it reaches pancake batter consistency
Preheat the taiyaki pan
- Place your taiyaki pan over medium heat.
- Let it heat for 5 minutes, allowing the molds to become evenly hot.
- Test the temperature by dripping a small amount of batter into one mold—it should sizzle immediately and start to set.
+ Show details− Hide details
Ready when: Pan is hot; batter sizzles on contact
Tip: An underheated pan leads to pale, dense taiyaki; if the pan is too hot, the outside burns before the inside cooks
Oil the pan
- Using a pastry brush, lightly coat all 12 molds with neutral vegetable oil.
- Be thorough but not excessive—you want a thin, even layer that ensures easy release and browning.
+ Show details− Hide details
Ready when: All molds are lightly and evenly oiled
Tip: Keeping a small bowl of oil and a brush nearby speeds up the process between batches
Fill the bottom molds
- Working quickly, pour about 1 tablespoon of batter into each of the 12 molds, filling each roughly one-third full.
- The batter should flow to coat the bottom and sides.
- Work from mold to mold in order so the first ones begin to set while you fill the rest.
+ Show details− Hide details
Ready when: All molds are one-third full with batter
Tip: If batter pools too much in the pan bottom, the molds may not fill evenly—keep heat at medium, not medium-high
Add the filling
- Once the bottom batter layer has set enough to hold the filling (about 20–30 seconds of cooking), spoon approximately 1 heaping teaspoon of room-temperature red bean paste into the center of each mold.
- Do not overfill; the paste should sit on top of the batter without touching the edges or top of the mold.
+ Show details− Hide details
Ready when: Each mold contains a small mound of paste in the center
Tip: Cold or overly thick paste is hard to spoon; room-temperature paste spreads a little on its own and helps seal the taiyaki
Top with more batter
- Spoon another 1 tablespoon of batter over each filling, covering it completely and filling each mold until nearly full (about three-quarters).
- The batter should encapsulate the paste.
+ Show details− Hide details
Ready when: Each mold is three-quarters full; filling is hidden
Tip: If the top batter runs into the crevices between molds, use a small offset spatula to gently tidy the edges
Cook the first side
- Let the taiyaki cook on the first side for 2–3 minutes, keeping the heat at medium.
- Listen for a gentle sizzle; the sound should be steady but not aggressive.
- The batter on the bottom should be setting and beginning to brown.
- You can gently peek under one taiyaki with a thin spatula to check for a light golden color.
+ Show details− Hide details
Ready when: Bottom batter is light golden and firm when gently tested
Tip: If the sizzle becomes loud and aggressive or you smell burning, lower the heat to medium-low for the next batch
Flip and cook the second side
- Using a small offset spatula or butter knife, gently slide under each taiyaki and flip it over.
- The taiyaki molds are designed so the two halves lock together after flipping.
- Once all are flipped, let them cook on the second side for 2–3 minutes until both sides are golden brown and the pastry is firm to the touch.
+ Show details− Hide details
Ready when: Both sides are light to medium golden brown; pastry feels firm
Tip: Flip gently to avoid breaking the pastry; if one sticks, run the spatula edge around its outline first to loosen it
Remove and cool
- Using your spatula, lift each finished taiyaki out of the pan and onto a wire cooling rack.
- They will be very hot, so handle carefully.
- The pastries will firm up as they cool.
- Let them rest for at least 5 minutes before serving; this allows the interior to set slightly and makes eating more enjoyable.
+ Show details− Hide details
Ready when: Taiyaki are cool enough to hold and eat without burning your mouth
Tip: If you are making a second batch, re-oil the pan between batches and allow it to return to medium heat
Make a second batch
- Once the pan is empty, brush it again with a thin layer of oil and let it return to medium heat for 1 minute.
- Repeat the filling and cooking process with the remaining batter and red bean paste (you should have enough for 12 total taiyaki).
+ Show details− Hide details
Ready when: Second batch of taiyaki are golden brown and firm
Tip: This recipe fills 12 molds exactly; if your pan is smaller or larger, scale quantities proportionally
Good to know
Tips
- A taiyaki pan is essential—look for 12-mold electric or stovetop pans online or at Asian specialty stores. The pan is an investment but lasts decades and is fun to use.
- The batter should be thin and pourable like pancake batter. If it seems too thick after whisking, add milk 1 tablespoon at a time until the consistency is right.
- Keep your heat at medium throughout. Too high and the outside burns while the inside stays raw; too low and the pastry will be pale and dense.
- Taiyaki are best eaten fresh and still warm, when the contrast between the crispy exterior and soft, warm filling inside is most enjoyable. If you are serving them later, a quick reheat in the oven restores that quality.
Make ahead
Store unbaked batter in the fridge for up to 2 hours; return to room temperature and whisk gently before using. You can prepare red bean paste ahead—keep it covered in the fridge for up to 1 week.
Storage & reheating
Room temperature (loosely covered): 2 days. Refrigerator (airtight container): 4 days; reheat in a 300°F (150°C) oven for 5 minutes to restore crispness. Freezer (airtight bag): 1 month; reheat from frozen in a 325°F (160°C) oven for 8–10 minutes.
Substitutions
- canned sweetened red bean paste → Sweetened black sesame paste or matcha paste. Use the same amount (about 1 tsp per taiyaki); these create authentic flavor variations. Sesame paste is slightly more assertive than red bean paste.
- canned sweetened red bean paste → Nutella or other chocolate-hazelnut spread. Use the same amount; this creates a sweeter, richer taiyaki. Spread thinly since it is more dense than red bean paste.
- whole milk → Dashi stock or mirin-sweetened dashi. Use the same amount; this creates a savory-sweet Japanese tea-time taiyaki. Reduce the granulated sugar to 0.5 cup (100 g).
- cake flour → All-purpose flour mixed with 1 tbsp cornstarch. Use 1 cup (125 g) all-purpose flour plus 1 tbsp (8 g) cornstarch. The taiyaki will be slightly less delicate but still light and tender.
More no-bake desserts
See all →


Find more like this
- Meal
- Dessert
- Cuisine
- Japanese
- Main ingredient
- Beans & Lentils
- Diet
- VegetarianHalal
- Method
- Stovetop