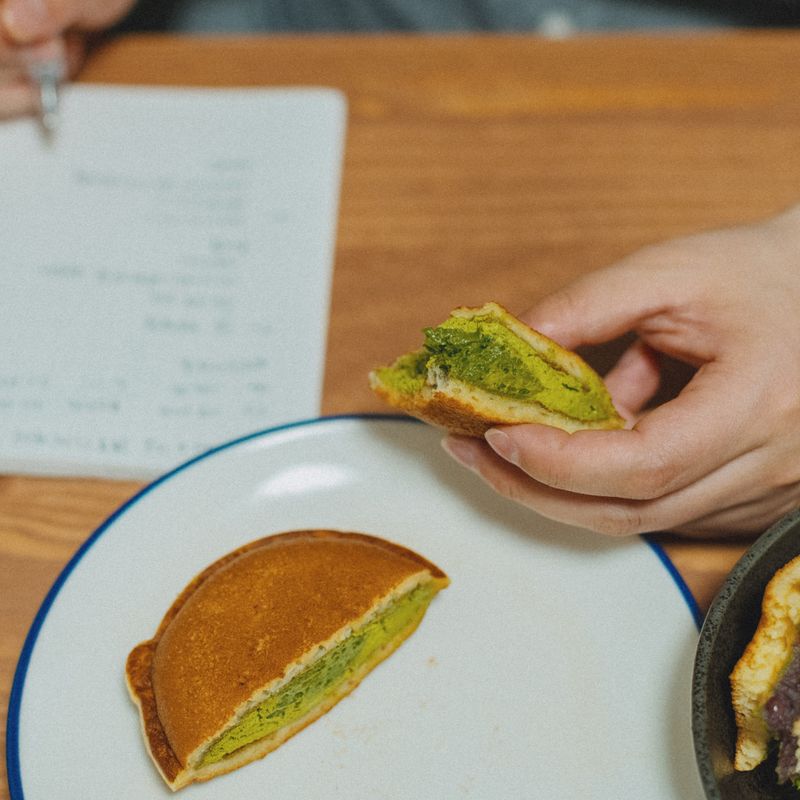
Japanese Dorayaki Red Bean Pancake Sandwich
Dorayaki are soft, pillowy Japanese pancakes with a delicate, slightly sweet exterior and a fluffy crumb. Two thin cakes sandwich a generous layer of smooth azuki (red bean) paste. The batter is simple—just eggs, sugar, flour, and a touch of baking powder—pan-fried gently to achieve an evenly golden surface without browning. The filling's natural sweetness and earthy flavor balances the mild cake. These are best eaten warm or at room temperature and are a beloved Japanese snack and dessert.
- Prep
- 15 min
- Cook
- 16 min
- Wait
- 10 min
- Total
- 41 min
- Makes
- 8 dorayaki (16 pancakes total)
Steps
Before you start
- Bring eggs to room temperature (30 minutes if straight from the fridge). Have all ingredients measured and ready before mixing the batter.
- Use a non-stick skillet or well-seasoned cast iron—dorayaki are delicate and stick easily. A 6-7 inch (15-18 cm) skillet works best; a smaller one gives thicker cakes, larger one thinner.
- Prepare azuki paste at room temperature so it spreads easily without breaking the warm cakes.
- Read through the pan-frying steps; the heat and timing matter for tender, pale cakes with crispy bottoms.
Whisk eggs and sugar
- In a medium bowl, whisk together the 2 room-temperature eggs and 65 g (⅓ cup) sugar for 1–2 minutes until pale, slightly thick, and ribbon-like.
- The mixture should be noticeably lighter in color and about doubled in volume.
- This aeration helps the batter rise gently in the pan.
+ Show details− Hide details
Ready when: Mixture is pale, thick, and forms a ribbon when the whisk is lifted
Tip: Don't skip the whisking—aeration is key to light, fluffy dorayaki. Hand whisking works fine; an electric mixer is faster but not necessary.
Mix dry ingredients
- In a small bowl, whisk together 90 g (¾ cup) all-purpose flour, 2 g (½ tsp) baking powder, and a pinch of salt.
- Break up any lumps in the flour or baking powder to avoid streaks in the batter.
+ Show details− Hide details
Ready when: Dry ingredients are evenly mixed with no lumps
Tip: Sifting is optional but helps ensure the baking powder is evenly distributed for consistent rise.
Combine wet and dry
- Pour the dry ingredients into the egg mixture.
- Gently fold with a rubber spatula until just combined—about 10–12 folds.
- The batter will be thick and slightly lumpy.
- Fold in the 60 ml (¼ cup) water in two additions, folding until the batter is smooth and pourable but still thick.
- Do not overmix; lumps are fine and will cook out.
+ Show details− Hide details
Ready when: Batter is smooth, thick, and pourable; no streaks of flour remain
Tip: Overmixing develops gluten and makes the cakes tough. If lumps remain, they'll smooth out as the batter rests and cooks.
Heat the skillet
- Set a 7–8 inch (18–20 cm) non-stick or well-seasoned cast-iron skillet over medium heat.
- Let it warm for 1–2 minutes, then lightly brush the surface with a small amount of the 22 ml (1.5 tbsp) neutral oil.
- The pan should be hot enough that a drop of batter sizzles gently but does not brown immediately.
+ Show details− Hide details
Ready when: A batter droplet sizzles gently and browns in about 5–10 seconds
Tip: Too hot and the cakes brown too quickly before cooking through; too cool and they'll be pale and rubbery. Medium heat is the sweet spot.
Pour and cook first side
- Pour about 3 tablespoons (45 ml) of batter onto the skillet's center.
- It will spread slightly; use the spatula to gently nudge it into a 2–2½ inch (5–6.5 cm) round, about ⅜ inch (1 cm) thick.
- Cook for 2–3 minutes until the bottom is pale golden and set, and small bubbles form on the surface.
- The top should look dull, not shiny.
+ Show details− Hide details
Ready when: Bottom is pale golden, top has dull, small bubbles, and edges look slightly set
Tip: Don't flip too early—the top should look dull and bubbles should form before you flip, or the cake will fall apart when inverted.
Flip and cook second side
- Using a flat spatula, quickly slide it under the cake and flip in one smooth motion.
- Cook the second side for 1–2 minutes until pale golden and set throughout.
- The second side cooks faster than the first because the pan is hotter and the center is already partially cooked.
- The cake should be soft and springy when pressed gently.
+ Show details− Hide details
Ready when: Both sides are pale golden, cake is soft and springy, and no wet batter remains on top
Tip: A damp kitchen towel under the skillet prevents it from sliding on the stovetop and keeps you safe while flipping.
Cool the cakes
- Transfer the cooked dorayaki cake to a damp cloth or cooling rack.
- Repeat the oil-brushing and cooking process with the remaining batter, brushing oil only between cakes (not every time).
- You'll make 16 cakes total.
- As each cake finishes, place it on the damp cloth or rack to cool to warm or room temperature (about 5–10 minutes total for all cakes).
- The damp cloth keeps them soft and slightly moist.
+ Show details− Hide details
Ready when: All 16 cakes are cooked and cooled to warm or room temperature
Tip: Don't let cakes cool completely on a hard surface or they'll firm up too much and crack when you fold them with the paste. A damp cloth keeps them pliable and warm.
Assemble with filling
- Once the cakes are warm to room temperature, place 8 cakes flat on a work surface (the prettier side down, if one side looks nicer).
- Spread or spoon about 2–2.5 tablespoons (30–37 g) of room-temperature azuki paste onto each cake, leaving a ½ inch (1.25 cm) border.
- Gently press a second cake on top, flat side up, to make a sandwich.
- Press gently so the paste spreads to the edges but doesn't squeeze out.
+ Show details− Hide details
Ready when: All 8 dorayaki are assembled with paste visible at the edges
Tip: If the paste is cold from the fridge, it won't spread smoothly and may crack the warm cakes. Let it come to room temperature for easy assembly.
Good to know
Tips
- Use a non-stick or seasoned skillet and brush lightly with oil between cakes—dorayaki are delicate and stick easily. If cakes start to stick, reduce the heat slightly and brush a little more oil.
- The batter thickens slightly as it sits; if it becomes too thick to pour after 30 minutes, thin it with 1–2 teaspoons of water to return it to a pourable consistency.
- Dorayaki freeze best as unassembled, cooled cakes in freezer bags for up to 1 month; thaw at room temperature, then fill with fresh or thawed paste just before serving.
- For a professional look, place the cake (prettier side down) in a ½-cup measure or small bowl, spoon paste onto the flat back, and top with the second cake; the weight and shape ensure even, pretty sandwiches.
Make ahead
You can make the batter up to 2 hours ahead and refrigerate it in an airtight container; let it come to room temperature for 10 minutes before cooking. Cooked cakes (before assembly) can be made up to 1 day ahead and stored in an airtight container at room temperature; reheat gently in a microwave (20 seconds) before filling.
Storage & reheating
Assembled dorayaki are best eaten the same day but keep well for 2–3 days in an airtight container at room temperature. Do not refrigerate, as cold hardens the cakes. To reheat, wrap in a damp paper towel and microwave for 15–20 seconds. Freezing is not recommended, as the cakes become tough when thawed.
Substitutions
- azuki (red bean) paste, sweetened → Black sesame paste, sweet miso paste, or chocolate-hazelnut spread. Use the same amount (250 g). Azuki paste's mild, earthy sweetness is traditional, but these alternatives offer different flavor profiles. Black sesame is common in Japanese desserts; sweet miso adds umami depth; chocolate-hazelnut makes a Western-style filling.
- sugar → Honey or light agave syrup. Use 60 ml (¼ cup) honey or agave for 65 g sugar. This adds moisture and a subtle floral or neutral sweetness. The batter may brown slightly faster, so watch the heat carefully.
- all-purpose flour → Cake flour or pastry flour. Use the same weight (90 g). Cake flour is lower in protein and yields even more tender, delicate cakes. Results will be slightly less sturdy but equally delicious.
- water → Milk or a mix of milk and water. Use 60 ml (¼ cup) milk or 50% milk / 50% water. Milk adds richness and slight sweetness, yielding a more custardy crumb. The cakes will be slightly less pale on the exterior.
More pancakes & waffles
See all →

Find more like this
- Meal
- Snack
- Cuisine
- Japanese
- Method
- Stovetop
- Quick & Easy
- 5 Ingredients or LessEasy