Italian Ragu-Style Beef Chili with Wine and Milk
A sophisticated beef chili inspired by Italian ragu, built on a soffritto base of onions, carrots, and celery, simmered with ground beef, red wine, and whole milk. Tomato paste and crushed tomatoes create a rich, savory sauce that's less spicy and more herbaceous than American-style chili. The milk adds velvety texture and balances the acidity of the wine and tomatoes. Serve over pasta, polenta, or rice, or with crusty bread for dipping.
- Prep
- 15 min
- Cook
- 1 hr 30 min
- Total
- 1 hr 45 min
- Makes
- 6 servings (about 2 quarts/1.9 liters)
Steps
Before you start
- Have all ingredients prepped and within arm's reach—this chili simmers unattended after the initial browning, but you'll need to stir occasionally.
- Use good-quality ground beef with some fat content (80/20 blend is ideal) for flavor.
- A dry to medium-bodied red wine works best—avoid expensive bottles, but don't use cooking wine; something you'd drink is perfect.
Build the soffritto base
- Heat the olive oil in a large 5-quart (4.7-liter) pot over medium heat for 1 minute until shimmering.
- Add the diced onion, carrot, and celery.
- Stir frequently and cook for 8–10 minutes until the vegetables are soft, fragrant, and beginning to turn golden at the edges.
- This is the soffritto—the aromatic base of the ragu.
- The vegetables should release their sweetness and caramelize slightly.
+ Show details− Hide details
Ready when: Vegetables are soft, fragrant, and lightly golden at the edges
Tip: Don't rush this step—slow caramelization builds the sauce's deep flavor foundation.
Brown the ground beef
- Add the ground beef to the soffritto and break it up with a wooden spoon into small, bite-sized crumbles (about ½ inch).
- Increase heat to medium-high and cook, stirring frequently, for 6–8 minutes until the beef is no longer pink and the meat has browned lightly.
- Pour off excess fat if there is more than ½ inch pooling in the bottom of the pot, leaving about 2 tablespoons of fat for flavor.
+ Show details− Hide details
Ready when: Beef is browned and no pink remains
Tip: Use a meat thermometer if needed—the beef should reach 160°F (71°C) internally, though high heat ensures this quickly.
Add garlic and tomato paste
- Reduce heat to medium.
- Add the minced garlic and cook, stirring, for 1 minute until fragrant but not browned.
- Add the tomato paste and stir constantly for 2 minutes.
- The tomato paste will deepen in color and lose its raw edge—this is caramelizing the paste and concentrating its flavor.
+ Show details− Hide details
Ready when: Tomato paste is darker and caramelized, 2 minutes elapsed
Tip: Stirring constantly prevents the tomato paste from scorching on the bottom of the pot.
Deglaze with wine
- Pour in the red wine, scraping the bottom of the pot with your wooden spoon to loosen any browned bits (fond) stuck to the surface.
- These bits are pure flavor.
- Bring the wine to a simmer and cook for 3–4 minutes, allowing some of the alcohol to evaporate and the wine to reduce slightly (it should smell less sharp and more rounded).
+ Show details− Hide details
Ready when: Wine is reduced by about one quarter and smells less harsh
Tip: Don't skip the deglazing—those browned bits are concentrated beef and vegetable flavor that makes the sauce complex.
Add tomatoes and herbs
- Pour in the crushed tomatoes with their juices and the beef broth.
- Add the bay leaves, thyme sprigs, and rosemary sprig.
- Stir well to combine.
- Bring to a gentle simmer over medium heat, then reduce heat to medium-low.
+ Show details− Hide details
Ready when: Mixture is simmering gently with small bubbles breaking the surface
Tip: Use fresh herbs if possible—they add brightness that dried herbs won't match.
Simmer and reduce
- Let the chili simmer gently, uncovered, for 45 minutes.
- Stir occasionally (every 10 minutes) to prevent sticking and ensure even cooking.
- The sauce will darken, thicken, and the flavors will meld.
- The goal is to reduce the liquid by about one third, concentrating the flavors and creating a rich, cohesive sauce.
+ Show details− Hide details
Ready when: Sauce is noticeably darker and thicker; liquid reduced by about one third
Tip: A gentle, rolling simmer is better than a hard boil, which can break down tomatoes unevenly and make the sauce bitter.
Add the milk
- Remove the pot from heat and let it cool for 1 minute.
- Slowly pour in the whole milk while stirring constantly.
- This prevents curdling and ensures the milk incorporates smoothly into the hot sauce.
- You'll see the sauce transform into a warm, tan-brown color with a velvety texture.
+ Show details− Hide details
Ready when: Milk is fully incorporated and sauce is uniform in color
Tip: Adding milk off heat prevents it from curdling. If the pot is still very hot, let it cool slightly longer before adding the milk.
Final simmer and season
- Return the pot to medium-low heat and bring the chili back to a gentle simmer for 5 minutes, stirring occasionally.
- This ensures the milk is heated through and any lingering raw flavors are mellowed.
- Remove from heat.
- Discard the bay leaves, thyme sprigs, and rosemary sprig.
- Taste and season with kosher salt and freshly ground black pepper to your preference.
+ Show details− Hide details
Ready when: Chili is simmering gently and herbs are removed
Tip: Season at the end so you can taste accurately; early salt can concentrate too much as the sauce reduces.
Good to know
Tips
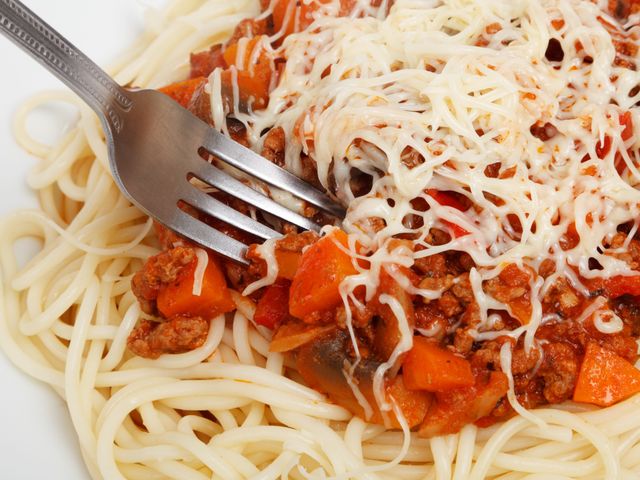
- Serve this chili over fresh egg pasta (tagliatelle or pappardelle are classic), creamy polenta, mashed potatoes, or white rice. It's less thick and chunky than American chili, so it clings beautifully to noodles rather than sitting on top.
- A drizzle of good extra-virgin olive oil and a sprinkle of fresh parsley over each bowl adds brightness and finishes the dish like a proper Italian cook would.
- This ragu freezes exceptionally well and improves with time. Make a double batch and freeze half for a quick weeknight dinner later.
- If you prefer a spicier chili, add ¼ teaspoon of red pepper flakes or a pinch of cayenne pepper along with the tomato paste—but the traditional approach values the savory, wine-forward flavors over heat.
Make ahead
You can prepare this chili up to 3 days ahead. Cool completely, then refrigerate in an airtight container. Reheat gently on the stovetop over medium-low heat, stirring occasionally and adding a splash of broth or water if the sauce has thickened too much. The flavors deepen after a day, making this an excellent make-ahead dish.
Storage & reheating
Room temperature: up to 2 hours. Refrigerator: up to 4 days in an airtight container. Freezer: up to 3 months in a freezer bag or airtight container (it thaws and reheats beautifully). Reheat from frozen on the stovetop over medium-low heat for 20–30 minutes, stirring occasionally, until heated through.
Substitutions
- whole milk → heavy cream or half-and-half. Use the same amount. Heavy cream will make the sauce richer and more decadent; half-and-half is slightly lighter but still luxurious.
- dry red wine → dry white wine or additional beef broth. White wine adds brightness instead of earthiness; broth makes a slightly less complex but still delicious sauce. Use 1.5 cups (360 ml) of either.
- ground beef (80/20 blend) → ground veal or ground pork (or a mix). Use the same amount. Veal creates a more delicate ragu closer to traditional Italian versions; pork adds sweetness. A 50/50 beef-pork blend is classic.
- fresh_herbs → 1 teaspoon each dried oregano, dried thyme, and a pinch of dried rosemary. Add dried herbs at the same time as the crushed tomatoes. Dried herbs are more concentrated, so use less. You'll lose the brightness of fresh herbs but gain convenience.