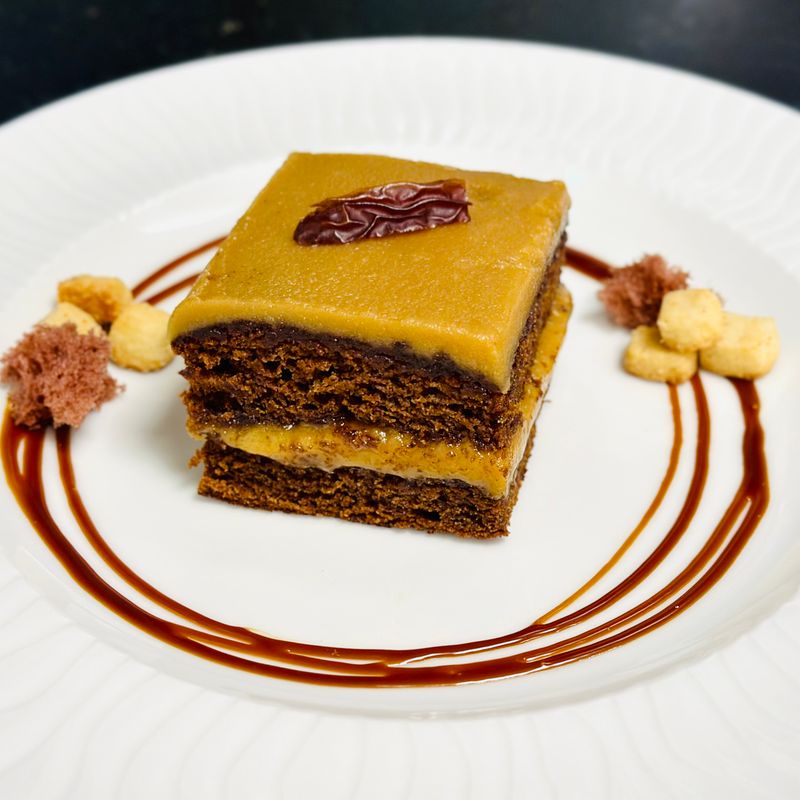
Instant Pot Miso Caramel Honey Cake
A tender, moist honey cake infused with umami-rich miso paste and finished with a glossy miso caramel glaze. Baked in an Instant Pot for hands-off convenience, this Japanese-inspired dessert delivers complex sweet and savory notes in every bite. The cake stays exceptionally moist thanks to pressure cooking, and the caramel layer adds sophisticated depth.
- Prep
- 20 min
- Cook
- 45 min
- Wait
- 30 min
- Total
- 1 hr 35 min
- Makes
- 1 cake (8 slices)
Steps
Before you start
- Bring eggs to room temperature for 30 minutes
- Have a 7-inch (18 cm) round cake pan or springform pan that fits inside your Instant Pot
- Pour 1½ cups (360 ml) water into the Instant Pot and place the trivet inside
- Read through the entire recipe to understand the miso caramel step
Prepare pan and pot
- Lightly oil the 7-inch (18 cm) cake pan and line the bottom with parchment paper.
- Ensure the Instant Pot has 1½ cups (360 ml) of water already placed with the trivet inside.
+ Show details− Hide details
Tip: A springform pan works beautifully here because you can easily lift the cake out by releasing the side.
Combine dry ingredients
- In a medium mixing bowl, whisk together the all-purpose flour (190 g), baking powder (7 g), and kosher salt (1.5 g).
- Set aside.
+ Show details− Hide details
Ready when: Mixture is evenly combined with no lumps
Tip: Whisk thoroughly to distribute the baking powder evenly so the cake rises uniformly.
Cream miso and honey
- In another mixing bowl, whisk the white miso paste (50 g) and honey (170 g) together vigorously for about 2 minutes until pale and creamy.
- The mixture should lighten in color and become airy.
- This is a critical step for the cake's texture.
+ Show details− Hide details
Ready when: Mixture is noticeably lighter in color and increased in volume slightly
Tip: Vigorous whisking incorporates air, which helps the cake rise and become tender. Don't skip this step.
Add oil and eggs
- Pour the vegetable oil (80 ml) into the miso-honey mixture and whisk for 1 minute.
- Add the eggs (3 large, room temperature) one at a time, whisking well after each addition.
- The batter should be smooth and homogeneous.
- Add vanilla extract (5 ml) and whisk to combine.
+ Show details− Hide details
Ready when: Batter is smooth, emulsified, and pale yellow
Tip: Room-temperature eggs and miso emulsify better, creating a lighter crumb. Cold ingredients will result in a denser cake.
Fold in dry ingredients
- Add the dry ingredient mixture to the wet ingredients in two additions.
- Fold gently with a spatula until just combined.
- Do not overmix—lumps are fine and will disappear during cooking.
+ Show details− Hide details
Ready when: No streaks of flour remain; batter is just combined
Tip: Overmixing develops gluten, which will make the cake tough. A few lumps are better than overworking the batter.
Pour batter and prepare cooker
- Pour the batter into the prepared cake pan.
- Tap the pan gently on the counter twice to release large air bubbles.
- Cover the pan tightly with foil (this prevents condensation from dripping onto the cake).
- Place the pan on the trivet in the Instant Pot.
- The water level should not touch the bottom of the pan.
+ Show details− Hide details
Ready when: Pan is level and secure on the trivet
Tip: Foil prevents water droplets from the lid condensing onto the cake's top, which would create a soggy crust.
Pressure cook the cake
- Close the Instant Pot lid and set to high pressure for 35 minutes.
- Once the cooking cycle finishes, allow the pot to naturally release pressure for 10 minutes.
- Then carefully open the pot and remove the foil from the pan.
+ Show details− Hide details
Ready when: A skewer inserted in the center comes out with a few moist crumbs; the cake should spring back when lightly touched
Tip: Natural release is important here—quick release can cause cracks in the cake due to sudden pressure change.
Cool in pot and remove
- Leave the cake in the Instant Pot with the lid open for 5 minutes to cool slightly.
- Then carefully lift the pan out using the foil edges or handle.
- Place on a wire rack and let cool completely to room temperature (about 20 minutes).
+ Show details− Hide details
Ready when: Pan is cool enough to handle comfortably
Tip: Cooling the cake completely ensures the miso caramel glaze sets properly and doesn't melt into the warm cake.
Make miso caramel glaze
- In a small saucepan over medium heat, melt the butter (57 g).
- Add the packed brown sugar (165 g) and stir constantly for 4–5 minutes until the mixture is bubbling and the sugar is dissolved.
- The color should deepen to a medium caramel (not dark).
- Remove from heat and immediately add the red miso paste (35 g), stirring vigorously until fully incorporated.
- Slowly pour in the heavy cream (120 ml) while stirring—the mixture will bubble vigorously.
- Continue stirring for 1 minute until smooth.
- Stir in the fleur de sel (1 g).
+ Show details− Hide details
Ready when: Caramel is smooth, glossy, and the color of medium amber; miso is fully incorporated
Tip: The miso paste will clump slightly when you add it—whisk aggressively to break it up. The caramel should reach 320–340°F (160–170°C) on a candy thermometer if you have one.
Apply glaze to cooled cake
- Once the cake is completely cool, run a thin knife around the inside edge of the pan and invert onto a serving plate (or leave in the springform and release the side).
- Pour the warm miso caramel glaze over the top of the cake, letting it drip naturally down the sides.
- Use a spatula to spread it evenly if desired.
- Allow the glaze to set for 5 minutes before slicing.
+ Show details− Hide details
Ready when: Glaze is opaque and no longer glossy; it holds its shape
Tip: The glaze will continue to thicken as it cools. If it becomes too stiff, warm it gently over low heat for 30 seconds.
Serve and enjoy
- Slice the cake with a warm, wet knife (dip in hot water and wipe after each cut).
- The knife slides through the miso caramel more cleanly this way.
- Serve at room temperature or slightly warm.
- Pairs beautifully with unsweetened whipped cream or vanilla ice cream.
+ Show details− Hide details
Tip: The cake is at its best served within 2 hours of glazing, while the caramel layer is still slightly soft.
Good to know
Tips
- White miso paste in the cake batter provides subtle umami and salt, enhancing the honey's sweetness without overpowering it. Red miso in the caramel adds deeper, toasted notes.
- The Instant Pot's moist environment creates an exceptionally tender crumb—much more moist than a traditional oven-baked cake. This is by design and part of the recipe's appeal.
- If you don't have an Instant Pot, this can be baked in a conventional oven in a 7-inch (18 cm) round cake pan at 350°F (175°C) for 30–35 minutes until a skewer comes out with a few moist crumbs.
- The miso caramel is the star of this cake. Do not rush it or cook it on high heat; medium heat allows the sugars to caramelize evenly and the miso to incorporate without scorching.
Make ahead
The cake can be baked 1 day ahead, wrapped in plastic, and refrigerated without the glaze. The miso caramel glaze can be made up to 3 days ahead and stored in an airtight container in the refrigerator. Rewarm gently over low heat or in the microwave for 20 seconds before glazing.
Storage & reheating
Room temperature (in an airtight container): 2 days. The miso caramel will soften slightly but the cake stays moist. Refrigerator (covered): 4 days; bring to room temperature before serving or warm gently. Freezer: Wrap the unglazed cake tightly in plastic wrap and freeze for up to 3 months. Thaw at room temperature for 3 hours, then glaze before serving.
Substitutions
- white miso paste → Chickpea miso or yellow miso. Yellow or chickpea miso will produce a slightly less delicate flavor but still excellent results. Use the same amount.
- red miso paste → Barley miso or omit for a plain caramel. Barley miso is milder; if omitted, the glaze becomes a traditional salted caramel. The umami depth will be lost, but the texture remains excellent.
- honey → Agave nectar or light maple syrup. Use the same weight (170 g). Agave and maple will shift the flavor subtly but maintain the cake's moisture and crumb.
- neutral vegetable oil → Melted coconut oil or light olive oil. Coconut oil may mute the miso flavor slightly. Light olive oil works well and adds a delicate fruity note.
More cakes
See all →




Find more like this
- Meal
- Dessert
- Diet
- VegetarianHalal
- Method
- Instant Pot
- Quick & Easy
- Make Ahead