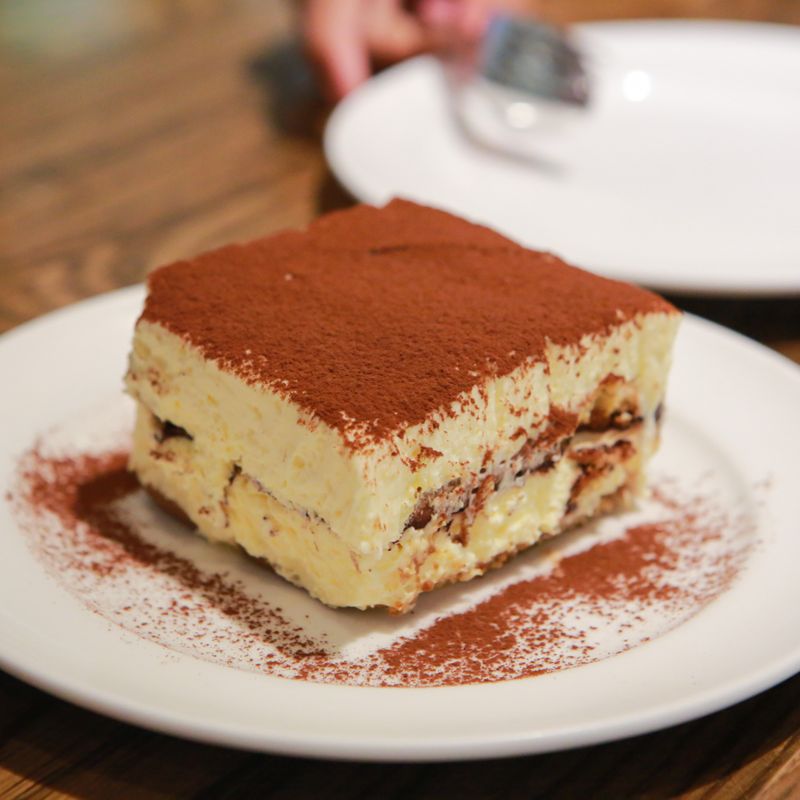
Classic Tiramisu with Cooked Yolk Cream
Espresso-dipped ladyfingers layered with a silky mascarpone cream and dusted with cocoa. The yolks are cooked to a safe 160°F (71°C), so there are no raw eggs. The dessert sets in the fridge and slices cleanly.
- Prep
- 41 min
- Cook
- 12 min
- Wait
- 6 hr 50 min
- Total
- 7 hr 43 min
- Makes
- 1 square dessert in a 9×9-inch dish (9 squares)
Steps
Before you start
- Plan ahead: tiramisu needs at least 6 hours in the fridge to set and is best after 12 hours. Total time is about 7¾ hours, mostly chilling.
- Brew the espresso first and cool it fully. Hot coffee melts the cream and turns the ladyfingers to mush.
- Keep the mascarpone and heavy cream in the fridge until you use them. Warm mascarpone can turn grainy or split.
- Use crisp, dry Italian-style ladyfingers (savoiardi), not soft sponge-style ones. You need 28 cookies, 14 per layer. Each should be about 3½–4 inches (9–10 cm) long and 1¼ inches (3 cm) wide.
- Have a 9×9-inch dish that is at least 3 inches (7.5 cm) deep. The finished dessert is about 2½ inches (6 cm) tall.
Cool the coffee soak
- Stir the rum (if using) into the hot espresso in a shallow dish or pie plate wide enough to dip a ladyfinger flat.
- Set the dish in a larger bowl of ice water, or leave it to cool on the counter.
- Stir now and then until the coffee is completely cool.
+ Show details− Hide details
Ready when: Coffee feels cool, not warm, when you dip a finger in
Tip: If skipping alcohol, add 1 tablespoon of sugar to the coffee for rounder flavor.
Cook the yolk custard
- Bring about 1 inch (2.5 cm) of water to a bare simmer in a saucepan, then keep it on low heat.
- In a heatproof bowl that sits above the water without touching it, whisk the egg yolks, sugar, Marsala, and salt.
- Set the bowl over the pan and whisk constantly, scraping the bottom and sides.
- The custard must reach 160°F (71°C) on an instant-read thermometer.
- This usually takes 8 to 12 minutes.
- If it is below 160°F at 8 minutes, keep whisking and check every minute.
- Remove the bowl from the heat as soon as it hits 160°F.
+ Show details− Hide details
Ready when: Custard is pale, thick, and foamy, leaves a ribbon trail for 3 seconds when the whisk is lifted, and reads 160°F (71°C)
Tip: Keep the water barely steaming. Boiling water scrambles the yolks at the edges of the bowl.
Chill the custard
- Set the bowl in a larger bowl of ice water and whisk for 3 minutes.
- Let it stand in the ice bath, stirring every few minutes, until it is cool.
- While it cools, whip the cream in the next step.
+ Show details− Hide details
Ready when: Custard is at or below room temperature, about 70°F (21°C), and thick
Tip: Folding warm custard into mascarpone makes the cream loose and grainy.
Whip the cream
- In a clean, cold bowl, beat the cream with the vanilla on medium speed until it holds medium-stiff peaks, about 2 to 3 minutes.
- The peaks should curl slightly at the tip.
- Cover and refrigerate until the custard is cool.
+ Show details− Hide details
Ready when: Cream is smooth and billowy, and the peak holds but the tip folds over
Tip: Stop early. Cream whipped past this point turns grainy once folded into the mascarpone.
Loosen the mascarpone
- Put the cold mascarpone in a large bowl.
- Stir it with a spatula for about 20 seconds, only until smooth.
- Add the cooled custard and stir gently until fully blended.
+ Show details− Hide details
Ready when: Mixture is smooth, with no streaks or lumps of mascarpone
Tip: Do not overbeat mascarpone. It curdles quickly and turns grainy.
Fold in the cream
- Stir about one-third of the whipped cream into the mascarpone mixture to lighten it.
- Fold in the remaining cream in two additions, cutting down the middle and sweeping up the side, until no white streaks remain.
- You will have about 4¾ cups (1.1 liters) of filling.
+ Show details− Hide details
Ready when: Cream is fluffy, uniform in color, and holds a soft mound on the spatula
Tip: Fold gently to keep the air in. Stirring hard deflates the cream.
Dip first ladyfinger layer
- Dip each ladyfinger in the coffee for 1 second per side, then lay it in the 9×9-inch dish.
- Arrange 7 rows running side to side, each row made of 2 cookies laid end to end, for 14 cookies.
- The rows should touch each other along the long sides.
- Cookies this size span about 7 to 8 inches (18–20 cm) of the 9-inch width, so a gap of up to 1 inch (2.5 cm) at one end or in the middle is normal.
- The cream will fill it.
+ Show details− Hide details
Ready when: Cookies are dark tan outside but still firm when pressed, not falling apart, and cover the dish bottom except for small end gaps
Tip: Don't soak longer than 1 to 2 seconds. The cookies keep absorbing moisture as the dessert chills.
Spread first cream layer
- Spoon half of the filling (about 2⅓ cups) over the ladyfingers.
- Spread it to the edges in an even layer with an offset spatula or the back of a spoon, pressing it gently into any gaps.
+ Show details− Hide details
Ready when: Layer is even, about ½ inch (1.2 cm) thick, and covers every cookie
Add second layers
- Dip the remaining 14 ladyfingers the same way and arrange them over the cream in 7 rows of 2, as in the first layer.
- Spread the remaining filling on top and smooth the surface.
- Discard any leftover coffee.
+ Show details− Hide details
Ready when: Top is level and smooth, about ½ inch (1.2 cm) below the rim of a 3-inch (7.5 cm) deep dish
Chill until set
- Cover the dish with plastic wrap, without pressing on the cream.
- Refrigerate at least 6 hours, ideally overnight.
+ Show details− Hide details
Ready when: The surface is firm and doesn't jiggle when the dish is nudged
Tip: Chilling less than 6 hours gives a soft, messy slice.
Dust and serve
- Just before serving, dust the cocoa over the top through a fine-mesh sieve in an even layer.
- Scatter the chocolate shavings over, if using.
- Cut into 9 squares (3 rows of 3) with a sharp knife wiped clean between cuts.
- Lift the squares out with an offset spatula.
+ Show details− Hide details
Ready when: Top is evenly dark with clean-edged squares
Tip: Dust right before serving. Cocoa applied early absorbs moisture and looks blotchy.
Good to know
Tips
- Use a thermometer for the custard. 160°F (71°C) makes the yolks safe while keeping them silky.
- Dip ladyfingers briefly. They keep softening in the fridge, and over-soaking makes the dessert watery.
- Cookie sizes vary by brand. If yours are shorter or longer, lay them in rows to cover the dish and snap or trim cookies to fit, using roughly 14 per layer.
- For neat slices, chill well and wipe the knife between cuts.
Make ahead
Assemble up to 2 days ahead, covered and refrigerated, without the cocoa. Dust with cocoa just before serving.
Storage & reheating
Refrigerate covered for up to 3 days. The texture is best on days 1 to 2. Do not leave it at room temperature for more than 2 hours. To freeze, wrap the undusted dish tightly and freeze for up to 1 month. Thaw overnight in the fridge (no reheating), then dust with cocoa before serving.
Substitutions
- sweet Marsala wine (or water) → Water, or additional espresso. Gives an alcohol-free custard with a slightly less complex flavor.
- dark rum, brandy, or coffee liqueur → Coffee liqueur such as Kahlúa, or omit. Liqueur adds sweetness. Omitting leaves a pure coffee flavor.
- crisp Italian ladyfingers (savoiardi), about 3½–4 inches (9–10 cm) long → Thin slices of dry pound cake or sponge cake. Dip for only a second and expect a softer, more cake-like texture. Cut slices to cover the dish bottom in one layer.
- strong brewed espresso or very strong coffee → 1 cup hot water mixed with 1½ tablespoons instant espresso powder, cooled. Works when no espresso machine is available.
More no-bake desserts
See all →


Find more like this
- Meal
- Dessert
- Cuisine
- Italian
- Main ingredient
- Cream CheeseEggs
- Diet
- Vegetarian
- Method
- Stovetop
- Quick & Easy
- Make Ahead