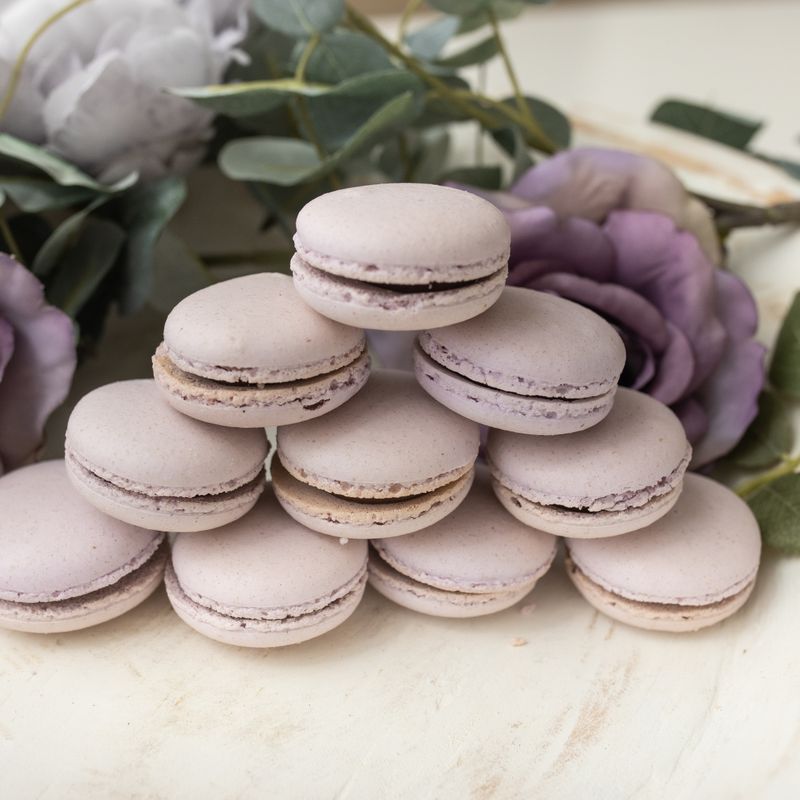
Vegan Charcoal Lavender Macarons
Elegant vegan macarons with activated charcoal shells and a delicate lavender-infused filling. These almond-based cookies feature a crispy exterior and chewy interior, filled with a silky lavender buttercream enriched with aquafaba meringue. A show-stopping French pastry that's naturally plant-based.
- Prep
- 45 min
- Cook
- 20 min
- Wait
- 1 hr 15 min
- Total
- 2 hr 20 min
- Makes
- 24 paired macarons (12 sandwiches)
Steps
Before you start
- Have aquafaba (liquid from a can of chickpeas) at room temperature
- Line two large baking sheets with parchment paper or silicone mats
- Preheat oven to 300°F (150°C) and allow it to stabilize for 15 minutes
- Sift almond flour and powdered sugar together three times to remove lumps
- Read through the full method once—macarons require precise technique and timing
Make the aquafaba meringue
- Pour 0.75 cup (180 ml) of room-temperature aquafaba into the bowl of a stand mixer fitted with the whisk attachment.
- Add 0.25 teaspoon (1 g) cream of tartar.
- Whip on medium speed for 2–3 minutes until foamy, then increase to medium-high speed.
- Whip for another 3–5 minutes until stiff peaks form—the meringue should be glossy, white, and hold its shape when you lift the whisk.
- This is crucial; underwhipped meringue will spread instead of piping neatly.
+ Show details− Hide details
Ready when: Stiff, glossy peaks that hold their shape when the whisk is lifted
Tip: Room-temperature aquafaba whips more reliably than cold. If your meringue isn't holding peaks after 7 minutes, it may not be humid enough—try adding 1 teaspoon more aquafaba and whipping again.
Combine dry ingredients for shells
- Sift 1 cup (100 g) almond flour and 1 cup (120 g) powdered sugar together 3 times into a large bowl.
- This removes clumps and aerates the mixture for lighter macarons.
- Add 0.5 teaspoon (2 g) food-grade activated charcoal powder and whisk together gently until the mixture is evenly dark gray with no white streaks.
+ Show details− Hide details
Ready when: Uniform dark gray color with no white streaks; no lumps
Tip: Triple-sifting is not excessive—it separates the fine almond flour from any larger particles. Use a sieve with fine mesh to ensure truly smooth shells.
Make the simple syrup
- In a small saucepan over medium heat, combine 0.5 cup (100 g) granulated sugar and 2 tablespoons (30 ml) water.
- Stir until the sugar dissolves, then remove from heat.
- Let the syrup cool to room temperature (about 5 minutes).
- You will use this to whip into the meringue to stabilize it.
+ Show details− Hide details
Ready when: Sugar fully dissolved and syrup is clear; cooled to room temperature
Tip: This step stabilizes the aquafaba meringue so it holds its shape better during piping and baking. Do not skip it.
Whip in the simple syrup
- With the stand mixer on medium speed, slowly drizzle the cooled simple syrup into the stiff meringue in a thin stream while whipping continuously.
- Once all syrup is incorporated, increase to medium-high speed and whip for 2–3 minutes more until the meringue is thick, glossy, and holds a peak.
- The mixture should be smooth and ribbon-like when you lift the whisk.
+ Show details− Hide details
Ready when: Thick, glossy meringue that holds a stiff peak and falls in ribbons from the whisk
Tip: Add syrup slowly—if you add it too fast, the meringue may deflate. Stop if the mixture breaks or looks grainy; it's stable enough to continue.
Fold in the charcoal-almond dry mix
- Add about one-third of the almond-charcoal dry mix to the meringue and fold in gently using a rubber spatula with large, broad motions—scoop from the bottom, fold over the top, rotate the bowl.
- Don't overmix, which deflates the meringue.
- Repeat with another third, folding until almost no dry bits remain.
- Add the final third and fold until the batter is uniform, smooth, and falls in ribbons from the spatula.
- The batter should be thick but flowable—this is called "macaronage."
+ Show details− Hide details
Ready when: Batter is smooth, ribbon-like, and uniform in color with no dry streaks
Tip: Overmixing creates runny shells that won't have feet; undermixing leaves lumps. The batter should fall slowly from your spatula in a thick ribbon and then gently settle back into the bowl.
Pipe the shells
- Transfer the macaron batter to a large piping bag fitted with a ¾-inch (2 cm) round tip.
- Pipe 1¼-inch (3 cm) diameter rounds onto two parchment-lined baking sheets, spacing them 1½ inches (4 cm) apart.
- Hold the bag vertically, apply gentle pressure, and lift straight up.
- Use a macaron template or reference as a guide.
- You should have about 48 shells (24 pairs).
- If you pipe too large, they'll spread and merge; too small, they won't develop proper feet.
+ Show details− Hide details
Ready when: Evenly sized rounds with smooth, domed tops
Tip: Do not tap the sheet. The macarons need air to develop feet. If you get a peak on top, dip a damp finger in water and gently smooth it down.
Rest and dry the shells
- Let the piped shells rest at room temperature (68–72°F / 20–22°C) uncovered for 30–40 minutes.
- A thin, papery skin should form on top when you gently touch the surface—it should not feel wet or sticky.
- This resting period is critical; it allows the exterior to set so the macarons develop characteristic ruffled feet during baking.
- If your kitchen is very humid (>70% relative humidity), allow 45–50 minutes.
- In dry conditions (<40% humidity), 25–30 minutes may suffice.
+ Show details− Hide details
Ready when: Shells feel dry and papery to the touch; no sticky surface
Tip: Resting is non-negotiable. Shells piped into a humid, warm kitchen will not develop proper feet. If your room is cold, rest may take longer.
Bake the shellsOven 300°F / 150°C
- Preheat the oven to 300°F (150°C / gas mark 2) and let it stabilize for 15 minutes.
- Place both baking sheets in the oven on the middle and lower-middle racks.
- Bake for 18–22 minutes until the shells are set and have formed ruffled feet around the base.
- The tops should be smooth and matte, not glossy or cracked.
- Swap the sheet positions halfway through (bottom to top, top to bottom) to ensure even baking.
- The shells are done when they do not move or wiggle at the base when you gently touch the top.
+ Show details− Hide details
Ready when: Shells are matte, smooth, and set at the base; ruffled feet are visible; tops do not move when gently touched
Tip: Oven temperature is critical—too hot and the shells crack and brown; too cool and they don't develop feet. Use an oven thermometer to verify your oven's accuracy.
Cool the shells completely
- Remove the baking sheets from the oven and let them rest on wire racks at room temperature for at least 10 minutes.
- Then gently peel the shells away from the parchment.
- They should release easily; if they stick, they may need another few minutes to cool.
- Once cool, sort the shells into pairs of similar size so they can be sandwiched evenly.
+ Show details− Hide details
Ready when: Shells are fully cool and peel away cleanly from parchment without cracking
Tip: Do not force the shells off the parchment while warm—they will break. Patience here prevents wasted work.
Make the lavender buttercream filling
- In a small bowl, grind or crush 1 tablespoon (5 g) dried culinary lavender buds into a fine powder.
- You can use a spice grinder or mortar and pestle.
- In the stand mixer bowl, combine 0.5 cup (115 g) room-temperature vegan butter with the ground lavender.
- Beat on medium speed for 1–2 minutes until the lavender is evenly distributed and the butter is light and fluffy.
- Add 1.5 cups (180 g) sifted powdered sugar a little at a time, beating on low speed to incorporate.
- Once half the powdered sugar is added, increase to medium speed and beat until light and creamy, about 2 minutes.
- Add 1 tablespoon (15 ml) non-dairy milk, 0.5 teaspoon (2.5 ml) vanilla extract, and a small pinch of sea salt.
- Beat for another minute until the filling is smooth, silky, and spreadable.
- If it's too thick, add a few more drops of non-dairy milk; if too thin, sift in a tablespoon more powdered sugar.
+ Show details− Hide details
Ready when: Smooth, silky, creamy filling with no lumps; light gray-purple color from lavender
Tip: Use culinary-grade dried lavender only—craft lavender may have pesticides. The filling should be the consistency of soft butter, neither grainy nor runny. Grinding the lavender fine ensures even flavor distribution.
Fill and sandwich the macarons
- Transfer the lavender buttercream to a piping bag fitted with a ¾-inch (2 cm) round tip.
- Pipe a mound of filling (about ½ teaspoon) onto the flat side of one shell from each pair.
- Press a second shell on top, flat side down, until the filling just reaches the edges but does not overflow.
- Work steadily but do not rush—the filling should be visible as a thin layer between the shells.
- If a shell breaks while handling, set it aside and use it as part of a 'broken sandwich' at the end, or enjoy it as a nibble.
+ Show details− Hide details
Ready when: All macarons are filled and paired with filling visible at the edges
Tip: Piping filling is easier than spreading it. If the filling is too warm and soft, refrigerate it for 10 minutes. Do not overfill—a thin, delicate layer is more elegant than a thick glob.
Rest filled macarons and serve
- Arrange the filled macarons in a single layer in an airtight container lined with parchment paper.
- Cover and refrigerate for at least 4 hours, or preferably overnight.
- This resting period allows the shell and filling to meld, creating a more cohesive texture and balanced flavor.
- The shells soften slightly and become chewier while the filling sets.
- After resting, macarons are ready to eat straight from the fridge—they should be cold when served and will warm slightly on your tongue, releasing the delicate lavender aroma.
+ Show details− Hide details
Ready when: Shells are soft and slightly chewy; filling is set and spreadable
Tip: The first 4 hours are the minimum; overnight resting (12–24 hours) produces the best, most balanced flavor and texture. Macarons improve slightly with age.
Good to know
Tips
- Aquafaba meringue is finickier than egg whites—it requires room temperature aquafaba, cream of tartar, and a stabilizing simple syrup. Read the full method before starting, and have all ingredients measured and at the correct temperature.
- Macarons are as much about technique and humidity as ingredient ratios. A humid day is your friend (60–70% relative humidity is ideal). If your kitchen is very dry or very humid, rest times will vary. A hygrometer is a helpful investment.
- The 'macaronage' fold is critical—overmixing deflates the meringue and produces thin, runny shells that won't develop feet; undermixing leaves lumpy, uneven shells. The batter should fall from the spatula in a thick, continuous ribbon that gently settles back into itself.
- Food-grade activated charcoal is mild in flavor but has a slightly earthy taste. If you find the charcoal flavor overwhelming, reduce it to 0.25 teaspoon (1 g) and add a few drops of vanilla extract to the batter to balance it out.
Make ahead
Macarons improve with age. Assemble shells the day before filling if you prefer—they soften and become chewier overnight. Fill them 1–2 days before serving for the best flavor melding. Store unfilled shells in an airtight container at room temperature for up to 3 days, or freeze for up to 1 month (thaw at room temperature before filling).
Storage & reheating
Room temperature (68–72°F / 20–22°C): Up to 2 days in an airtight container. Refrigerator (35–40°F / 2–4°C): Up to 1 week in an airtight container; remove 10 minutes before serving to bring to cool room temperature and enjoy the best texture. Freezer (0°F / −18°C): Up to 3 months in an airtight, freezer-safe container, separated by parchment layers. Thaw at room temperature for 30 minutes before serving.
Substitutions
- dried culinary lavender buds → 2 teaspoons (3 g) culinary lavender extract or 0.5 teaspoon (1 g) dried culinary rose buds ground with a pinch of powdered lemon zest. Lavender extract will make the filling slightly more wet, so reduce non-dairy milk by 1 teaspoon. Rose and lemon creates an elegant floral note. Do not use craft lavender or ornamental varieties—they are not food-safe.
- vegan butter (dairy-free, unsalted) → 0.25 cup (60 g) vegan butter mixed with 0.25 cup (60 g) refined coconut oil, beaten until combined. Coconut oil gives a lighter, less greasy texture, though the filling will be softer and must be piped cold.
- activated charcoal powder (food-grade) → 0.5 teaspoon (2 g) food-grade black cocoa powder or 0.75 teaspoon (2 g) food-grade squid ink powder (diluted in 0.5 teaspoon water before folding). Black cocoa will add a subtle chocolate note; squid ink creates a true black color but has a slight briny undertone—use sparingly.
- unsweetened non-dairy milk → 1 tablespoon (15 ml) aquafaba or 1 tablespoon (15 ml) oat milk. Aquafaba adds richness and a silkier texture; oat milk is neutral and works equally well.