Sourdough Garlic and Herb Focaccia
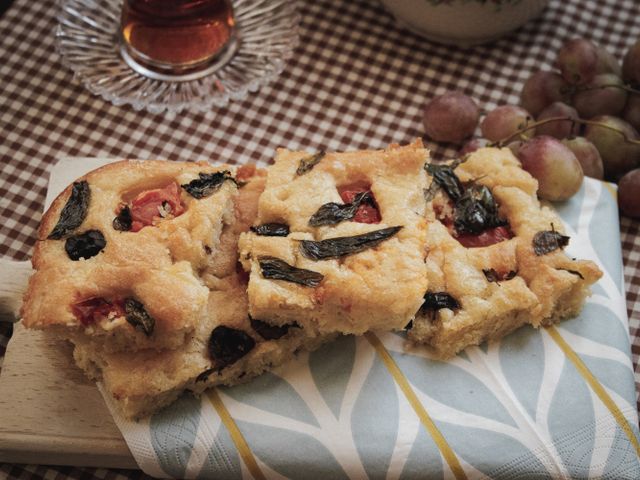
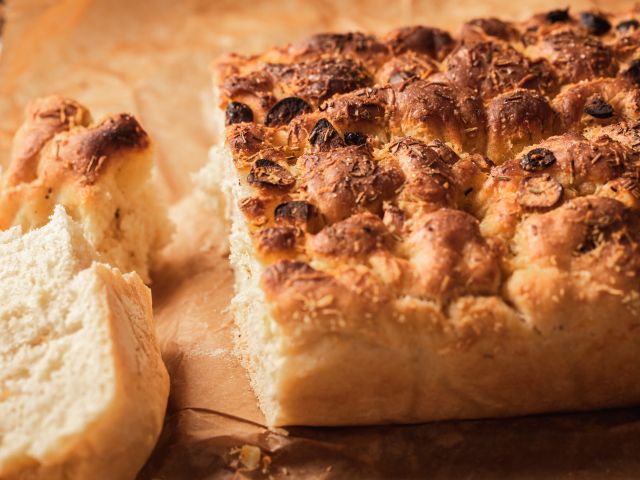
A rustic Italian-style focaccia made with active sourdough starter, topped with roasted garlic, fresh rosemary, thyme, and a generous drizzle of quality olive oil. The dough develops its characteristic open crumb and tender crust through a long, cool fermentation, resulting in a flatbread with tangy flavor and excellent keeping qualities. Perfect for tearing apart, dipping, or slicing for sandwiches.
- Prep
- 20 min
- Cook
- 25 min
- Wait
- 8 hr
- Total
- 8 hr 45 min
- Makes
- 1 focaccia (8–10 slices)
Steps
Before you start
- Have your sourdough starter at peak activity (doubled in size within 4–8 hours of feeding)
- Use a 14×10-inch half-sheet pan or similar rectangular baking pan
- Read through the bulk fermentation timing; total rise time is 8 hours at room temperature or overnight in the fridge
Mix the dough
- In a large bowl, combine 435 g bread flour, 120 ml active sourdough starter at peak, and 300 ml room-temperature water.
- Stir vigorously with a wooden spoon or your hand for 2 minutes until all flour is hydrated and you have a shaggy, wet dough with no dry flour visible.
- The dough will be quite sticky—this is correct.
- Let rest uncovered at room temperature for 30 minutes (autolyse).
+ Show details− Hide details
Ready when: All flour hydrated; dough is slack and wet
Tip: Don't skip the autolyse—it allows the flour to fully absorb water and improves extensibility.
Incorporate salt and oil
- After 30 minutes, sprinkle 10 g sea salt and 30 ml (2 tbsp) olive oil over the dough.
- Wet your hand and fold the dough onto itself 8–10 times, working from the sides toward the center, rotating the bowl 90 degrees between folds.
- This distributes salt and oil evenly without overworking.
- The dough will be sticky but should feel cohesive and smooth.
+ Show details− Hide details
Ready when: Salt and oil fully incorporated; dough is smooth and supple
Tip: Use wet hands for folding to prevent sticking; the fold-and-turn method builds strength without kneading.
Bulk fermentation—first phase
- Cover the bowl with a damp kitchen towel or plastic wrap.
- Let the dough rest at room temperature (68–72°F / 20–22°C) for 4 hours, performing 4 sets of stretch-and-folds at 30-minute intervals during the first 2 hours.
- For each stretch-and-fold: wet your hand, grab one side of the dough, pull it up and fold it over the center, rotate the bowl, and repeat 4 times.
- After the first 2 hours of stretches, let the dough rest undisturbed for the remaining 2 hours.
+ Show details− Hide details
Ready when: Dough has increased 40–50% in volume; surface shows visible bubbles
Tip: Stretch-and-folds develop strength in a wet dough better than kneading; if your kitchen is cold, this step may take 5–6 hours instead.
Prepare the pan
- While the dough ferments, brush a 14×10-inch (36×25 cm) half-sheet pan with 15 ml (1 tbsp) olive oil, coating the bottom and sides evenly.
- Set aside.
+ Show details− Hide details
Ready when: Pan is evenly coated with oil
Prepare the garlic and herbs
- Mince 6 garlic cloves finely.
- Strip the leaves from 2 tbsp fresh rosemary sprigs and chop roughly.
- Strip the leaves from 1 tbsp fresh thyme sprigs.
- Combine garlic and herbs in a small bowl.
+ Show details− Hide details
Ready when: Garlic minced, herbs chopped and combined
Tip: Chop herbs just before topping the focaccia so they stay bright and fragrant.
Shape on the pan
- Turn the fermented dough out onto the oiled pan.
- Using oiled fingertips, gently stretch the dough to fill the pan, working from the center outward.
- The dough is very slack; don't fight it—let it relax for 2–3 minutes between stretches if needed.
- Aim for an even 1-inch (2.5 cm) thickness throughout.
- The dough should reach the edges of the pan.
+ Show details− Hide details
Ready when: Dough fills the pan evenly; thickness is about 1 inch
Tip: If dough springs back aggressively, let it rest 5 minutes, then continue stretching—the gluten is working.
Final proof
- Cover the pan loosely with a damp towel or plastic wrap.
- Let the dough proof at room temperature for 2–3 hours until it has risen noticeably and springs back slowly (not completely) when poked gently with a finger.
- Alternatively, cover and refrigerate overnight (8–12 hours), bringing to room temperature 1 hour before baking.
+ Show details− Hide details
Ready when: Dough has visibly risen; poke test shows slow spring-back
Tip: A long, cool proof (overnight in the fridge) develops better flavor than a quick room-temperature rise.
Preheat and dimpleOven 450°F / 230°C
- Preheat your oven to 450°F (232°C) for 20 minutes.
- Just before baking, using oiled fingertips, gently press dimples all over the surface of the dough, spacing them about 1 inch (2.5 cm) apart.
- These dimples are the signature of focaccia and help prevent the dough from puffing up too much.
- Work gently so you don't deflate the dough.
+ Show details− Hide details
Ready when: Entire surface is dimpled; dough remains risen
Tip: Dimple gently—you're creating indentations, not tearing the dough. This creates the classic focaccia texture.
Top and bakeOven 450°F / 230°C
- Scatter the garlic and herb mixture evenly over the dimpled dough.
- Drizzle the remaining 15 ml (1 tbsp) olive oil over the top, and sprinkle 3 g (½ tsp) fleur de sel across the surface.
- Place in the preheated 450°F (232°C) oven on the middle rack.
+ Show details− Hide details
Tip: Add toppings just before baking so they remain vibrant and don't dry out in the oven.
Bake until goldenOven 450°F / 230°C
- Bake for 22–25 minutes at 450°F (232°C).
- The focaccia is done when the top is deep golden brown, the sides are golden, and the bottom is crispy and sounds hollow when tapped.
- The internal temperature should reach 205–210°F (96–99°C) at the thickest part.
+ Show details− Hide details
Ready when: Top and sides deep golden brown; bottom crisp and hollow-sounding when tapped
Tip: Rotate the pan halfway through baking if your oven has hot spots, but don't open the door before 20 minutes—steam is crucial for a good crust.
Cool and serve
- Remove the focaccia from the oven and let it rest in the pan for 5 minutes.
- Turn it out onto a wire rack to cool for at least 15 minutes before slicing or tearing.
- The focaccia will continue to set as it cools.
- Serve warm or at room temperature.
+ Show details− Hide details
Ready when: Focaccia has cooled enough to handle; crust is firm
Tip: Don't slice immediately—the crumb is still setting, and slicing too early can compress it.
Good to know
Tips
- Peak sourdough starter is essential: it should have doubled in size within 4–8 hours of feeding and show a dome on top. A weak starter leads to slow fermentation and dense focaccia.
- Don't skip the stretch-and-folds during bulk fermentation. They build strength in wet dough without aggressive kneading, ensuring an open crumb and good oven spring.
- If your kitchen is cool, bulk fermentation may take 6–8 hours instead of 4. Cold dough ferments slowly, which is fine—longer fermentation develops more flavor. Retard overnight in the fridge for best results.
- For extra-crispy edges, brush the sides of the pan with more olive oil and let them brown while the focaccia bakes.
Make ahead
Dough can be mixed and bulk-fermented up to 1 day ahead. After shaping on the pan (step 6), cover and refrigerate for 8–12 hours. Bring to room temperature 1 hour before dimpling and baking. This cold, slow proof deepens the sourdough flavor significantly.
Storage & reheating
Room temperature: Keep covered with a kitchen towel for up to 2 days. Refrigerator: Wrap tightly in plastic wrap or foil and store for up to 5 days. To reheat, wrap in foil and warm in a 350°F (175°C) oven for 8–10 minutes. Freezer: Slice, wrap individually in plastic wrap, then place in a freezer bag for up to 1 month. Toast directly from frozen or thaw on a plate. To serve, warm as you would leftover focaccia.
Substitutions
- fresh rosemary sprigs → 1 tbsp dried oregano or Italian seasoning. Use half the amount if substituting with dried herbs, as they are more concentrated. Add dried herbs to the dough during mixing rather than as a topping.
- fresh thyme sprigs → 1 tsp dried thyme. Dried thyme is stronger; use sparingly. Rehydrate in a few drops of water before topping, or mix into the dough.
- garlic cloves → ½ tsp garlic powder mixed with 1 tbsp neutral oil. Fresh garlic provides better flavor and texture, but powder is a convenient backup. Mix with oil to distribute evenly.
- active sourdough starter → ¼ tsp instant yeast mixed into the water, then omit the autolyse step; reduce bulk fermentation to 2–3 hours. Instant yeast works, but you'll lose the sourdough tang and slow fermentation benefits. The result will be less flavorful and may lack the open crumb structure.