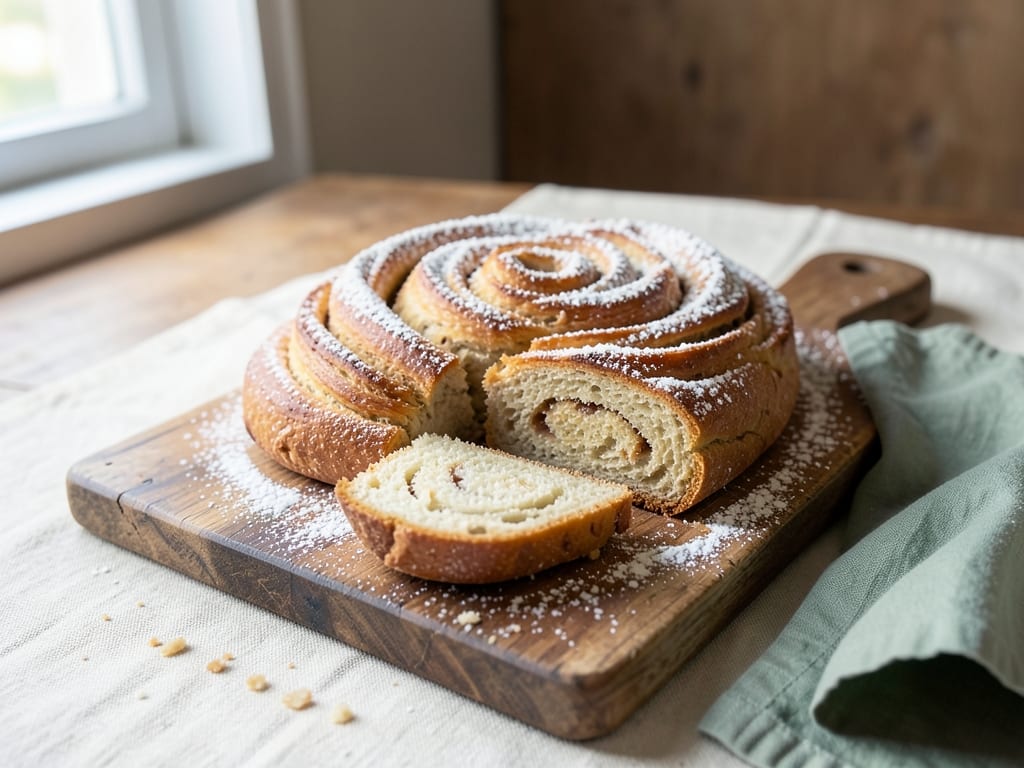
Sourdough Ensaimada
A traditional Spanish spiral pastry made with a rich, lard-based sourdough dough. The tender, flaky layers develop from rolling the fermented dough with softened lard and cinnamon sugar, creating a delicate pastry with complex sourdough flavor and a slightly crispy exterior. Each ensaimada is dusted generously with powdered sugar, making for a beautiful, iconic Spanish treat.
- Prep
- 1 hr 15 min
- Cook
- 30 min
- Wait
- 6 hr 35 min
- Total
- 8 hr 20 min
- Makes
- 6–8 ensaimadas
Steps
Before you start
- Ensure your sourdough starter is active, bubbly, and has been fed 4–6 hours before (or use a portion at peak)
- Bring all ingredients to room temperature, especially the lard (cold lard won't incorporate smoothly)
- Maintain a warm kitchen (70–75°F / 21–24°C) for proper fermentation
- Line your 9×13 baking sheet with parchment paper before you start
Mix and knead dough
- In a large bowl or stand mixer, combine flour, sourdough starter, lukewarm milk, eggs, salt, and caster sugar.
- Mix with a dough hook or by hand for 2–3 minutes until shaggy.
- Let rest (autolyse) for 10 minutes covered.
- Add softened lard in 3–4 additions, mixing well for 1 minute after each addition.
- Once fully incorporated, knead for 8–10 minutes by machine or 15 minutes by hand until the dough is smooth, elastic, and slightly sticky.
- The dough should come together into a cohesive mass that pulls away from the bowl sides.
+ Show details− Hide details
Ready when: Dough is smooth, elastic, slightly sticky, and pulls away from bowl sides
Tip: Don't rush incorporating the lard—add it gradually so it fully integrates into the gluten structure. If the dough is cold, the lard won't mix in properly.
Bulk fermentation
- Transfer dough to a lightly oiled bowl and cover with a damp cloth or plastic wrap.
- Let rise at warm room temperature (70–75°F / 21–24°C) for 4 hours until doubled in size and bubbly.
- You should see bubbles on the surface and the dough should feel airy when gently poked.
+ Show details− Hide details
Ready when: Dough has doubled in volume, shows visible bubbles on surface, and jiggles gently when the pan is moved
Tip: If your kitchen is cool, fermentation will take longer. Use the visual cues (doubled size, visible bubbles) rather than time as your guide.
Pre-shape and rest
- Turn the fermented dough onto a lightly floured work surface.
- Divide into 6–8 equal pieces (about 140–150g each).
- Gently shape each piece into a round, tucking the edges under to build tension.
- Let rest on the floured surface, covered with a cloth, for 15–20 minutes.
- This bench rest relaxes the gluten and makes final shaping much easier.
+ Show details− Hide details
Ready when: Dough pieces have relaxed slightly and feel soft to the touch
Shape ensaimadas
- For each piece, flour your work surface lightly.
- Roll the dough out into a thin rectangle about 8×6 inches (20×15 cm).
- Brush generously with melted lard, then sprinkle with a mix of cinnamon and caster sugar (about 1 tsp sugar plus a pinch of cinnamon per ensaimada).
- Starting from one long side, roll the dough tightly into a coil.
- Once rolled, coil the rope and place seam-side down in a flat spiral shape on the parchment-lined baking sheet.
- Repeat with all remaining pieces, spacing them about 2 inches (5 cm) apart.
+ Show details− Hide details
Ready when: All ensaimadas are shaped and arranged on the baking sheet with proper spacing
Tip: Work quickly but gently to avoid deflating the fermented dough. If dough resists rolling, let it rest for 2–3 minutes and try again.
Final proofOven 375°F / 190°C
- Cover the shaped ensaimadas loosely with a damp cloth or plastic wrap.
- Let them proof at warm room temperature (70–75°F / 21–24°C) for 2–2.5 hours until they are noticeably puffy and light.
- The dough should increase in volume by about 50% and feel airy when gently touched.
- About 15 minutes before the proof is complete, preheat your oven to 375°F (190°C).
+ Show details− Hide details
Ready when: Dough is puffy and jiggles gently when the pan is moved; looks light and airy
Score and bakeOven 375°F / 190°C
- Ensure your oven is fully preheated to 375°F (190°C).
- Lightly brush the proofed ensaimadas with egg wash (1 beaten egg mixed with 1 tbsp water) if desired for a golden, shiny finish.
- Place the baking sheet in the center of the oven.
- Bake for 25–30 minutes until the tops are deep golden brown and lightly caramelized.
- The ensaimadas should smell sweet and aromatic.
+ Show details− Hide details
Ready when: Tops are deep golden brown and caramelized; edges are crispy and pull slightly from the sides
Tip: Don't skip the preheat. A fully preheated oven ensures good oven-spring and even browning.
Cool and finish
- Transfer the hot ensaimadas to a wire cooling rack and let cool for 10–15 minutes until warm but handleable.
- While still warm, generously dust with powdered sugar, tapping off the excess.
- You can add another layer once they've cooled slightly if desired for a thicker coating.
- Serve warm or at room temperature.
+ Show details− Hide details
Ready when: Ensaimadas are warm, dusted with powdered sugar, and ready to serve
Good to know
Tips
- Keep your kitchen warm (70–75°F / 21–24°C) for proper fermentation. Fermentation will be slower in a cool environment, but visual cues (doubling, puffiness) are more reliable than times.
- Don't skip the 10-minute autolyse before adding lard. It helps develop the gluten and makes the fat integrate more smoothly into the dough.
- When rolling out the dough, work gently to avoid deflating all the air bubbles from fermentation. If the dough springs back, let it rest and relax for a few minutes before trying again.
- The melted lard should be cool to room temperature before brushing on the dough to prevent cooking the surface prematurely.
Make ahead
The dough can be cold-fermented in the refrigerator overnight after the initial knead (after step 1) or after pre-shaping (after step 3). Cold fermentation slows the process and develops deeper sourdough flavor. Shaped ensaimadas can also be refrigerated for up to 8 hours before the final proof and baking; allow them to come to room temperature before proofing.
Storage & reheating
Room temperature: 1–2 days in an airtight container. Reheat gently in a 300°F (150°C) oven for 5–10 minutes or microwave for 15–20 seconds. Refrigerator: Up to 4 days in an airtight container; reheat as above. Freezer: Up to 3 months, wrapped individually in plastic wrap then in a freezer bag. Thaw overnight in the refrigerator, then reheat in a 325°F (160°C) oven for 15–20 minutes until warm.
Substitutions
- lard → butter. Use the same amount. Butter will be slightly less traditional but creates a very similar rich, flaky pastry.
- lard → butter. Use the same amount for the filling. The texture will be nearly identical, though lard is more traditional.
- active sourdough starter → instant yeast (½ tsp mixed with 1 tbsp milk, let sit 10 minutes before adding). You'll lose the sourdough tang and fermentation will be faster. Reduce bulk fermentation to 2–3 hours.
- ground cinnamon → finely grated lemon zest (1–2 tbsp) mixed into the filling sugar, or omit for a sugar-only filling. Lemon zest creates a traditional Spanish variation. A plain sugar filling is also authentic.
More pastries
See all →

Find more like this
- Meal
- Breakfast
- Cuisine
- Spanish
- Main ingredient
- Eggs
- Method
- Oven
- Quick & Easy
- Make Ahead