
Sourdough Eid Celebration Walnut and Honeycomb Twisted Buns
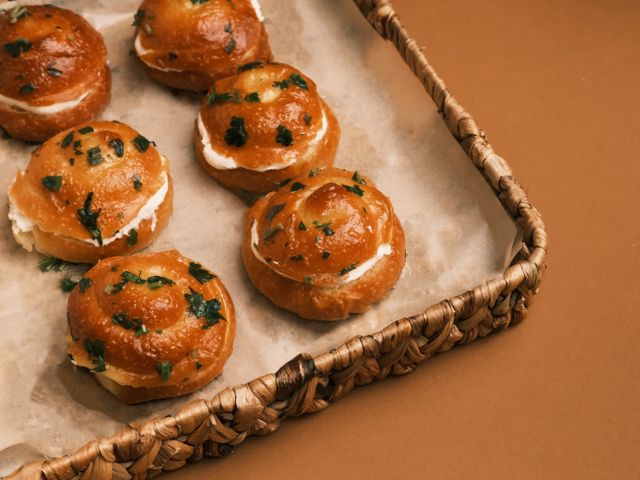
Soft, tangy sourdough buns swirled with spiced walnuts and honey, then topped with a honeycomb glaze. These festive twisted buns celebrate Eid with warm Middle Eastern flavors—cinnamon, cardamom, and rose water—making them perfect for gathering with family. The sourdough fermentation creates a complex flavor and tender crumb, while the honeycomb topping adds a glossy, sticky sweetness.
Steps
Before you start
- Ensure your sourdough starter is active and bubbly; feed it 4–6 hours before starting if needed
- Toast walnuts at 350°F (175°C) for 8 minutes and let cool before using
- Have all ingredients at room temperature for even dough development
- Line two baking sheets with parchment paper
Mix the dough
- In a large bowl or the bowl of a stand mixer, combine the active sourdough starter (180 ml), bread flour (430 g), lukewarm water (180 ml), and salt (9 g).
- Mix with a dough hook on low speed for 2–3 minutes until the flour is fully hydrated and a shaggy dough forms.
- If mixing by hand, stir with a wooden spoon until no dry flour remains.
- Let the dough rest for 20 minutes (autolyse) to allow the flour to fully absorb the liquid.
+ Show details− Hide details
Ready when: Dough is hydrated and shaggy
Tip: Autolyse improves dough extensibility and flavor development.
Add butter and sugar
- Resume mixing on medium-low speed, adding the softened butter (43 g) and sugar (25 g) a little at a time.
- Incorporate each addition fully before adding the next.
- Continue mixing for 5–6 minutes until the dough is smooth, elastic, and comes away from the bowl.
- The dough should feel slightly tacky but not sticky.
+ Show details− Hide details
Ready when: Dough is smooth, elastic, and pulls away from the bowl
Tip: Add butter gradually so it fully incorporates; the sourdough's weak gluten develops during kneading.
First rise
- Transfer the dough to a lightly oiled bowl, cover with a damp towel or plastic wrap, and let rise at room temperature (68–72°F / 20–22°C) for 90–120 minutes until increased in volume by about 50–70%.
- The dough should feel airy and slightly risen but not doubled.
- Sourdough rises more slowly than commercial yeast doughs.
+ Show details− Hide details
Ready when: Dough has increased in volume; poke test leaves a slow impression that partially springs back
Tip: Room temperature and humidity affect rise time. If your kitchen is cool, allow extra time.
Prepare filling mixture
- While the dough rises, combine the chopped toasted walnuts (170 g), honey (100 ml), ground cinnamon (5 g), ground cardamom (1.5 g), and rose water (5 ml, if using) in a small bowl.
- Stir until the walnuts are evenly coated.
- The mixture should be chunky and slightly sticky.
- Taste and adjust cinnamon if desired.
+ Show details− Hide details
Ready when: Walnuts are evenly coated and mixture is well combined
Tip: Toast the walnuts fresh for the best flavor; cold toasted nuts distribute more evenly than raw.
Shape and fill
- Turn the risen dough onto a lightly floured work surface and gently press into a rough rectangle about 12×18 inches (30×45 cm).
- Brush the dough evenly with melted butter (57 g).
- Spread the walnut-honey filling in an even layer over the dough, leaving a ½-inch (1 cm) border.
- Starting from one long edge, roll the dough tightly into a log.
- Cut the log into 12 equal pieces (about 1.5 inches / 4 cm thick).
- Take each piece and gently twist it once at the center, then coil it and tuck the end underneath to create a spiral shape.
+ Show details− Hide details
Ready when: Twelve twisted buns are shaped and ready for the pan
Tip: Twist gently to avoid squeezing out the filling; the coil design mimics a honeycomb and looks beautiful.
Arrange in pan
- Arrange the twisted buns in a 9×13-inch (23×33 cm) baking sheet, leaving about ½ inch (1 cm) between them.
- Alternatively, arrange 6 buns in each of two 8-inch (20 cm) round cake pans.
- Cover loosely with a damp towel or plastic wrap and let proof at room temperature for 60–90 minutes until puffy and risen about ¾ to 1 inch (2–2.5 cm) above the pan edge.
+ Show details− Hide details
Ready when: Buns are puffy; a gentle poke leaves a slight impression that slowly springs back
Tip: Proof in a warm spot (70–75°F / 21–24°C) for best results; overproofing makes them gummy.
Preheat and bakeOven 375°F / 190°C
- Near the end of proofing, preheat the oven to 375°F (190°C).
- Once the buns are ready, place the baking sheet on a rack in the center of the preheated oven.
- Bake for 22–26 minutes until the tops are deep golden brown and the buns sound hollow when tapped on the bottom.
- An instant-read thermometer inserted into the center of a bun should read 200–205°F (93–96°C).
+ Show details− Hide details
Ready when: Deep golden-brown tops; hollow sound when tapped; internal temperature 200–205°F (93–96°C)
Tip: If the tops brown too quickly, tent with foil for the last 8–10 minutes; rotating the pan halfway helps even browning.
Prepare honeycomb glaze
- While the buns bake, combine the honey (100 ml), butter (43 g), and water (15 ml) in a small saucepan.
- Heat over medium heat, stirring occasionally, for 2–3 minutes until the butter is melted and the mixture is warm and blended.
- Remove from heat and let cool slightly for 2–3 minutes.
+ Show details− Hide details
Ready when: Glaze is warm and fully combined
Tip: Keep the glaze warm but not smoking; it should be pourable and glossy.
Glaze while warm
- Remove the buns from the oven and let cool for 2–3 minutes.
- Using a pastry brush, generously brush the warm honeycomb glaze over the tops and sides of each warm bun.
- If using sesame seeds, sprinkle them over the glaze while it's still sticky.
- The glaze will seep into the buns as they cool, creating a moist, sticky-sweet exterior.
+ Show details− Hide details
Ready when: All buns are evenly glazed and glistening
Tip: Work quickly while the buns are warm so the glaze adheres and sets properly; sesame seeds add festive texture.
Cool and serve
- Let the glazed buns cool on the baking sheet for 15–20 minutes, then transfer to a wire rack to cool to room temperature if desired, or serve warm.
- The glaze will set and become tacky as the buns cool.
- Serve with tea, coffee, or milk.
+ Show details− Hide details
Ready when: Buns are warm or at room temperature and glaze has set to a glossy finish
Tip: These are best enjoyed warm or at room temperature on the day they are baked.
Good to know
Tips
- Toast walnuts in a dry skillet or oven at 350°F (175°C) for 8 minutes before chopping; this deepens their flavor and prevents oil from making the filling soggy.
- Sourdough doughs rise much more slowly than commercial yeast. Trust the poke test over the clock: the dough should feel bubbly and pillowy, not doubled in volume.
- The twisted shape looks impressive and helps distribute the filling evenly. If you prefer, you can make simple spiral rolls by rolling, filling, and cutting without twisting.
- For a celebration, arrange the buns in concentric circles on a round platter or cake stand and drizzle with extra warm honey after glazing for an elegant, glistening centerpiece.
Make ahead
The dough can be mixed, covered, and refrigerated for up to 12 hours after the first rise. Bring it back to room temperature (about 60 minutes) before shaping. Alternatively, shape and arrange the buns in the pan, cover, and refrigerate overnight; bake directly from cold, adding 5–10 minutes to the baking time. The finished buns are best served within a few hours of baking.
Storage & reheating
Room temperature: Store in an airtight container or covered baking dish for up to 2 days; the glaze keeps them moist. Refrigerator: Up to 4 days in an airtight container; reheat gently in a 300°F (150°C) oven for 10–12 minutes, loosely covered with foil. Freezer: Wrap cooled buns individually in plastic wrap and freeze in an airtight container for up to 1 month. Thaw at room temperature for 1–2 hours, then warm in a 300°F (150°C) oven for 8–10 minutes.
Substitutions
- raw walnuts → blanched almonds, pistachios, or hazelnuts. Toast them the same way; hazelnuts and pistachios pair especially well with cardamom.
- rose water → orange zest (finely grated) or a pinch of ground cloves. Use ½ teaspoon orange zest or ¼ teaspoon cloves; both complement the warm spices.
- ground cardamom → a pinch of ground nutmeg mixed with ½ teaspoon cinnamon. Maintains warmth; use sparingly as nutmeg is potent.
- active sourdough starter, fed 4–6 hours ahead → ½ cup (120 ml) whole wheat sourdough starter, or use 2 tsp instant yeast mixed into the flour for a faster rise. Whole wheat starter adds deeper flavor; commercial yeast shortens fermentation to 60 minutes for the first rise.
More rolls & buns
See all →




Find more like this
- Meal
- Breakfast
- Cuisine
- Middle Eastern
- Diet
- VegetarianHalal
- Method
- Oven
- Quick & Easy
- Make Ahead
- Occasion
- Eid