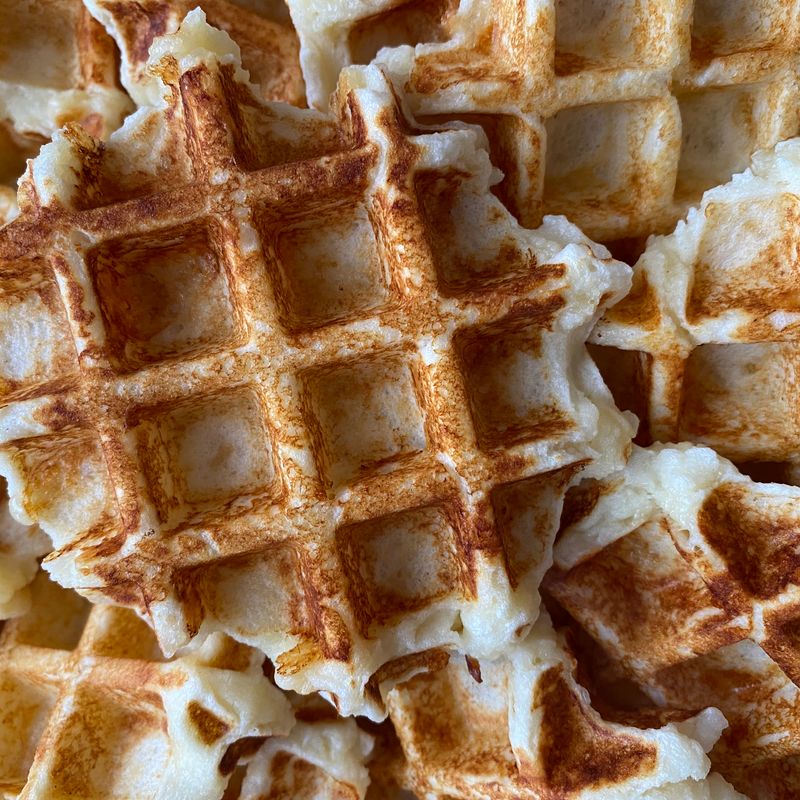
Sourdough Discard Waffles with Crispy Edges
Tender, tangy waffles made with active sourdough discard, delivering a subtle fermented flavor and natural rise. The baking soda reacts with the acidic starter for extra lift, while butter and eggs create a rich, custard-like interior with satisfyingly crispy edges. These waffles are perfect for using up your weekly starter refresh and freeze beautifully for busy mornings.
Steps
Before you start
- Preheat your waffle iron for at least 5 minutes so it's hot and ready—a cool waffle iron will stick
- Use sourdough discard that's bubbly and recently fed (within 4–8 hours of feeding), not sluggish or aged starter
- Have all ingredients at room temperature so the batter mixes smoothly without lumps
- Gather your toppings: maple syrup, fresh berries, whipped cream, or fried eggs—whatever you like
Mix dry ingredients
- In a medium bowl, whisk together the flour, baking soda, and salt.
- Set aside.
- This ensures the leavening is evenly distributed and prevents lumps in your batter.
+ Show details− Hide details
Ready when: mixture is uniform and no streaks of dry flour remain
Tip: Whisk the dry ingredients thoroughly—baking soda clumps easily and won't react properly if unevenly distributed.
Combine wet ingredients
- In a small bowl, whisk the eggs with the sugar until pale and slightly thickened, about 30 seconds.
- Add the melted butter, vanilla extract, and milk, whisking until smooth.
- The mixture should look creamy and well combined.
+ Show details− Hide details
Ready when: mixture is smooth, pale, and fully combined with no streaks of egg white
Tip: Don't overmix once the butter is added—gentle whisking prevents the batter from becoming dense.
Fold in sourdough discard
- Add the bubbly sourdough discard to the wet mixture and whisk gently until just combined.
- The batter will look slightly lumpy—this is fine and actually desirable.
- Avoid overmixing, which can deflate the bubbles and make tough waffles.
+ Show details− Hide details
Ready when: no large streaks of discard remain visible; batter still has a light, airy texture
Tip: Fold gently—the sourdough discard brings existing bubbles that help make fluffy waffles, so preserve that aeration.
Combine wet and dry
- Pour the wet ingredients into the bowl with the dry ingredients.
- Using a rubber spatula, fold together with about 10–12 gentle strokes until just combined.
- The batter should have some small lumps and look slightly thick.
- Do not overmix or beat the batter smooth.
+ Show details− Hide details
Ready when: flour is incorporated with no visible streaks; batter is thick and lumpy, not smooth
Tip: Lumps in waffle batter are fine—they actually help create texture. Smooth, homogeneous batter will cook up dense.
Rest batter briefly
- Let the batter rest for 5 minutes at room temperature.
- This allows the flour to fully hydrate and gives the baking soda a moment to start activating before cooking.
+ Show details− Hide details
Tip: Don't rest longer than 5 minutes or the batter will lose its lift—the baking soda reaction peaks quickly.
Preheat waffle iron
- While the batter rests, ensure your waffle iron is preheated to medium-high heat (or the hottest setting if your iron has no dial).
- The iron should be hot enough that water droplets sizzle immediately on the surface.
- If it has a light that signals readiness, wait for it to turn off.
+ Show details− Hide details
Ready when: water droplets sizzle and evaporate immediately on the hot surface
Tip: A properly preheated iron is essential—a cool iron will stick and produce pale, soggy waffles.
Cook first waffle
- Lightly brush or spray the top and bottom of the waffle iron grid with neutral oil or cooking spray.
- Pour about ¾ cup (180 ml) of batter into the center of the iron.
- Close the lid gently but firmly—do not press down hard or it will squeeze the batter out and make a thin waffle.
- Cook for 3–4 minutes until the exterior is deep golden brown and crispy.
+ Show details− Hide details
Ready when: waffle is deep golden brown, steam has nearly stopped escaping, and it releases easily from the iron when you gently lift the lid
Tip: Don't open the lid before 3 minutes—peeking releases steam and can cause sticking. The waffle should release from the iron easily when truly done.
Transfer and cook remaining waffles
- Using a fork or waffle tool, gently remove the cooked waffle and place it on a plate or wire rack.
- Do not stack waffles on top of each other, as they will steam and soften.
- Repeat with the remaining batter, brushing or spraying the iron with oil between each waffle.
- All 8 waffles should take 15–20 minutes total to cook.
+ Show details− Hide details
Ready when: all waffles are golden brown, crispy on the outside, and warm to the touch
Tip: If your batter thickens as it sits, whisk in 1–2 tbsp of milk to return it to the original consistency.
Serve hot
- Serve the waffles warm, ideally within a few minutes of cooking, with your favorite toppings: maple syrup, fresh berries, whipped cream, fried eggs, sausage, or butter and jam.
- The interior will be fluffy and tender while the edges stay crispy.
+ Show details− Hide details
Tip: Waffles are best eaten immediately, but they stay crispy for about 30 minutes if left uncovered.
Reheat if neededOven 350°F / 175°C
- To reheat frozen or day-old waffles, place them directly in a toaster oven at 350°F (175°C) for 3–5 minutes until heated through and crispy again.
- Do not use a regular toaster, which can char them unevenly.
+ Show details− Hide details
Ready when: waffles are hot throughout and edges are crispy
Tip: Toaster ovens heat waffles more evenly and gently than regular toasters.
Cool before freezing (if freezing)
- If you plan to freeze waffles, let them cool to room temperature on a wire rack for about 10 minutes.
- This prevents condensation from making them soggy.
+ Show details− Hide details
Ready when: waffles are completely cool to the touch
Tip: Cool them uncovered so steam can escape; covering them will trap moisture.
Good to know
Tips
- The key to fluffy waffles is a hot waffle iron and not opening the lid too early. Steam escaping mid-cook causes sticking and pale, undercooked waffles.
- If your sourdough discard is sluggish or several days old, it won't have enough bubble power. Always use recently fed, actively bubbly discard for best results.
- Lumpy batter is your friend—overmixing deflates bubbles and creates dense, rubbery waffles. Mix just until the flour disappears.
- Make a double batch and freeze the extras. These waffles freeze beautifully and reheat to almost fresh-made crispiness in a toaster oven.
Make ahead
You can prepare the dry ingredients and combine the wet ingredients (minus the discard) up to 1 day ahead. Store the dry mix in an airtight container and refrigerate the wet mix in a covered bowl. Just before cooking, fold in the bubbly discard and cook as directed. You can also freeze cooked waffles for up to 2 months.
Storage & reheating
Room temperature (uncovered): up to 4 hours, though best eaten fresh. Refrigerator: up to 3 days in an airtight container. Freezer: up to 2 months in a freezer bag or airtight container with parchment between waffles. Reheat frozen waffles in a toaster oven at 350°F (175°C) for 3–5 minutes until crispy.
Substitutions
- whole milk or buttermilk → equal amount of buttermilk or sour cream thinned with water. Buttermilk adds extra tang and tenderness, enhancing the sourdough flavor. If using sour cream, use 3 tbsp sour cream mixed with 1 tbsp water.
- all-purpose flour → whole wheat flour (use 3/4 cup or 90 g) mixed with 1/4 cup (35 g) all-purpose flour. Whole wheat waffles will be slightly denser but more flavorful. White whole wheat flour works better than red for a less heavy result.
- unsalted butter, melted → neutral oil such as vegetable, canola, or light olive oil. Oil makes waffles slightly crisper and lighter. Use the same amount (4 tbsp or 60 ml). The flavor will be less rich but still delicious.
- baking soda → 1 tsp baking powder in place of the baking soda (omit the salt if doing this to avoid too much sodium). Baking powder gives less tang but still provides lift. The waffles will be slightly less sour. Use 1/4 tsp salt if substituting.
More pancakes & waffles
See all →




Find more like this
- Meal
- Breakfast
- Diet
- VegetarianHalal
- Method
- Stovetop
- Quick & Easy
- EasyFreezer Friendly