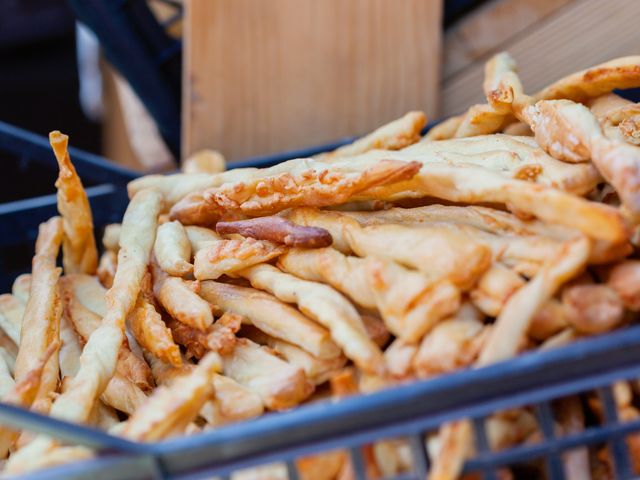
Sourdough Discard Japanese Sake and Mirin Glazed Breadsticks
Crispy, golden breadsticks made with sourdough discard and brushed with a tangy-sweet glaze of sake, mirin, and fresh ginger. The sourdough adds depth and slight sourness that complements the Japanese flavors beautifully. These breadsticks are perfect as an appetizer, snack, or side dish—ideal for dipping in miso soup or serving alongside sushi.
- Prep
- 25 min
- Cook
- 22 min
- Wait
- 1 hr 30 min
- Total
- 2 hr 17 min
- Makes
- 16 breadsticks
Steps
Before you start
- Have your sourdough discard at room temperature before starting
- Preheat your oven to 425°F (220°C) about 15 minutes before the final rise is complete
- Line two large baking sheets with parchment paper
Mix dough ingredients
- In a large bowl or in the bowl of a stand mixer, combine sourdough discard, bread flour, warm water, salt, and olive oil.
- Using a stand mixer with a dough hook on low speed (or mixing by hand), combine until all flour is incorporated and a shaggy dough forms, about 2 minutes.
- Increase speed to medium and knead for 8 minutes until the dough is smooth, elastic, and slightly tacky (not sticky).
- The dough should come away from the bowl sides but stick slightly to the bottom.
+ Show details− Hide details
Ready when: Dough is smooth, elastic, and slightly tacky
Tip: If dough is too sticky, add flour 1 tablespoon at a time; if too dry, add water 1 teaspoon at a time
First rise
- Cover the bowl with a damp towel or plastic wrap.
- Let the dough rise at room temperature for 60 minutes until it increases by about 50% (not quite doubled; sourdough typically rises slower than commercial yeast dough).
+ Show details− Hide details
Ready when: Dough has increased by about 50% and feels airy when pressed gently
Tip: Use the poke test: press a finger into the dough; if the indent springs back halfway, it's ready
Prepare glaze
- While dough rises, make the glaze.
- In a small saucepan, combine sake, mirin, minced ginger, soy sauce, and sugar.
- Bring to a simmer over medium-high heat, stirring occasionally, and simmer for 4–5 minutes until the liquid reduces by about one-third and becomes slightly syrupy (you should have roughly ¼ cup / 60 ml of glaze remaining).
- The sauce should coat the back of a spoon lightly.
- Remove from heat and let cool slightly before using.
+ Show details− Hide details
Ready when: Glaze is syrupy and reduced by about one-third, coats a spoon lightly
Tip: The glaze will thicken slightly as it cools, so don't over-reduce or it will become too thick to brush
Shape breadsticks
- Turn dough out onto a lightly floured surface.
- Gently press it into a rectangle approximately 8×12 inches (20×30 cm) and about ½ inch (1.25 cm) thick.
- Using a bench scraper or sharp knife, cut the dough into 16 equal strips, each about ½ inch (1.25 cm) wide and 12 inches (30 cm) long.
- Gently stretch each strip to about 14 inches (35.5 cm) long as you transfer it to a prepared baking sheet, spacing them about 1 inch (2.5 cm) apart.
- You should fit 8 breadsticks per sheet.
+ Show details− Hide details
Ready when: 16 evenly cut strips laid out on baking sheets
Tip: Don't stretch too hard or the dough will tear; let it rest a moment if it resists, then stretch gently
Second rise
- Cover the baking sheets loosely with a damp towel or plastic wrap.
- Let breadsticks rise at room temperature for 30 minutes until they are puffy and have increased by about 50% in thickness (they should look airy but not overly puffed).
- The surface should feel slightly springy to the touch.
+ Show details− Hide details
Ready when: Breadsticks are puffy and increased by about 50% in thickness
Tip: If your kitchen is cool, the rise may take 35–40 minutes; warm kitchens speed up proofing
Preheat ovenOven 425°F / 220°C
- About 15 minutes before the second rise is complete, preheat your oven to 425°F (220°C).
- Use the top rack and middle rack for even baking.
+ Show details− Hide details
Ready when: Oven reaches 425°F (220°C)
Brush with glaze
- Once the breadsticks have risen and the oven is preheated, use a pastry brush to lightly brush the glaze over the top surface of each breadstick.
- Use about half the glaze, brushing evenly so each stick gets a thin, even coating.
- Reserve the remaining glaze for after baking.
+ Show details− Hide details
Ready when: Breadsticks are lightly coated with glaze
Tip: Don't apply glaze too heavily or it will pool and burn; a light, even brush stroke is best
Bake until goldenOven 425°F / 220°C
- Place baking sheets in the preheated 425°F (220°C) oven on the top and middle racks.
- Bake for 18–22 minutes, rotating the sheets halfway through (top rack to middle, middle to top) to ensure even browning.
- The breadsticks are done when they are deep golden brown on top and bottom, and sound hollow when tapped on the bottom.
- The edges should be crispy and slightly darker than the centers.
+ Show details− Hide details
Ready when: Deep golden brown color, hollow sound when tapped, crispy edges
Tip: Rotate pans halfway through for even browning; if tops are browning too fast, lower oven temperature by 25°F (14°C)
Final glaze and garnish
- Remove breadsticks from the oven and let cool on the baking sheets for 2 minutes.
- Use the remaining glaze to brush a light second coat on each breadstick while still warm.
- This gives a glossy finish.
- If using toasted sesame seeds, sprinkle them evenly over the glaze immediately while it's still sticky.
- If using nori strips, scatter them over the top as well.
- Let the breadsticks cool completely on the baking sheets (about 10 minutes) so the glaze sets and the breadsticks firm up to a crispy texture.
+ Show details− Hide details
Ready when: Glaze has set to a glossy finish and breadsticks are crispy
Tip: Apply the second glaze coat while breadsticks are still hot so it adheres and becomes glossy; wait until cool before serving to avoid burns
Good to know
Tips
- Sourdough discard doesn't need to be active/bubbly, but it should be at room temperature so it activates during mixing and proofing—a cold starter will slow fermentation significantly
- The sake and mirin glaze is the flavor anchor; don't skip reducing it, as this concentrates the umami and creates a glossy, professional-looking finish
- These breadsticks are best served warm or at room temperature, and they pair beautifully with miso soup, edamame, or as a creative snack alongside sushi
- If you don't have a stand mixer, you can knead by hand: mix until shaggy, then knead on a lightly floured surface for 10–12 minutes until smooth and elastic
Make ahead
Dough can be mixed and refrigerated for up to 8 hours. Skip the first rise and place covered dough in the fridge for 4–8 hours or overnight. Remove 30 minutes before shaping to bring to cool room temperature, then proceed with shaping, proofing, and baking. Alternatively, shaped and proofed breadsticks can be frozen on a baking sheet (before glazing) for up to 2 weeks; bake directly from frozen, adding 5–7 minutes to bake time.
Storage & reheating
Store cooled breadsticks in an airtight container at room temperature for up to 3 days. They will soften slightly but remain flavorful. To restore crispness, reheat in a 350°F (175°C) oven for 5–7 minutes until warmed through and crispy again. Freeze for up to 1 month in a freezer-safe bag. Thaw at room temperature or reheat directly from frozen in a 375°F (190°C) oven for 8–10 minutes.
Substitutions
- dry sake → Dry sherry or white wine (use the same amount). Sake is ideal, but sherry or wine will give a similar depth; reduce the glaze to achieve the same syrupy consistency
- mirin (sweet rice wine) → Honey or agave nectar (use 3 tablespoons / 45 ml in place of ¼ cup). Mirin adds a complex sweetness; honey is sweeter, so reduce the amount and adjust soy sauce to taste for balance
- bread flour → All-purpose flour (use the same amount). Bread flour gives a chewier crumb; all-purpose flour will produce a slightly more tender breadstick but less structure
- fresh ginger root → ¼ teaspoon ground ginger or ½ teaspoon fresh garlic, finely minced. Fresh ginger is preferable for brightness; ground ginger is more muted but still effective; garlic adds a savory note instead