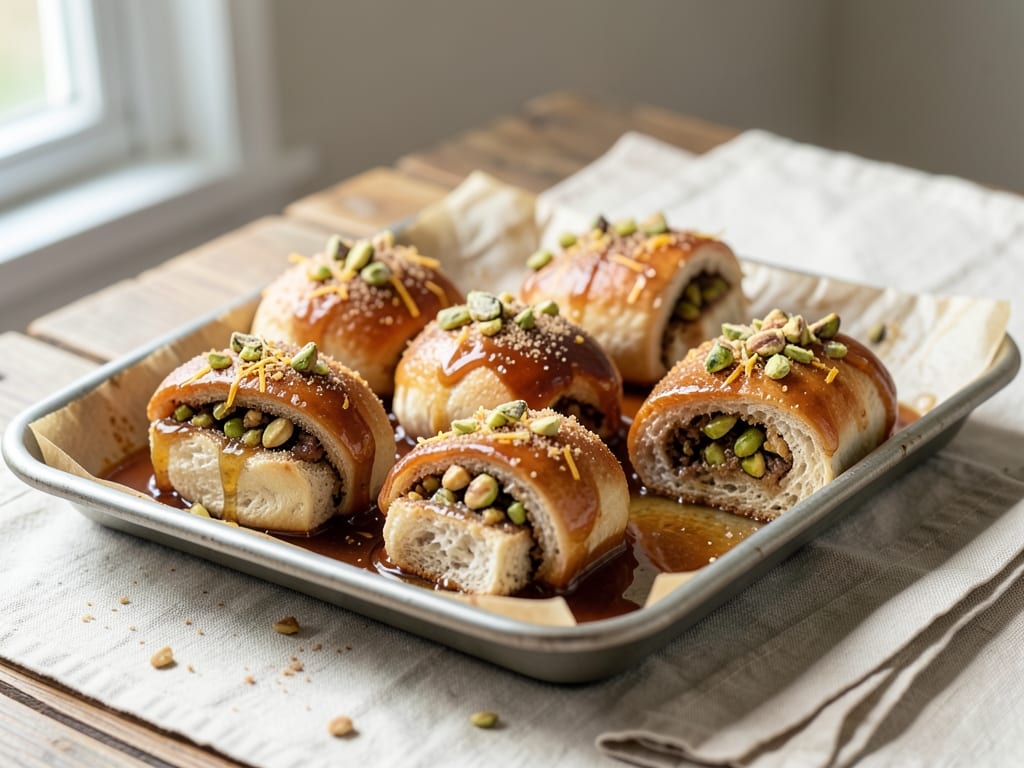
Sourdough Baklava Sticky Buns
Soft, tangy sourdough buns are rolled around a cardamom-spiced pistachio and walnut filling, then baked over a sticky honey-brown sugar caramel with orange blossom. They taste like baklava in cinnamon-roll form. The dough proofs overnight in the fridge, so you bake them fresh in the morning.
- Prep
- 1 hr 37 min
- Cook
- 33 min
- Wait
- 16 hr 25 min
- Total
- 18 hr 35 min
- Makes
- 12 sticky buns (one 9×13-inch pan)
Steps
Before you start
- Feed your starter 4–8 hours before mixing. It should be bubbly and at least doubled in volume, and a spoonful should float in water.
- Plan the timeline: mix in the morning, bulk ferment about 5 hours, shape in the afternoon, chill overnight, then proof 45 minutes and bake the next day. Total time is about 18½ hours, and only about 1¾ hours of that is hands-on.
- Take the 6 tablespoons (85 g) of dough butter out of the fridge 1 hour before kneading so it is soft but not greasy.
- Toast the walnuts and pistachios first (instructions are in the filling step) and let them cool. Lightly butter a 9×13-inch pan before you start the topping.
Mix and rest dough
- In a large bowl, whisk the lukewarm milk, starter, egg, egg yolk and sugar until the starter has mostly dissolved and the mixture looks uniform and slightly foamy.
- Add the bread flour, salt and cardamom.
- Stir with a sturdy spatula, then squeeze with wet hands, until no dry flour remains and you have a shaggy, sticky dough.
- Cover and let it rest for 30 minutes so the flour hydrates.
+ Show details− Hide details
Ready when: No dry flour remains and the dough looks like a shaggy, sticky mass
Tip: Measure the flour by weight if you can. Too much flour gives dense buns.
Knead in butter
- Add the softened butter, a piece at a time.
- Knead in the bowl with wet hands, or use a stand mixer on medium-low (speed 2–3), until each piece is absorbed before adding the next.
- Keep kneading for 8–10 minutes by machine or 12–15 minutes by hand.
- The dough is ready when it is smooth, tacky but not sticky, and passes the windowpane test: a small piece stretches thin enough to see light through without tearing.
+ Show details− Hide details
Ready when: Dough is smooth and elastic, and a stretched piece forms a thin translucent window
Tip: If the dough feels greasy and slides around, rest it for 5 minutes before continuing. The butter will absorb as the gluten relaxes.
Bulk ferment with folds
- Transfer the dough to a lightly oiled or buttered bowl and cover.
- Ferment at 75–78°F (24–26°C) for about 5 hours.
- In the first 2 hours, do 3 sets of stretch and folds, 30–45 minutes apart: lift one edge of the dough, stretch it up, and fold it over the center.
- Turn the bowl and repeat 4 times.
- Leave the dough alone for the remaining time.
- It is ready when it has grown by about 50–75%, looks puffy and jiggly, and has a few bubbles at the edges.
+ Show details− Hide details
Ready when: Dough is puffy and jiggly, has risen 50–75%, and shows bubbles at the edges
Tip: Enriched sourdough ferments slowly. In a cool kitchen it can take 6–7 hours, so judge by the dough's volume, not the clock.
Toast nuts and make fillingOven 350°F / 175°C
- While the dough finishes fermenting, heat the oven to 350°F (175°C).
- Spread all the pistachios and walnuts (filling and topping) on a rimmed baking sheet.
- Toast for 8–10 minutes until they smell nutty and the walnuts darken slightly.
- Cool completely.
- Pulse the filling nuts in a food processor in 1-second bursts to a coarse crumb with some pea-sized pieces (or chop finely by hand).
- Chop the topping nuts coarsely and set them aside.
- Stir the filling nuts with the melted butter, brown sugar, 2 tablespoons honey, cinnamon, cardamom, orange zest and salt into a thick, damp, sandy paste.
+ Show details− Hide details
Ready when: Nuts smell toasty and are fragrant; the filling holds together when pinched
Tip: Don't over-process. Nut butter will leak out of the filling and make the buns greasy.
Make honey caramel
- Butter the sides of a 9×13-inch (23×33 cm) pan lightly.
- In a small saucepan over medium heat, melt the topping butter with the brown sugar, honey, cream and salt.
- Stir until smooth.
- Bring to a gentle bubble and simmer for 2 minutes without stirring.
- Take off the heat and stir in the orange blossom water, if using.
- Pour the caramel into the pan, tilt to coat the bottom evenly, and scatter the chopped topping nuts over it.
- Let it cool while you shape the buns.
+ Show details− Hide details
Ready when: Caramel is smooth, glossy and has simmered for 2 minutes
Tip: Honey scorches fast. Stay by the stove and take the pan off the heat the moment the 2 minutes are up.
Roll out and fill
- Turn the dough onto a lightly floured counter.
- Gently press it into a rough rectangle, then roll to an even 12×18-inch (30×45 cm) rectangle about ¼ inch (6 mm) thick, with a long side facing you.
- Keep the corners square.
- Spread the filling evenly over the dough, leaving a ¾-inch (2 cm) clean border along the far long edge.
- Press the filling lightly into the dough.
- Starting from the long edge nearest you, roll up tightly into an 18-inch log.
- Pinch the seam closed.
+ Show details− Hide details
Ready when: Dough is an even 12×18-inch rectangle and the log is snug with a sealed seam
Tip: If the dough springs back while rolling, rest it for 5 minutes under a towel, then continue.
Cut and arrange buns
- Using the dental floss or a sharp serrated knife, trim the ends of the log if they are thin.
- Cut the log into 12 equal slices, each about 1½ inches (4 cm) thick.
- To use floss, slide it under the log, cross the ends over the top and pull.
- Arrange the buns cut side down in the pan in 3 rows of 4, over the cooled caramel.
- Leave small gaps between them, because they will grow to fill the pan.
+ Show details− Hide details
Ready when: 12 even buns sit cut side down in the pan
Tip: Floss cuts cleanly without squashing the swirls, which a dull knife can do.
Chill overnight
- Cover the pan tightly with plastic wrap or a large reusable cover.
- Refrigerate for 8–12 hours.
- The cold proof builds the tangy sourdough flavor and lets the buns puff up slowly.
+ Show details− Hide details
Ready when: Buns look slightly puffy and have started to fill the gaps in the pan
Tip: You can leave them up to 14 hours. Beyond that, the dough can over-ferment and bake up flat.
Warm up and preheatOven 375°F / 190°C
- Take the pan out of the fridge.
- Remove the cover and replace it with a loose tent of plastic wrap sprayed with oil.
- Let the buns stand at room temperature for 45–60 minutes.
- Preheat the oven to 375°F (190°C) with a rack in the center for the last 20 minutes.
- The buns are ready when they look puffy, fill the pan, and a gently poked bun springs back slowly and leaves a small dent.
+ Show details− Hide details
Ready when: Buns are puffy, touching each other, and spring back slowly when poked
Tip: If your kitchen is cold, give the buns up to 90 minutes. Underproofed buns bake up dense and tight.
Bake the bunsOven 375°F / 190°C
- Put the pan on a rimmed baking sheet to catch drips.
- Bake at 375°F (190°C) for 28–32 minutes, until the tops are deep golden brown, the caramel is bubbling around the edges, and the center of a middle bun reads 190°F (88°C) on an instant-read thermometer.
- If the tops are browning too fast after about 18 minutes, tent loosely with foil.
+ Show details− Hide details
Ready when: Tops are deep golden brown and the center bun reads 190°F (88°C)
Tip: Don't pull them early because they look done on top. Underbaked centers stay doughy and gummy.
Rest and invert
- Let the buns rest in the pan for 10 minutes, no longer.
- The caramel should be thick but still fluid.
- Put a rimmed serving platter or baking sheet over the pan.
- Wearing oven mitts, flip them together in one confident motion.
- Lift the pan away slowly.
- Spoon any caramel and nuts left in the pan back over the buns.
+ Show details− Hide details
Ready when: Caramel is thick and glossy but still flows when the pan is tilted
Tip: If you wait too long, the caramel hardens and the buns will stick to the pan. If that happens, warm the pan on a burner on low for 1 minute and try again.
Drizzle and serve
- Drizzle the warmed honey over the buns, and add a tiny pinch of flaky salt if you like.
- Serve warm, pulling the buns apart by hand.
- They are best in the first 2 hours, while the caramel is soft.
Good to know
Tips
- Use an active starter at its peak. A sluggish one will make the bulk ferment much longer and the buns dense.
- Toast the nuts. Raw nuts taste flat and woody; toasted ones give the real baklava flavor.
- Cool the caramel before laying the buns on it. Hot caramel starts to melt the dough and makes it bake unevenly.
- Invert the pan within 10 minutes of leaving the oven. This is the biggest factor in clean release.
Make ahead
"Make the dough through step 8 and chill for 8–12 hours as written. You can also freeze the shaped, unbaked buns in the pan (wrapped tightly) for up to 1 month. Thaw overnight in the fridge, then proof at room temperature for 1–1½ hours before baking."
Storage & reheating
"Room temperature: covered, up to 1 day. Refrigerator: up to 4 days in an airtight container. Freezer: wrap individual baked buns and freeze up to 2 months. To reheat, microwave one bun for 20–30 seconds, or warm covered with foil at 325°F (160°C) for 10–15 minutes until soft and the caramel is sticky again."
Substitutions
- shelled unsalted pistachios → Almonds or hazelnuts. The flavor will be less like baklava but still good. Toast them the same way.
- bread flour → All-purpose flour. The buns will be slightly softer and less chewy. Hold back 1–2 tablespoons of flour if the dough feels dry.
- orange blossom water → Rose water or ½ teaspoon vanilla extract. Use 1/2 teaspoon of rose water because it is stronger. Or omit and add a little extra orange zest to the filling.
- whole milk → Unsweetened oat milk. Works fine for a dairy-light dough, though the crumb is a little less rich. Use the same weight.
More breakfast bakes
See all →


Find more like this
- Meal
- Breakfast
- Cuisine
- American
- Diet
- VegetarianHalal
- Quick & Easy
- Make Ahead