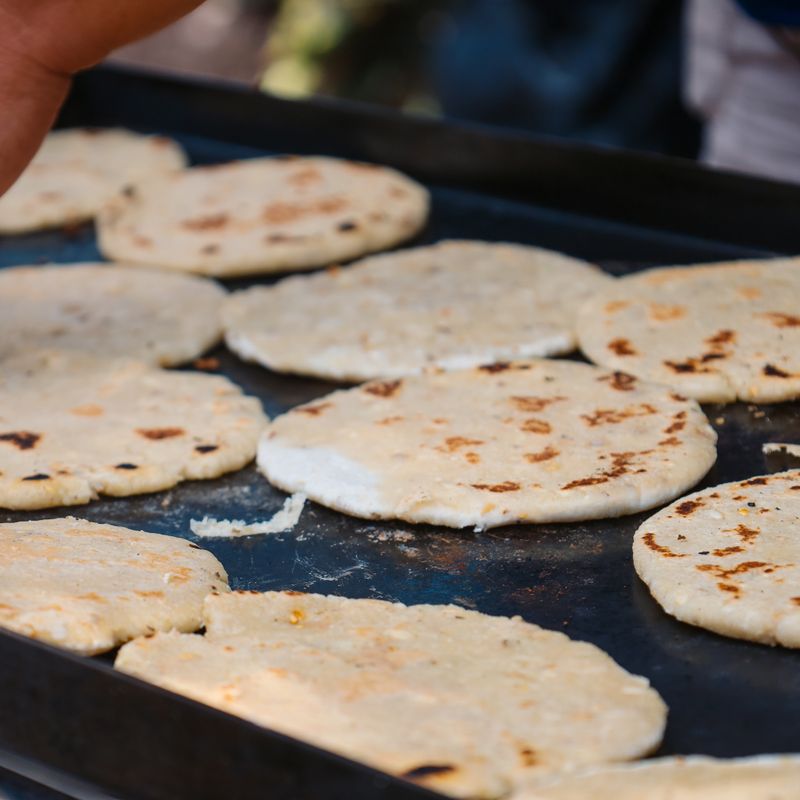
Pupusa with Cheese and Loroco
A traditional Salvadoran street food—a thick, hand-pressed corn tortilla filled with melted quesillo cheese and delicate loroco flowers. Pan-fried until golden and crispy on the outside while staying soft within, pupusas are authentically served with a side of curtido (pickled cabbage slaw) and spicy tomato salsa roja.
Steps
Before you start
- Have a tortilla press ready, or use two sheets of plastic wrap and a heavy skillet to flatten the dough
- Gather all filling ingredients and measure them before you begin forming pupusas so you can work quickly
- Use warm water (about 110°F / 43°C) so the masa hydrates evenly and the dough is easier to shape
- Have vegetable oil heating and ready as you form the last few pupusas so the pan is hot when you start frying
Mix the dough
- Combine corn masa harina and salt in a medium mixing bowl.
- Gradually add warm water, mixing with your hands until a soft, pliable dough forms that holds together without cracking when pressed, but isn't sticky or wet.
- The texture should resemble a cross between playdough and mashed potatoes.
- If the dough feels too dry and crumbly, add water 1 tablespoon at a time; if too wet, sprinkle in a little more masa harina.
+ Show details− Hide details
Ready when: Dough is smooth, holds together, and shows no cracks when pressed between your palms
Tip: Do not overmix; gentle handling keeps the dough tender. Add water slowly—it's easier to add more than to remove excess.
Prepare the filling
- In a small mixing bowl, combine crumbled quesillo cheese and rinsed loroco flowers, gently folding them together so the delicate flower petals don't shred.
- If using dried loroco, crumble it gently into the cheese.
- The filling should be evenly distributed with visible pieces of loroco throughout.
+ Show details− Hide details
Ready when: Cheese and loroco are evenly mixed and ready to fill the pupusas
Tip: Don't overmix—loroco petals are delicate and will shred if agitated too much. Gentle folding preserves their delicate texture.
Form the pupusas
- Divide the dough into 8 equal portions (each about 2 oz / 55g).
- Working with one portion at a time, place it between two sheets of plastic wrap and use a tortilla press (or the bottom of a heavy skillet) to press it into a thin circle about 4 inches (10 cm) across and ¼-inch (6 mm) thick.
- Peel off the top plastic sheet, spread 2 to 3 tablespoons of the cheese-loroco filling onto the center, leaving a ½-inch (1 cm) border.
- Carefully peel off the bottom plastic, fold the edges of the dough up and over the filling, and gently press with your fingers to seal all around the edges, creating a flat patty.
- Quickly re-press the sealed pupusa between fresh plastic sheets to flatten it to about ½-inch (1 cm) thickness, being careful not to apply too much pressure or the filling will burst through.
- Stack finished pupusas between plastic sheets to keep them warm and pliable while you shape the rest.
+ Show details− Hide details
Ready when: All pupusas are sealed, flat, about ½-inch thick, with no visible cracks or torn spots
Tip: Work quickly so the dough doesn't cool and become stiff. If dough tears when sealing, pinch it closed and re-press gently. Keep your hands slightly damp to prevent sticking.
Heat pan and fry pupusas
- Place a large cast iron skillet or griddle over medium-high heat and add vegetable oil.
- Once the oil shimmers and is hot (about 30 seconds), carefully transfer a pupusa to the pan.
- Fry for 3 to 4 minutes on the first side until the surface turns golden brown and small blisters begin to form.
- Using a spatula, gently flip the pupusa and fry the other side for another 3 to 4 minutes until it is also golden brown and crispy.
- Transfer to a paper towel-lined plate.
- Repeat with remaining pupusas, working in batches to avoid crowding the pan—you should fit 2 to 3 pupusas comfortably depending on your skillet size.
- Keep finished pupusas warm on a covered plate while you finish cooking the remainder.
+ Show details− Hide details
Ready when: Exterior is golden brown with light blistering; cheese inside feels soft and melted when gently pressed; interior is warm throughout
Tip: Don't flip too early or the dough will tear—wait for a light crust to form on the bottom first. Maintain medium-high heat so the dough cooks through without burning the outside.
Rest and serve
- Transfer the pupusas to a serving platter and let them cool for 1 to 2 minutes so the cheese sets slightly and they are comfortable to eat.
- Serve warm with curtido (pickled cabbage slaw), tomato salsa roja, and extra fresh loroco on the side if desired.
- Pupusas are traditionally eaten by hand, often torn open to add extra filling or salsa inside.
+ Show details− Hide details
Ready when: Pupusas are warm throughout, cheese is melted but beginning to set, exterior is still crispy
Tip: Pupusas are best eaten fresh and warm. If they cool completely, reheat them in a dry skillet over medium heat for 1 to 2 minutes per side to restore crispiness.
Good to know
Tips
- Quesillo is a fresh, mild cheese traditional to El Salvador and Guatemala; if unavailable, fresh mozzarella is the closest substitute, though it's slightly more elastic
- Loroco flowers are now easier to find online, in Latin American markets, or specialty grocery stores; dried loroco is a convenient substitute and stores well for months
- Keep finished pupusas warm on a covered plate while frying to maintain their temperature and prevent them from cooling too quickly
- Pupusas are eaten by hand and traditionally torn open to add more curtido, salsa, or extra filling inside—this is part of the eating experience
Make ahead
Pupusa dough can be prepared up to 4 hours ahead and stored covered at room temperature. Formed, uncooked pupusas can be refrigerated for up to 2 hours or frozen for up to 3 months; fry directly from frozen, adding 1 to 2 minutes to the cooking time per side.
Storage & reheating
Room temperature (up to 2–3 hours in an airtight container, though they are best eaten fresh). Refrigerate (up to 3 days; reheat in a dry skillet over medium heat for 1–2 minutes per side). Freeze (up to 3 months; thaw slightly before frying or fry directly from frozen, adding 1–2 minutes to cooking time per side).
Substitutions
- quesillo cheese → fresh mozzarella (pulled into small pieces) or Oaxaca cheese. These fresh cheeses melt similarly to quesillo. Avoid hard cheeses as they will not melt properly inside the pupusa.
- loroco flowers, fresh → dried loroco (3 tbsp / 15g), or diced poblano pepper. Dried loroco works as well as fresh and is easier to find online or in markets—use the full amount. Poblano pepper provides mild heat and earthiness instead of the subtle floral flavor, giving a nice regional twist.
- vegetable oil → lard or coconut oil. Lard is traditional in parts of Central America and adds authentic richness; coconut oil works but will add a subtle coconut taste.
- corn masa harina → fresh masa (2.5 cups / 580g), adjusting water as needed. Fresh masa makes slightly softer pupusas with better texture. Reduce water to ¾ cup (180ml) since fresh masa already contains moisture; add more if needed.
More flatbreads
See all →
Find more like this
- Meal
- Snack
- Main ingredient
- Cheese
- Method
- Stovetop
- Quick & Easy
- 5 Ingredients or Less