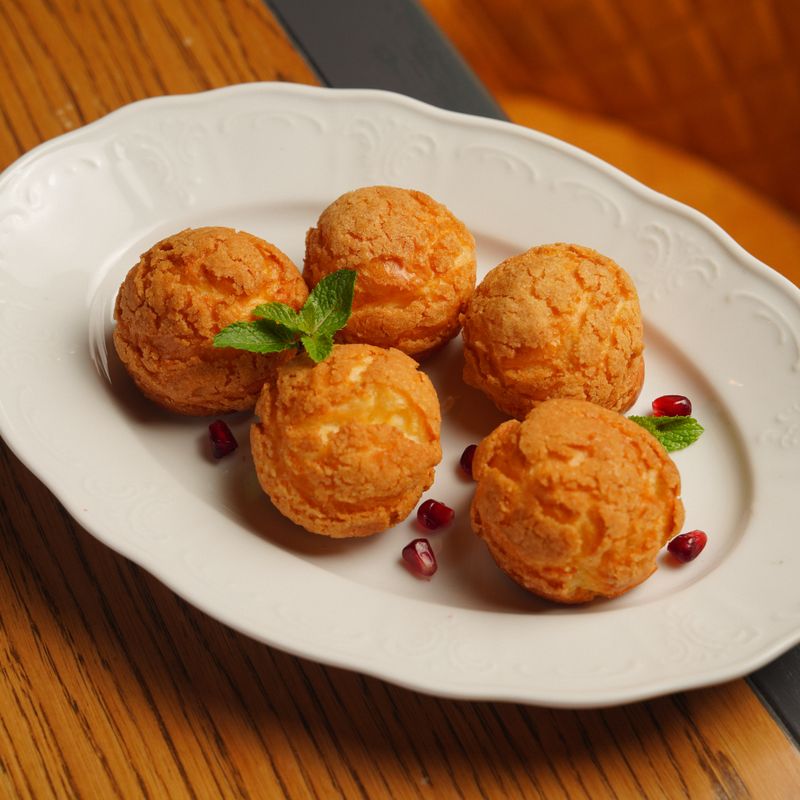
Huevos Reales Cream Puff with Candied Orange
A Caribbean-inspired cream puff pastry featuring delicate, golden choux shells filled with silky egg yolk custard and topped with candied orange peel. Huevos Reales—Spanish for "royal eggs"—celebrates the richness of egg yolks in a light, elegant dessert that marries crispy pastry with creamy filling and the bright citrus notes of homemade candied orange.
- Prep
- 45 min
- Cook
- 50 min
- Wait
- 1 hr 15 min
- Total
- 2 hr 50 min
- Makes
- 12 cream puffs
Steps
Before you start
- Bring all ingredients to room temperature unless noted; cold butter and eggs will prevent proper choux emulsification
- Prepare a baking sheet with parchment paper; keep a piping bag and round tip ready for choux
- Make candied orange peel 1–2 days ahead if possible so it dries slightly and firms up
Make the choux paste
- In a medium saucepan, combine the water, cold butter, salt, and sugar.
- Bring to a rolling boil over medium heat, stirring occasionally so the butter melts completely.
- Once boiling (about 3–4 minutes), remove from heat and immediately stir in the flour with a wooden spoon until fully incorporated—the mixture should be smooth and begin to pull away from the sides of the pan.
- Return the pan to medium heat and stir constantly for 1–2 minutes, drying out the paste slightly so it can absorb the eggs properly; you should see a light film form on the bottom of the pan.
- Transfer the paste to a bowl and let cool for 2–3 minutes.
+ Show details− Hide details
Ready when: Paste is smooth, pulls away from pan, and has a light film on the bottom
Tip: Drying the paste over heat is crucial—it allows the eggs to incorporate fully and creates steam for lift. Don't skip this step or the puffs won't rise.
Beat in eggs
- Add the eggs to the choux paste one at a time, beating vigorously with an electric mixer or wooden spoon after each addition.
- The mixture will look lumpy and separated after each egg, but keep beating until it becomes smooth and glossy before adding the next.
- After all 4 eggs are incorporated, the paste should be thick, smooth, and hold soft peaks when you lift the spoon.
- It will look slightly shiny and fall slowly from the spoon.
+ Show details− Hide details
Ready when: Paste is smooth, glossy, thick, and falls slowly from the spoon
Tip: Add eggs at room temperature; cold eggs won't emulsify properly. If the paste seems too stiff after all eggs, it's ready—don't overmix.
Pipe choux onto baking sheetsOven 400°F / 205°C
- Preheat the oven to 400°F (200°C).
- Fit a large piping bag with a ½-inch round tip and fill it with the choux paste.
- Pipe 12 mounds, each about 1¼ inches (3 cm) in diameter, onto two lined baking sheets, spacing them 2 inches (5 cm) apart.
- The mounds should be even in size and height.
- Lightly smooth any peaks on top with a damp fingertip to ensure even baking.
+ Show details− Hide details
Ready when: Choux is evenly piped into 12 mounds with smooth, even tops
Tip: Use even pressure when piping so all puffs rise uniformly. Smoothing the peaks prevents cracking and encourages even browning.
Bake the choux puffsOven 400°F / 205°C
- Place both baking sheets in the preheated 400°F (200°C) oven.
- Bake for 25–30 minutes, until the puffs are deep golden brown and firm to the touch.
- They should not jiggle when you gently tap the baking sheet.
- Halfway through baking (around 12–13 minutes), if the puffs are browning too fast, reduce heat to 375°F (190°C).
- Do not open the oven door for the first 20 minutes, as the puffs need uninterrupted steam to rise.
- After baking, remove from the oven and let cool on the baking sheets for 10 minutes, then transfer to a wire rack to cool completely.
+ Show details− Hide details
Ready when: Puffs are deep golden brown, firm, and don't jiggle when the pan is tapped
Tip: Don't open the oven door early—steam is what makes choux rise. If puffs are still soft or collapse after cooling, they weren't baked long enough. Slightly underbaked puffs won't hold filling well.
Make the custard base
- In a small saucepan, heat the milk over medium heat until it begins to steam (do not boil).
- While the milk heats, in a medium bowl, whisk together the egg yolks, sugar, and cornstarch until pale and thick, about 2–3 minutes.
- Slowly pour the hot milk into the egg mixture while whisking constantly to temper the yolks and prevent scrambling.
- Pour the mixture back into the saucepan and return it to medium heat.
+ Show details− Hide details
Ready when: Egg yolks are pale and thick; milk is steaming
Tip: Whisk the yolk mixture into the milk slowly while stirring the milk constantly to avoid curdling. This tempering step is essential for a smooth custard.
Cook the custardOven 160°F / 70°C
- Whisk the custard constantly over medium heat for 4–6 minutes, scraping the bottom and sides of the pan, until it thickens to a pudding-like consistency and reaches 160°F (71°C) on an instant-read thermometer.
- The custard should coat the back of a spoon and leave a trail when you run your finger across it.
- Remove from heat, add the butter, vanilla extract, and salt, and whisk until the butter is fully incorporated and the custard is smooth and glossy.
+ Show details− Hide details
Ready when: Custard thickens to pudding consistency, coats the back of a spoon, and reaches 160°F (71°C)
Tip: Don't let the custard boil or lumps will form. Keep whisking constantly. The temperature ensures food safety when using raw egg yolks.
Chill the custard
- Press plastic wrap directly onto the surface of the custard to prevent a skin from forming.
- Refrigerate for at least 45 minutes, until completely chilled and set.
- The custard can be made up to 2 days ahead and stored covered in the refrigerator.
+ Show details− Hide details
Ready when: Custard is cold, thick, and spreadable
Tip: Plastic wrap directly on the surface prevents oxidation and keeps the custard smooth. Cold custard is easier to work with and won't collapse the delicate puffs.
Fill the choux puffs
- Once the choux puffs are completely cooled and the custard is chilled, use a small serrated knife or paring knife to carefully cut a small hole (about ½ inch / 1.25 cm diameter) into the side of each puff, creating a small flap or opening.
- Gently enlarge the opening slightly without tearing the puff.
- Using a small spoon or a pastry bag fitted with a small round tip, fill each puff with about 2 tablespoons (30 g) of the chilled egg yolk custard.
- Fill carefully so the custard doesn't overflow.
+ Show details− Hide details
Ready when: All 12 puffs are evenly filled with custard and not overflowing
Tip: Fill gently to avoid breaking the delicate puffs. If you're nervous, you can use a pastry bag for more control. Serve soon after filling so the puffs stay crispy.
Dust and garnish
- Sift or dust the powdered sugar generously over the top of each filled puff, covering the opening and creating a light white coating.
- Top each puff with a small pinch (about ½ teaspoon / 2 g) of finely chopped candied orange peel, pressing it gently into the powdered sugar so it adheres.
- The candied orange provides both color and a burst of bright citrus flavor that complements the rich custard.
+ Show details− Hide details
Ready when: All puffs are dusted with powdered sugar and topped with candied orange peel
Tip: Dust the sugar just before serving so it stays bright white and doesn't absorb moisture from the custard. The candied orange not only looks elegant but also echoes the Caribbean origins of this dessert.
Good to know
Tips
- Huevos Reales is traditionally made with a very egg-yolk-forward custard, which gives it its richness and golden color. Don't reduce the number of yolks—they're essential to the classic flavor and appearance.
- For an extra-luxurious version, fold 2–3 tablespoons (15–22 g) of finely chopped candied orange directly into the custard instead of just garnishing with it on top.
- If you're making candied orange peel at home, plan ahead: homemade peel dries and sets better over 1–2 days, making it easier to chop and handle. Store in an airtight container with a little sugar.
- Choux pastry is forgiving once baked, but the eggs and proper drying of the paste are non-negotiable. A slightly lower oven temperature (375°F / 190°C) for the full baking time also works well—just add 5–10 minutes to the bake time and watch for even browning.
Make ahead
Candied orange peel can be made 1–2 weeks ahead and stored in an airtight container. The custard can be made up to 2 days ahead, covered and refrigerated. Choux puffs can be baked 1 day ahead and stored in an airtight container at room temperature. Assemble (fill and garnish) within 1–2 hours of serving for the crispiest texture.
Storage & reheating
Unfilled choux puffs: Room temperature in an airtight container for up to 2 days. Wrap in foil and freeze for up to 2 months; reheat at 300°F (150°C) for 8–10 minutes before filling. Filled cream puffs: Best served within 1–2 hours of assembly. Covered loosely (not tightly, which creates condensation) on the counter for up to 3 hours. Do not refrigerate or freeze filled puffs, as the custard will soften and the puffs will lose crispness. Leftover custard: Covered in the refrigerator for up to 3 days.
Substitutions
- whole milk → Half-and-half or light cream. Use the same amount. This creates a richer, more decadent custard with deeper flavor.
- vanilla extract → 1 tablespoon of dark rum or ½ teaspoon orange extract. Rum adds Caribbean warmth; orange extract echoes the candied peel garnish.
- candied orange peel, homemade or quality store-bought → Candied lemon peel, candied citron, or candied ginger. Any candied citrus or ginger works beautifully. Adjust the quantity to taste and your preference for sweetness.
- large eggs → 3 large eggs plus 3 tablespoons (45 ml) of water, whisked together. If you have fewer eggs, this keeps the ratio of liquid to dry ingredients consistent. The result is slightly less rich but still excellent.
More puddings & custards
See all →

Find more like this
- Meal
- Dessert
- Main ingredient
- Eggs
- Diet
- VegetarianHalal
- Method
- Oven