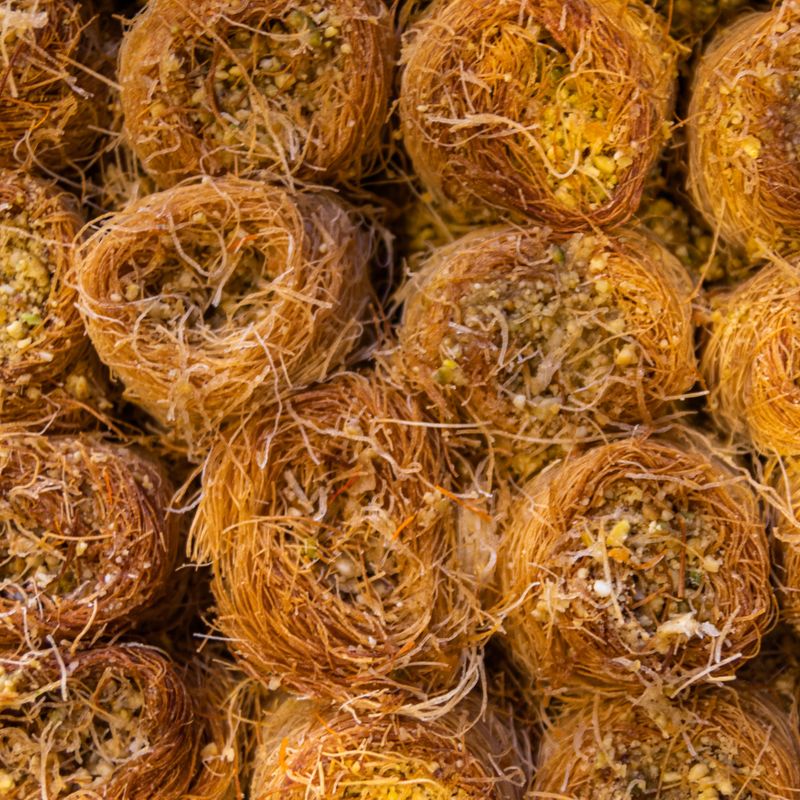
Greek Kataifi Rolls with Walnuts and Honey
Delicate crispy phyllo pastry rolls filled with spiced walnuts, baked until golden, and immediately soaked in warm honey and lemon syrup. A traditional Greek-Middle Eastern dessert with a shattercrisp exterior and aromatic, honeyed interior. Serve warm or at room temperature as an elegant finish to any meal.
- Prep
- 40 min
- Cook
- 32 min
- Wait
- 20 min
- Total
- 1 hr 32 min
- Makes
- 8 rolls (about 4 servings)
Steps
Before you start
- If using frozen kataifi noodles, thaw in the refrigerator overnight or at room temperature for at least 2 hours before beginning
- Gather all equipment and ingredients so you can work quickly once you start assembling rolls
- Have melted butter in a small bowl with a pastry brush ready beside your work surface
- Read through the steps once so you understand the timing, especially when to make the syrup during baking
Make the walnut filling
- Finely chop the walnuts by hand or pulse briefly in a food processor until no pieces are larger than a grain of rice.
- Transfer to a large mixing bowl and add the ground cinnamon, ground cloves, granulated sugar, and fine sea salt.
- Stir to combine evenly.
- Drizzle 1 tablespoon of the honey over the mixture and stir until all the nuts and spices are evenly moistened and the mixture is clumpy.
- Set aside.
+ Show details− Hide details
Ready when: Filling is evenly moistened and clumpy
Tip: Don't overmix or add too much honey, or the filling will be wet and the rolls will fall apart during baking
Preheat oven and prepare baking sheetOven 350°F / 175°C
- Position an oven rack in the middle of the oven and preheat to 350°F (175°C).
- Brush a 9×13-inch (23×33 cm) baking sheet lightly and evenly with melted unsalted butter.
- Set aside.
+ Show details− Hide details
Ready when: Oven is preheated and baking sheet is evenly buttered
Tip: If your oven runs hot or cold, you may need to adjust the temperature slightly for even browning
Separate the kataifi noodles
- If using frozen kataifi noodles, ensure they are fully thawed in the refrigerator overnight or at room temperature for 2 hours.
- Once thawed, gently and carefully pull apart the kataifi strands with your fingers to separate them into a light, airy mass.
- Work slowly to avoid breaking the delicate noodles.
- The goal is to have individual, loose strands rather than any clumped sections.
- Spread the separated noodles on a clean work surface or in a shallow baking dish and set aside.
- This step is crucial for achieving the desired crispy texture.
+ Show details− Hide details
Ready when: Noodles are completely separated, light, and airy with no clumps
Tip: Properly separated kataifi is the key to crispy rolls. Don't rush this; it's worth taking the time to separate the strands thoroughly
Form and fill the rolls
- Take approximately 1/4 cup (about 1 ounce / 30g) of separated kataifi noodles and place them on your work surface.
- Flatten and shape the noodles gently into a rough rectangular shape about 4×3 inches (10×8 cm).
- Using a pastry brush, brush the entire surface evenly with melted butter.
- Sprinkle approximately 2–3 tablespoons of the walnut filling along one long edge of the rectangle, leaving about 1/2 inch (1.3 cm) clear on each end.
- Starting from the filled edge, carefully roll or fold the noodles tightly around the filling, tucking in the sides as you go.
- The result should be a compact log or cigar shape about 4–5 inches (10–13 cm) long and about 1.5 inches (4 cm) thick.
- Place the roll seam-side down on the prepared baking sheet.
- Repeat with the remaining noodles and filling, spacing the rolls about 1 inch (2.5 cm) apart.
- You should have 8–10 rolls depending on size.
+ Show details− Hide details
Ready when: All rolls are formed, filled, and arranged on the baking sheet seam-side down
Tip: Handle the delicate noodles gently to avoid breaking them. If some strands separate, simply tuck them back in as you roll
Brush with butter and bakeOven 350°F / 175°C
- Using the pastry brush, brush the tops and all visible sides of each roll thoroughly with the remaining melted butter.
- Make sure every exposed surface is buttered for even browning.
- Transfer the baking sheet to the preheated 350°F (175°C) oven and bake for 25–35 minutes, until the rolls are deep golden brown on top and the noodle edges are crispy and make a slight crackling sound when tapped.
- If your oven has hot spots, rotate the sheet halfway through baking (around the 15–17 minute mark) for more even browning.
- The rolls are done when they are fragrant, golden, and crispy to the touch.
+ Show details− Hide details
Ready when: Rolls are deep golden brown, crispy on the edges, and fragrant
Tip: Watch carefully near the end of baking, especially for your first batch. The noodle edges brown quickly and can burn if left too long
Prepare the honey syrup
- While the rolls are baking (you can start this around the 15–20 minute mark), combine the water, the remaining 3/4 cup honey, and fresh lemon juice in a small saucepan.
- Place the saucepan over medium heat and stir occasionally until the mixture reaches a gentle simmer, about 5–7 minutes.
- Do not let it boil vigorously.
- Once simmering, let it cook undisturbed for 2–3 minutes to allow the flavors to combine.
- Remove from heat and let the syrup cool for 5–10 minutes at room temperature.
- It should still be quite warm (about 110–120°F / 43–49°C) but not piping hot when you pour it.
+ Show details− Hide details
Ready when: Syrup is thin and warm, flavors have melded, and it has cooled slightly
Tip: The temperature of the syrup is important: too hot and the pastry becomes soggy; too cool and it won't absorb properly
Finish rolls with syrup and serve
- As soon as the rolls come out of the oven, transfer them to a serving platter or keep them on the baking sheet.
- Working quickly and carefully, pour the warm honey syrup evenly over all the rolls, allowing it to flow between them and soak in.
- Use all of the syrup.
- Let the rolls rest at room temperature for 5–10 minutes to allow the syrup to fully absorb into the pastry.
- Serve warm or at room temperature.
- The rolls will remain moist and delicious for several hours.
+ Show details− Hide details
Ready when: Syrup is fully absorbed and rolls are glistening and moist
Tip: Pour the syrup immediately after removing from the oven while the rolls are still hot; this ensures even absorption
Good to know
Tips
- Separate the kataifi thoroughly before assembly—this is the key to crispy rolls. Properly separated, fluffy noodles will bake to a delicate, shattering crispness, while clumped noodles will be chewy. Take your time with this step.
- The temperature of the syrup matters: pour it when it is warm (about 110–120°F / 43–49°C), not hot. Syrup that is too hot will make the pastry soggy; syrup that is too cool will not absorb properly.
- Pour the syrup immediately after the rolls come out of the oven while they are still hot. This ensures the pastry will absorb the syrup evenly throughout.
- Watch carefully during the final 10 minutes of baking. The edges and bottom of the rolls brown quickly, and overbaking will make them bitter. Aim for deep golden brown, not dark brown.
Make ahead
The walnut filling can be prepared 1 day ahead and stored in an airtight container at room temperature. Kataifi noodles must be thawed before assembly. The rolls are best served on the day they are made, but can be baked 1–2 days ahead if stored in an airtight container. Reheat gently in a 300°F (150°C) oven for 5–10 minutes before serving.
Storage & reheating
Room temperature: 3–4 days in an airtight container. Refrigerator: 1 week in an airtight container; reheat at 300°F (150°C) for 10–15 minutes before serving. Freezer: Unbaked rolls can be frozen on a baking sheet, then baked as needed (add 5–10 minutes to the baking time). Not recommended for freezing after the syrup is added, as the texture will become soggy.
Substitutions
- Walnuts → Pistachios or almonds. Use 1.5 cups (180g) finely chopped pistachios or a mix of 0.75 cups each of walnuts and almonds. This creates a more delicate, slightly sweeter flavor. Texture and baking time remain the same.
- Fresh lemon juice → Fresh orange juice. Use 2 tablespoons fresh orange juice instead of lemon juice in the syrup. This creates a sweeter, less acidic syrup that is common in Middle Eastern versions of this pastry.
- Unsalted butter → Clarified butter or ghee. Substitute melted clarified butter or ghee for a more traditional Mediterranean flavor and longer shelf life. The ratio and baking time remain the same.
- Honey → Half honey and half sugar syrup. For a less intensely sweet roll, mix 3/4 cup honey with 1/4 cup water and 2 tablespoons sugar. Adjust lemon juice to taste. The rolls will be slightly less sticky but still delicious.
More middle eastern sweets
See all →
Find more like this
- Meal
- Dessert
- Cuisine
- Greek
- Diet
- VegetarianHalal
- Method
- Oven