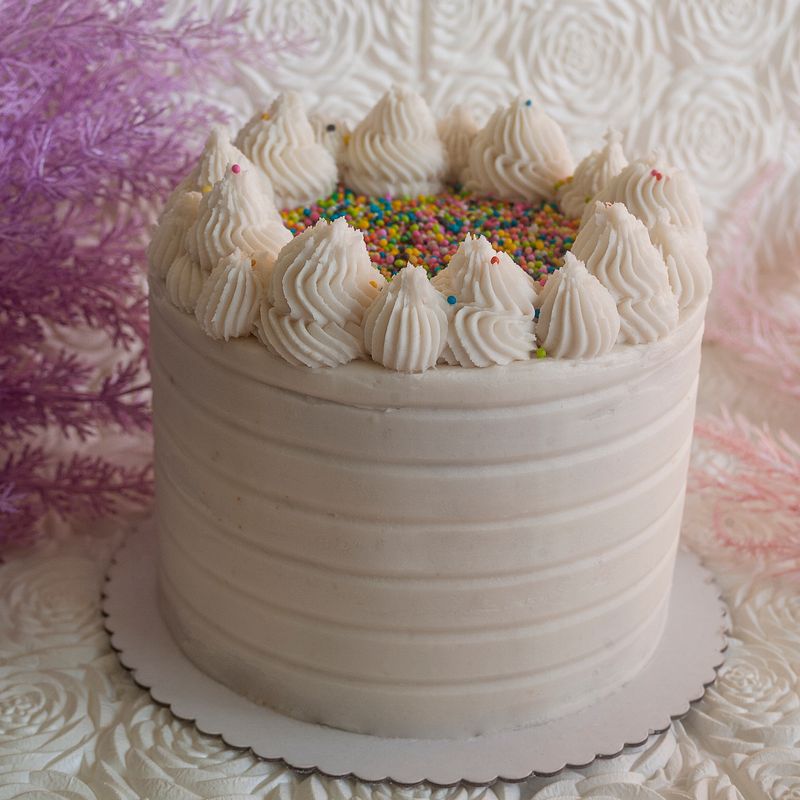
Classic Vanilla Birthday Cake
A tender, buttery two-layer vanilla cake with a fluffy, creamy vanilla buttercream. It's the dependable, nostalgic birthday cake you can make with pantry staples and no special flour.
- Prep
- 55 min
- Cook
- 30 min
- Wait
- 1 hr 15 min
- Total
- 2 hr 40 min
- Makes
- 1 two-layer 9-inch (23 cm) cake (12–16 slices)
Steps
Before you start
- Take the butter, eggs and milk out of the fridge 1 hour ahead. The butter should dent easily under a finger but not look shiny or greasy (about 65°F/18°C).
- Plan on about 2 hours 40 minutes in total. The layers need at least 1 hour to cool completely before frosting, or the buttercream will melt.
- Weigh the flour on a kitchen scale if you can. Scooping it with a cup can pack in up to 25% extra and make the cake dry.
- Position an oven rack in the center and preheat when the recipe tells you to, not earlier.
Prep oven and pansOven 350°F / 175°C
- Position a rack in the center of the oven and preheat to 350°F (175°C).
- Cut two 9-inch (23 cm) parchment circles by tracing a pan.
- Grease the sides and bottoms of two 9-inch round pans with the 1 tbsp softened butter, then press a parchment circle into the bottom of each pan.
+ Show details− Hide details
Ready when: Pans are evenly coated with no bare patches, and the parchment lies flat.
Tip: Don't skip the parchment. It's what guarantees the layers release cleanly.
Whisk dry ingredients
- In a medium bowl, whisk together the flour, baking powder and ¾ tsp salt for about 30 seconds, until evenly combined.
- Set aside.
+ Show details− Hide details
Ready when: No streaks or clumps of baking powder remain.
Cream butter and sugar
- In the bowl of a stand mixer fitted with the paddle, beat the 1 cup (227 g) softened butter on medium speed for 1 minute until smooth.
- Add the granulated sugar and beat on medium-high for 3–4 minutes, stopping once to scrape the bowl and paddle.
+ Show details− Hide details
Ready when: The mixture is pale, fluffy and noticeably increased in volume, like thick wet sand that holds soft peaks.
Tip: Under-creaming is the most common reason for a dense cake. Use the full 3–4 minutes.
Beat in eggs and vanilla
- With the mixer on medium-low, add the eggs one at a time, beating about 30 seconds after each until fully absorbed.
- Add the 1 tbsp vanilla and beat 10 seconds more.
- Scrape down the bowl.
+ Show details− Hide details
Ready when: The batter looks smooth and glossy with no visible egg streaks. Slight curdling is okay and will smooth out once flour is added.
Tip: Cold eggs can cause the batter to split, so make sure they've come to room temperature.
Alternate flour and milk
- Turn the mixer to its lowest speed.
- Add the dry ingredients in 3 additions, alternating with the 1 cup milk in 2 additions, beginning and ending with flour (flour, milk, flour, milk, flour).
- Mix just until each addition disappears.
- Finish by folding with a rubber spatula, scraping the bottom of the bowl, until no dry flour pockets remain.
+ Show details− Hide details
Ready when: The batter is thick, smooth and pourable, and no flour streaks remain.
Tip: Stop mixing as soon as the flour disappears. Overmixing develops gluten and makes the cake tough.
Divide and bakeOven 350°F / 175°C
- Divide the batter evenly between the pans (about 650 g each if weighing).
- Smooth the tops with a spatula and tap each pan firmly on the counter twice to release large air bubbles.
- Bake at 350°F (175°C) for 28–32 minutes, rotating the pans front to back at the 20-minute mark only if your oven bakes unevenly.
+ Show details− Hide details
Ready when: The tops are pale golden and spring back when lightly pressed, the edges just start to pull from the pan, and a toothpick in the center comes out clean or with a few dry crumbs (internal temperature 205–210°F / 96–99°C).
Tip: Avoid opening the oven door before the 20-minute mark, as the cakes can sink.
Cool the layers
- Cool the cakes in their pans on a wire rack for 15 minutes.
- Run a thin knife around the edges, invert each onto the rack, peel off the parchment, then turn right-side up.
- Cool completely, about 1 hour, until the bottoms feel neutral and not warm to the touch.
+ Show details− Hide details
Ready when: The layers feel completely cool, with no warmth at the center.
Tip: To frost faster, wrap cooled layers and chill 30 minutes. They are firmer and less crumbly.
Make the buttercream
- In a clean mixer bowl with the paddle, beat the 1½ cups (340 g) softened butter on medium speed for 3 minutes until very pale and creamy.
- Turn the speed to low and add the powdered sugar 1 cup at a time, mixing until incorporated.
- Add the 4 tbsp milk, 2 tsp vanilla and ¼ tsp salt.
- Beat on medium-high for 2–3 minutes.
- If it feels stiff, beat in extra milk 1 tbsp at a time.
+ Show details− Hide details
Ready when: The frosting is light, fluffy and smooth, and holds a soft peak that spreads easily without tearing the cake.
Tip: Add the powdered sugar slowly, or it will puff out of the bowl.
Level and fill the cake
- If the layers have domed tops, trim them flat with a serrated knife.
- Place one layer, cut or flat side up, on a cake stand or plate.
- Spread about 1¼ cups of buttercream evenly to the edges.
- Top with the second layer, flat side up.
+ Show details− Hide details
Ready when: The top layer sits level and straight on the filling.
Tip: Slide strips of parchment under the cake edges to keep the plate clean while frosting.
Frost and decorate
- Spread a thin layer of buttercream over the top and sides to trap crumbs, and chill for 15 minutes if the crumbs are lifting.
- Cover the cake with the remaining frosting, using an offset spatula to make smooth sides and swirls on top.
- Scatter the sprinkles over the top, or press them around the base.
- Remove the parchment strips.
+ Show details− Hide details
Ready when: The cake is fully covered with an even layer of frosting and no crumbs show through.
Tip: Dip the spatula in hot water and wipe dry for smoother frosting.
Good to know
Tips
- Room temperature ingredients matter: they combine into an emulsion that traps air, giving a fluffy, even crumb.
- Check your oven with an oven thermometer. Many ovens run 15–25°F off, which causes domed, dry or sunken cakes.
- For perfectly even layers, weigh the batter into each pan.
- Use a sharp knife dipped in hot water and wiped dry between cuts for clean slices.
Make ahead
"Bake the layers up to 2 days ahead: cool completely, wrap tightly in plastic, and keep at room temperature (or freeze up to 2 months, thawing wrapped at room temperature). Make the buttercream up to 3 days ahead and refrigerate it in an airtight container; bring to room temperature and re-whip for 1–2 minutes before using."
Storage & reheating
"Room temperature: covered, up to 2 days (unless your kitchen is hot). Refrigerator: up to 5 days in an airtight container; bring slices to room temperature for 30 minutes before serving for the best texture. Freezer: freeze unwrapped slices on a tray until firm, then wrap well and store up to 2 months; thaw overnight in the fridge, then 30 minutes at room temperature."
Substitutions
- whole milk → Buttermilk. Use the same amount in the cake batter for a slightly tangier, more tender crumb. The cake will still rise well.
- whole milk → Heavy cream. Use the same amount for a richer, silkier buttercream.
- pure vanilla extract → Vanilla bean paste. Use the same amount for a more visible vanilla speckle and stronger flavor.
- fine salt → Kosher salt (Diamond Crystal). Use 1 tsp in the cake instead of ¾ tsp fine salt, because the flakes are less dense.