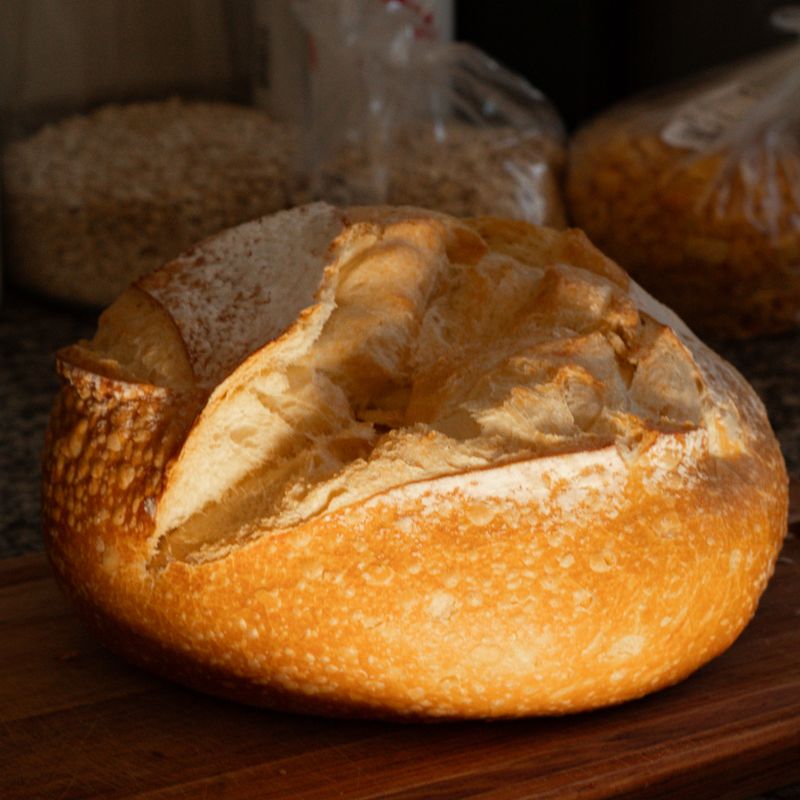
Classic Sourdough Boule
A crackly-crusted, open-crumbed French-style round loaf made with just four ingredients. A long cold proof builds tangy flavor, and baking in a preheated Dutch oven gives bakery-style spring and a deeply browned crust.
- Prep
- 40 min
- Cook
- 45 min
- Wait
- 19 hr 5 min
- Total
- 20 hr 30 min
- Makes
- 1 boule (about 10 slices)
Steps
Before you start
- Feed your starter 4–8 hours before mixing, so it is bubbly, domed, and at least doubled in volume. A ripe starter floats in a glass of water.
- Plan the timeline: mix in the morning (about 8 a.m.), shape in the afternoon (about 1 p.m.), refrigerate overnight, and bake the next morning. The dough needs about 20 hours in total.
- Dough temperature matters. Aim for a kitchen around 75–78°F (24–26°C). In a cooler kitchen, add 30–60 minutes to the bulk rise. In a warmer one, shorten it.
- Weigh the ingredients with a digital scale. Cup measures are given, but grams are far more reliable for bread.
- You need a 5–6 quart (4.7–5.7 L) lidded Dutch oven that tolerates 500°F (260°C), and a banneton or a bowl with a towel for proofing.
Mix and autolyse
- In a large bowl, combine the 500 g bread flour and 375 ml lukewarm water.
- Mix with wet hands or a spatula until no dry flour remains and the dough looks shaggy and rough.
- Cover the bowl with a damp towel or plate and let it rest.
+ Show details− Hide details
Ready when: No dry flour pockets remain and the dough looks shaggy but cohesive
Tip: Resting the flour and water before adding salt and starter makes the dough smoother and easier to stretch.
Add starter and salt
- Spoon the 100 g starter over the dough and sprinkle the 10 g salt on top.
- Wet your hand and squeeze and pinch the dough repeatedly, folding it over itself, for about 3 minutes until the starter and salt are fully worked in and the dough feels cohesive and slightly tacky.
- Cover and rest.
+ Show details− Hide details
Ready when: No streaks of starter or grains of salt are visible, and the dough pulls together in one mass
Tip: Keep your hand wet to stop the sticky dough clinging to your fingers. Don't add extra flour at this stage.
Stretch and fold
- With wet hands, grab one edge of the dough, stretch it up until it resists, and fold it over the center.
- Turn the bowl a quarter turn and repeat 3 more times (4 folds total, one per side).
- Cover and rest 30 minutes, then repeat.
- Rest another 30 minutes and do a third and final set.
- That is 3 sets, 60 minutes apart from first to last.
+ Show details− Hide details
Ready when: After the third set the dough is smoother, puffier, and holds a rounded shape with noticeable elasticity
Tip: If the dough tears while stretching, stop and let it rest 10 more minutes.
Finish bulk rise
- Cover the bowl and leave it undisturbed at 75–78°F (24–26°C) for about 3 more hours (4½ hours total bulk from when the starter was added).
- Look for a 50–75% increase in volume, a domed, slightly jiggly surface, and a few bubbles around the edges and on top.
+ Show details− Hide details
Ready when: Dough has grown 50–75%, jiggles like set gelatin when the bowl is shaken, and has bubbles along the edges
Tip: Judge by volume and feel, not just the clock. Under-fermented dough bakes up dense, while over-fermented dough turns slack and sticky.
Pre-shape and rest
- Lightly flour your work surface.
- Use a scraper to ease the dough out onto it, bubbly side down.
- Fold the edges into the center like closing an envelope, then flip it seam side down.
- Drag it toward you in short pulls with cupped hands or the scraper until it forms a loose, tight-ish ball.
- Leave uncovered to rest.
+ Show details− Hide details
Ready when: The ball holds its shape and spreads only slightly
Tip: Handle gently to keep the air bubbles you built during the bulk rise.
Final shape
- Generously dust a banneton with the rice flour (use about 1 tablespoon).
- Flip the dough over so the seam side is up.
- Fold the bottom third up, the sides in, and the top down over the center.
- Flip it seam side down and drag it toward you on the counter to tighten the surface into a taut round.
- Lift it into the banneton seam side up, and pinch the seam closed if it gapes.
+ Show details− Hide details
Ready when: The surface is smooth and taut like a drum, with no loose folds
Tip: Rice flour doesn't absorb water like wheat flour, so it prevents sticking better.
Cold proof overnight
- Slip the banneton into a plastic bag or cover with a shower cap and refrigerate for 12–14 hours (up to 18 for a tangier loaf).
+ Show details− Hide details
Ready when: Dough is puffy and springs back slowly when poked with a floured finger, leaving a small dent that fills halfway
Tip: If the dough springs back immediately, it needs more time. If the dent doesn't fill at all, bake right away.
Preheat Dutch ovenOven 500°F / 260°C
- About 45 minutes before baking, place the empty Dutch oven with its lid on the center rack of the oven.
- Heat to 500°F (260°C).
- Leave the dough in the fridge until the oven is fully hot.
+ Show details− Hide details
Ready when: Oven reached 500°F (260°C) and has been at that temperature for at least 30 minutes
Tip: A thoroughly preheated pot is the secret to a tall loaf. Don't cut this step short.
Turn out and score
- Cut a piece of parchment slightly larger than the loaf.
- Flip the dough out onto the parchment so the smooth side faces up.
- Using a razor blade held at a 30-degree angle, make one confident, ½-inch (1-cm) deep curved slash from the top to the side, or a cross pattern.
+ Show details− Hide details
Ready when: The slash opens slightly and shows the pale interior of the dough
Tip: Score cold dough straight from the fridge. It is firmer and cuts cleaner. Hesitating makes ragged cuts, so cut quickly.
Bake coveredOven 450°F / 230°C
- Wearing thick oven mitts, remove the hot Dutch oven and set it on a heatproof surface.
- Carefully lift the dough by the parchment and lower it into the pot.
- Cover with the lid, return it to the oven, and reduce the heat to 450°F (230°C).
- Bake covered for 25 minutes.
+ Show details− Hide details
Ready when: The loaf has risen noticeably and the slash has opened into an 'ear'; the crust is pale golden
Tip: The pot is extremely hot, so be careful not to touch the sides or lid with bare skin.
Bake uncoveredOven 450°F / 230°C
- Remove the lid and continue baking at 450°F (230°C) for 18–22 minutes more, until the crust is a deep mahogany brown and the loaf sounds hollow when tapped on the bottom.
- Lift the loaf out with the parchment.
+ Show details− Hide details
Ready when: Deep brown crust, hollow sound when tapped on the bottom, and an internal temperature of 205–210°F (96–99°C)
Tip: If the bottom is browning too fast, set the loaf on a baking sheet for the last 10 minutes.
Cool completely
- Transfer the boule to a wire rack and let it cool for at least 1 hour before slicing.
- You may hear the crust crackle as it cools.
+ Show details− Hide details
Ready when: The loaf is just barely warm at the center and the bottom is no longer hot
Tip: Cutting into hot bread releases steam and leaves the crumb gummy. Wait for it.
Good to know
Tips
- Use the starter at its peak, when it has doubled and just begun to dome. A weak starter is the most common cause of a flat loaf.
- If the dough feels too sticky to handle, wet your hands rather than adding flour. Extra flour changes the hydration and tightens the crumb.
- For a more pronounced sour tang, extend the cold proof to 16–18 hours. For a milder loaf, keep to 12 hours.
- A pale, flat bottom or thick crust that won't brown means the pot wasn't hot enough or the bake was too short. Next time, preheat longer and bake until deeply colored.
Make ahead
"The shaped loaf can stay in the fridge for up to 18 hours before baking, so you can shape in the evening and bake the next day whenever convenient. The starter can be fed the night before, as long as it is ripe when you mix."
Storage & reheating
"Room temperature: store cut side down on a board or in a paper bag or bread bag for up to 3 days. Fridge: not recommended, as it dries the bread out faster. Freezer: slice and freeze in an airtight bag for up to 3 months. Toast slices from frozen, or refresh a whole thawed loaf in a 375°F (190°C) oven for 8–10 minutes to re-crisp the crust."
Substitutions
- bread flour → all-purpose flour. Use the same weight but reduce water to 350 ml (1½ cups). The loaf will be slightly less chewy and rise a little lower.
- bread flour → 50 g (about ⅓ cup) whole wheat flour replacing 50 g of the bread flour. Gives a nuttier flavor and slightly denser crumb. Add 10–15 ml extra water if the dough feels stiff.
- rice flour or extra bread flour → wheat bran or extra bread flour. Bread flour works but may stick, so dust generously. Bran sticks less well but adds rustic flavor.
- fine sea salt → kosher salt (Diamond Crystal) at 2 teaspoons. Flake sizes vary, so weigh 10 g where possible.
More sourdough
See all →

Find more like this
- Meal
- Breakfast
- Cuisine
- French
- Method
- Oven
- Quick & Easy
- 5 Ingredients or LessMake Ahead