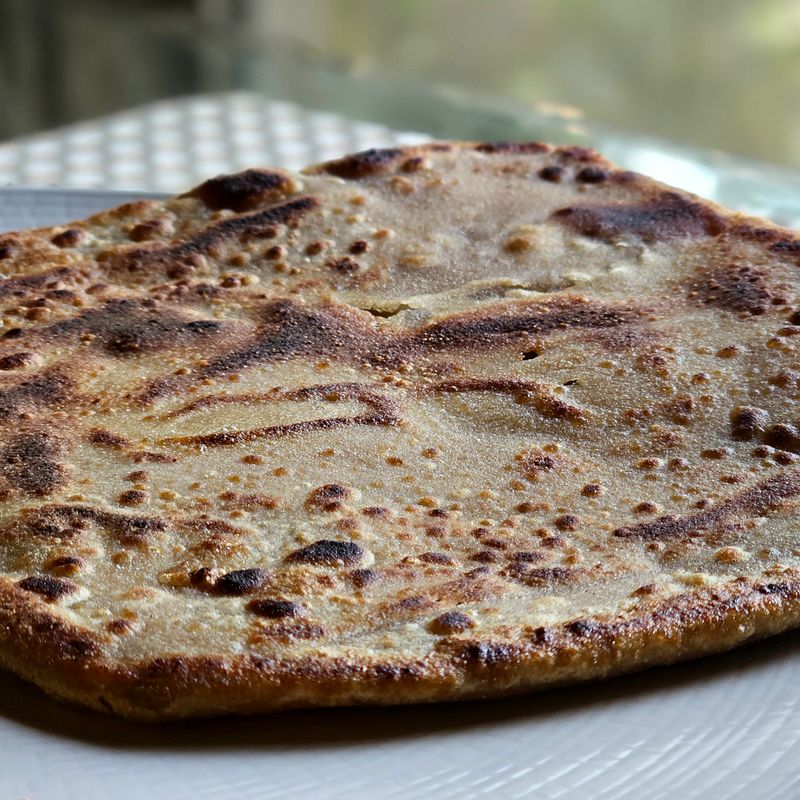
Classic Layered Whole Wheat Paratha
Flaky, golden, pan-fried Indian flatbread made from a simple whole wheat dough that is brushed with ghee, pleated into spiral layers, and cooked on a hot skillet. Soft inside, crisp at the edges, and perfect with yogurt, pickle, or curry.
- Prep
- 30 min
- Cook
- 20 min
- Wait
- 30 min
- Total
- 1 hr 20 min
- Makes
- 8 parathas
Steps
Before you start
- Use regular whole wheat flour or atta (finely milled Indian whole wheat flour); atta gives the softest result.
- Melt the ghee if it is solid so it is easy to brush; keep it warm but not hot.
- Plan for a 30-minute dough rest, which makes rolling much easier and the parathas softer.
- Have a clean kitchen towel or foil ready to keep cooked parathas warm and steamy.
Mix the dough
- In a large bowl, whisk 2 cups (240 g) whole wheat flour with the salt.
- Add 1 tbsp melted ghee and rub it into the flour with your fingertips until the mixture looks like damp sand.
- Pour in ¾ cup (180 ml) lukewarm water gradually, mixing with your hand until a shaggy dough forms.
+ Show details− Hide details
Ready when: Dough comes together with no dry flour left in the bowl.
Tip: Add water a tablespoon at a time at the end; flours absorb differently.
Knead until smooth
- Turn the dough onto a clean surface and knead for 6–8 minutes, pressing with the heel of your hand, folding, and turning.
- If it sticks to your hands, dust with a pinch of flour; if it feels stiff, wet your hands and knead again.
+ Show details− Hide details
Ready when: Dough is smooth, soft like an earlobe, and springs back slowly when poked.
Tip: A slightly soft dough makes tender parathas; a stiff dough makes tough ones.
Rest the dough
- Shape the dough into a ball, place it in the bowl, and cover with a damp towel.
- Let it rest at room temperature for 30 minutes.
+ Show details− Hide details
Ready when: Dough feels softer and stretches easily when pulled gently.
Divide into balls
- Knead the rested dough for 30 seconds, then divide into 8 equal pieces (about 50 g each).
- Roll each piece between your palms into a smooth ball and keep them covered with the towel so they don't dry out.
+ Show details− Hide details
Ready when: Eight smooth, crack-free balls of similar size.
Roll and layer
- Dust a ball with flour and roll into a 5-inch (13 cm) circle.
- Brush the surface with about ¼ tsp melted ghee from the 2 tbsp set aside for layering and sprinkle with a pinch of flour.
- Fold the circle in half, brush again lightly with ghee, and fold in half again to make a triangle.
+ Show details− Hide details
Ready when: Each paratha is a neat, ghee-brushed triangle with 4 layers.
Tip: Use just a light dusting of flour so the layers still stick together.
Roll out triangles
- Dust the triangle lightly with flour and roll it out, keeping the triangle shape, until each side is about 6–7 inches (15–18 cm) long and about ⅛ inch (3 mm) thick.
- Roll gently with even pressure and turn it often.
- Repeat with the remaining balls, stacking finished triangles with a small piece of parchment or lightly floured separations if needed.
+ Show details− Hide details
Ready when: Triangle is evenly thin and layers are still visible at the edges.
Tip: Roll from the center outward; pressing too hard seals the layers together.
Heat the skillet
- Place a skillet or tawa over medium-high heat for 2–3 minutes.
- Sprinkle a few drops of water on it.
+ Show details− Hide details
Ready when: Water droplets sizzle and evaporate within a couple of seconds.
Tip: Too hot and the paratha scorches before cooking through; too cool and it turns dry and stiff.
Cook first side
- Lay one paratha on the hot skillet and cook for 40–60 seconds, until the top surface shows a few small bubbles and pale opaque patches.
+ Show details− Hide details
Ready when: Bubbles appear on top and the underside has light spots.
Flip and fry with ghee
- Flip the paratha and spoon or brush about ½ tsp ghee (from the 4 tbsp cooking portion) over the surface.
- Cook 40–60 seconds, flip again, brush the other side with another ½ tsp ghee, and press gently with a spatula for 30–45 seconds, turning once more if needed, until both sides are covered with deep golden-brown spots.
+ Show details− Hide details
Ready when: Both sides are crisp-edged with golden-brown spots and the paratha puffs slightly.
Tip: Reduce to medium heat if the spots darken faster than 45 seconds.
Repeat and keep warm
- Transfer the cooked paratha to a plate lined with a towel and fold the towel over it.
- Repeat with the remaining parathas, wiping out any burnt flour from the skillet between batches.
- Lightly crush each paratha between your palms while hot to open up the layers.
+ Show details− Hide details
Ready when: All 8 parathas are golden, flaky and soft.
Tip: Stacking them in the towel traps steam and keeps them pliable.
Good to know
Tips
- Keep the dough slightly soft; it should be easy to press with a finger but not sticky.
- Use only a light dusting of flour while rolling, since excess flour burns in the skillet and tastes bitter.
- Serve hot with plain yogurt, pickles, or alongside potato curry, dal, or fried eggs.
- If the parathas puff up and seem raw inside, lower the heat slightly and cook each side a little longer.
Make ahead
Shape the triangles through step 6, stack them with parchment between each, wrap well, and refrigerate up to 24 hours. Cook straight from the fridge, adding 15–20 seconds per side. Uncooked triangles can also be frozen up to 1 month and cooked from frozen.
Storage & reheating
Room temperature: wrapped in a towel or foil up to 6 hours. Refrigerator: airtight up to 3 days. Freezer: layered with parchment in a freezer bag up to 2 months. Reheat in a dry skillet over medium heat for 30–45 seconds per side, until hot and pliable.
Substitutions
- ghee → neutral oil or unsalted butter. Oil gives a slightly less rich flavor; butter browns faster, so lower the heat a little.
- whole wheat flour (atta) → half whole wheat flour and half all-purpose flour. Gives a lighter, softer paratha; add a tablespoon of extra water if the dough feels dry.
- ghee → vegetable oil. Use the same amount for a similar tender texture.
More flatbreads
See all →


Find more like this
- Meal
- Breakfast
- Cuisine
- North Indian
- Method
- Stovetop
- Quick & Easy
- 5 Ingredients or Less