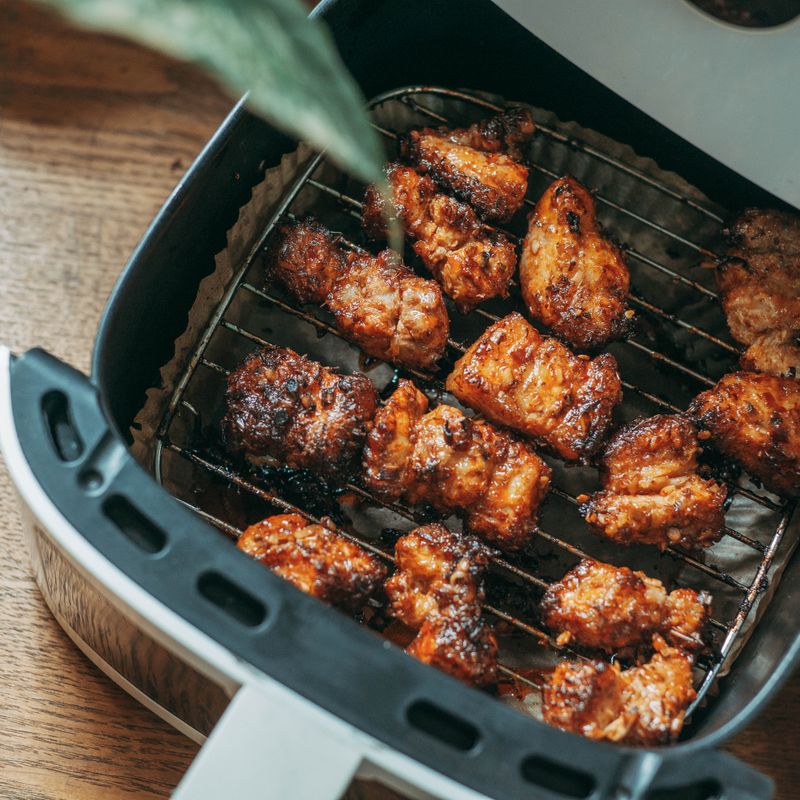
Air Fryer Roasted Bone Broth
This modern approach combines the speed and space-efficiency of an air fryer for roasting bones with the traditional slow-simmering method for extracting deep, rich, collagen-laden broth. The air frying develops complex caramelized flavors that set this broth apart from one made with raw bones, then a long, gentle simmer—anywhere from 12 to 24 hours—coaxes out the gelatin and minerals that make bone broth so prized. The result is a golden, deeply savory broth that gels when cooled and tastes like comfort in a cup.
- Prep
- 20 min
- Cook
- 25 min
- Wait
- 12 hr
- Total
- 12 hr 45 min
- Makes
- 2 quarts (8 servings of 1 cup each)
Steps
Before you start
- Prepare a large 6-quart stockpot, fine-mesh strainer, and storage containers ahead of time.
- Pat the beef bones completely dry with paper towels before roasting—this is essential for proper browning.
- Preheat the air fryer to 400°F (200°C).
- Schedule the simmering for 12–24 hours; starting in the evening allows for overnight cooking.
Pat and season bones
- Pat the beef bones completely dry with paper towels on all sides.
- This is crucial for browning.
- Evenly season all sides with sea salt and coarsely ground black pepper.
- The well-seasoned bones will develop deeper, more complex flavors during roasting.
+ Show details− Hide details
Tip: Dry bones brown much better than wet ones. Don't skip the patting step.
Air fry bones until goldenOven 400°F / 205°C
- Arrange the seasoned bones in a single layer in the air fryer basket, being careful not to overcrowd them.
- Set the air fryer to 400°F (200°C) and roast for 20–25 minutes, stirring or shaking the basket halfway through.
- The bones are ready when they're deep golden brown with some charred spots on the edges.
- You should see visible caramelization and smell a rich, meaty aroma.
+ Show details− Hide details
Ready when: Bones are deep golden brown with visible charring on the edges; they smell rich and meaty.
Tip: If your air fryer is small (under 5 quarts), you may need to roast the bones in batches. This is fine; just repeat the process for the remaining bones.
Prepare vegetables
- While the bones are roasting, cut the carrots and celery stalks into 2-inch (5 cm) chunks.
- Leave the onion halves whole (skin on adds color and prevents them from breaking apart).
- Set all vegetables aside on a cutting board.
Transfer bones to pot
- Once the bones are deeply browned, carefully transfer them to your large stockpot.
- Do not rinse the air fryer basket—those browned, caramelized bits (called fond) are flavor gold.
- If you'd like, pour a splash of water into the hot air fryer basket, scrape with a wooden spoon, and add this liquid to the pot as well.
- This deglazing step adds even more depth.
+ Show details− Hide details
Tip: Don't discard the browned bits stuck to the air fryer basket; they contain concentrated flavor.
Add water and aromatics
- Pour the 3 quarts (2.8 liters) of water into the pot over the bones.
- Add the halved onion, carrot chunks, celery chunks, bay leaves, fresh thyme sprigs, and whole black peppercorns.
- The water should cover everything by about 1 inch (2.5 cm); add a bit more water if needed.
- Stir gently to combine.
Bring to boil and skim
- Set the pot over high heat and bring to a full boil.
- Once boiling (you'll see large, vigorous bubbles breaking the surface), use a slotted spoon or skimmer to remove any gray or brown scum that rises to the top.
- This takes 2–3 minutes.
- Skimming removes impurities and results in a clearer, cleaner-tasting broth.
- Skim multiple times until little to no scum appears.
+ Show details− Hide details
Ready when: Broth is at a rolling boil; visible scum has been skimmed away (or little remains).
Tip: Skimming is optional but recommended for a crystal-clear broth. If you prefer a richer but slightly cloudy broth, skip this step.
Reduce heat to gentle simmer
- Reduce the heat to low so the broth simmers very gently.
- You should see just occasional small bubbles breaking the surface—definitely not a rolling boil.
- A gentle simmer is key: it extracts collagen without boiling away delicate flavors or making the broth cloudy from emulsified fat.
+ Show details− Hide details
Ready when: Broth simmers gently with only occasional small bubbles breaking the surface.
Simmer the broth
- Partially cover the pot with a lid (leave a small gap for steam to escape) and let the broth simmer gently and unattended for a minimum of 12 hours, though 24 hours is ideal for maximum collagen extraction and deeper flavor.
- You can simmer overnight and into the next day.
- The finished broth should be a rich golden or amber color, smell deeply savory and meaty, and taste intensely flavorful.
- The bones should be soft enough that they crumble easily when pressed.
+ Show details− Hide details
Ready when: Broth is a rich golden-amber color; it smells deeply savory and meaty; bones are soft and fall apart easily when pressed.
Tip: A slow cooker set to low, or a low oven at 180°F (82°C), also works beautifully for this phase if you prefer a completely hands-off approach. Optional: add 1–2 tablespoons of apple cider vinegar to the pot at the start of simmering to help extract minerals and add subtle depth.
Strain the broth
- Set a large fine-mesh strainer or colander over a large bowl.
- Carefully pour the hot broth through the strainer, discarding the bones and vegetables (they've given all their goodness to the broth).
- For an extra-clear, refined broth, line the strainer with cheesecloth before pouring.
- Let the broth cool to room temperature, which takes 30–45 minutes, or place the bowl in an ice bath to speed up cooling.
- Do not cover the bowl while it's hot, as condensation will drip back in.
+ Show details− Hide details
Ready when: Broth is fully strained and cooled to room temperature.
Tip: The sediment at the bottom of the bowl contains minerals and flavor but may look cloudier. You can decant the clear broth into a clean container for a pristine presentation, or leave it all together if you don't mind the sediment.
Degrease and store
- Once cooled to room temperature, you can remove the fat layer on top if you prefer a lighter broth.
- To do this, chill the broth in the refrigerator for 2–4 hours or overnight; the fat will solidify into a disk on top and can be lifted off easily.
- If you enjoy the richness of the fat (it adds flavor and protects the broth during storage), leave it in place.
- Portion the broth into glass or freezer-safe plastic containers, leaving about ½ inch (1 cm) of headspace if freezing.
- Refrigerate for immediate use or freeze for long-term storage.
+ Show details− Hide details
Ready when: Broth is cooled and portioned into storage containers.
Tip: A sign of excellent bone broth is that it gels when chilled. This is due to the high collagen content and is exactly what you want.
Good to know
Tips
- Don't skip the air-frying step. Roasting the bones before simmering develops deep, complex flavors and creates a richer, more restaurant-quality broth compared to one made with raw bones.
- Skim the broth after the first boil, and again at the 1-hour mark if you're aiming for crystal clarity. It takes only a minute and makes a significant visual difference.
- A slow cooker set to low, or a low oven at 180°F (82°C), can replace the stovetop simmer. This is excellent for overnight or all-day cooking without worrying about stovetop heat.
- The collagen breaks down into gelatin as the broth cools; if your finished broth gels or jiggles when cold, that's a sign of success and means it's full of beneficial collagen and minerals.
Make ahead
Make this broth up to 5 days in advance and refrigerate, or make several batches at once and freeze for up to 3 months. It's an ideal make-ahead recipe since the long simmering is unattended and the finished broth stores beautifully. Many cooks dedicate a Sunday to making large quantities for the week or month ahead.
Storage & reheating
Refrigerate in a sealed glass or plastic container for up to 5 days. The broth will gel when chilled due to its collagen content—this is a sign of excellent quality and is exactly what you want. Freeze in ice cube trays for easy single-portion use (pop cubes into freezer bags once solid), or freeze in larger containers, for up to 3 months. Thaw overnight in the refrigerator and gently reheat on the stovetop over medium heat or in the microwave. The broth may separate or look cloudy when cold or reheated; this is completely normal and can be gently whisked to recombine. The fat layer, if present, adds flavor and protects the broth—you can leave it on or remove it after chilling, depending on preference.
Substitutions
- large beef bones (knuckle, marrow, and/or meaty bones) → Chicken carcasses, pork bones, or a mix of beef and poultry bones. Lighter broths (chicken) can be simmered for 8–12 hours instead of 12–24 hours and will gel less intensely but taste delicious.
- bay leaves → 1 teaspoon dried oregano or Italian seasoning. Provides a different herbaceous note; use only 1 tsp because dried herbs are more concentrated.
- fresh thyme sprigs → 1 teaspoon dried thyme. Dried thyme works in a pinch, though fresh has a brighter, more aromatic quality.
- large yellow onion → 1 additional medium carrot or 1 large leek (white and light green parts), cut into chunks. Carrots add natural sweetness; leeks provide a milder onion flavor. Onion can also be omitted entirely if unavailable, though the broth will be less complex.
More broths
See all →


Find more like this
- Meal
- Snack
- Quick & Easy
- 5 Ingredients or LessEasyMake Ahead