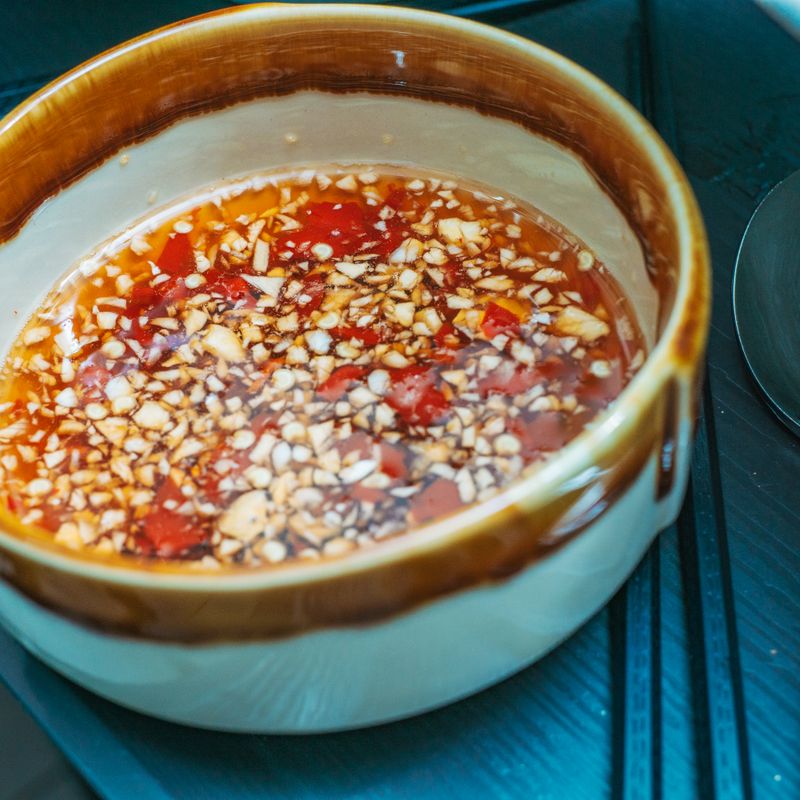
Vietnamese Charred Chili and Roasted Garlic Dip
A vibrant, smoky dip with blistered bird's eye chilies and caramelized roasted garlic, balanced with tangy lime juice, funky fish sauce, and a touch of palm sugar. Charred until the peppers blister and soften, then pounded into a coarse paste with a rustic, slightly chunky texture. Serve with fresh vegetables, crackers, or as a condiment for grilled meats and seafood. This sambal-style dip comes together in under 20 minutes and stores beautifully in the fridge for up to two weeks.
- Prep
- 5 min
- Cook
- 12 min
- Wait
- 3 min
- Total
- 20 min
- Makes
- About 1 cup (240 ml)
Steps
Before you start
- Have a medium mortar and pestle ready (or a small bowl and sturdy spoon)
- Measure out the lime juice and fish sauce ahead of time
- Use fresh bird's eye chilies—they should be firm and glossy, not wrinkled
Char the chilies and garlic
- Heat a 10- to 12-inch cast-iron or heavy stainless steel skillet over medium-high heat until very hot, about 2 minutes.
- Add the whole chilies and unpeeled garlic cloves in a single layer.
- Let them sit undisturbed for 1 minute, then use tongs to turn them and char on the other sides, moving them around the pan occasionally.
- The chilies should blister and blacken in patches (they'll look slightly charred and wrinkled), and the garlic should soften and show deep brown spots.
- This takes about 8 to 10 minutes total.
+ Show details− Hide details
Ready when: Chilies blister and blacken on the surface; garlic cloves are soft and deeply browned
Tip: Don't walk away—char them actively for the best smoky flavor. If they're too dark or smell burnt, they've gone past charred into bitter.
Cool slightly
- Transfer the charred chilies and garlic to a small bowl and let them cool for 2 to 3 minutes.
- This makes them easier to handle and won't burn your hands when pounding.
Peel the garlic
- Once cool enough to touch, slip the roasted garlic cloves out of their skins by gently squeezing or rubbing them between your fingers.
- The charred skin should come away easily, revealing soft, sweet roasted garlic inside.
- Discard the skins.
+ Show details− Hide details
Ready when: Garlic cloves are easily peeled and soft
Tip: If the skins don't come away easily, let the garlic cool a minute longer.
Pound the chilies and garlic
- Place the charred chilies and peeled garlic cloves into a mortar and pestle (or a small bowl with the back of a sturdy spoon).
- Pound firmly and continuously for 2 to 3 minutes, breaking down the chilies and garlic into a coarse, slightly chunky paste.
- You want some texture remaining—don't puree it completely.
- The mixture will release its oils and take on a darker, deeper color as you work.
+ Show details− Hide details
Ready when: Mixture is a coarse paste with small chunks remaining, darker in color, with visible oils
Tip: Pound deliberately and let the pestle do the work. If you're using a spoon, brace the bowl with one hand and crush the chilies against the side.
Add lime juice and seasonings
- Pour the fresh lime juice and fish sauce directly into the mortar or bowl with the pounded chilies and garlic.
- Add the palm sugar and kosher salt.
- Stir and fold everything together gently with a spoon or by working with the pestle, combining until the flavors are evenly distributed.
- Taste and adjust: add more lime juice if you want extra tang, more fish sauce for depth, or more sugar if it's too spicy.
+ Show details− Hide details
Ready when: All ingredients are blended with visible flecks of chili and garlic throughout
Tip: Taste as you go—fish sauce is pungent, so a little goes a long way. You can always add more, but you can't take it out.
Good to know
Tips
- For extra heat, leave 1 or 2 of the chili stems intact or add a pinch of dried chili flakes after pounding—the initial char is the main heat source, so this dip can be adjusted easily.
- This dip is best served at room temperature or lightly chilled, paired with fresh cucumber slices, bell peppers, cherry tomatoes, or grilled shrimp and chicken. It's also excellent alongside banh mi or as a condiment for grilled fish.
- If the dip seems too thick, stir in a teaspoon of warm water at a time until it reaches your desired consistency.
- The mortar and pestle method is traditional and worth the effort—it creates a better texture and deeper flavor than a food processor, which tends to over-blend and warm the mixture.
Make ahead
Prepare the dip up to 2 days ahead. The flavors actually deepen and mellow slightly as it sits, making it even better the next day. Store it in an airtight container in the refrigerator.
Storage & reheating
Room temperature: up to 4 hours. Refrigerator: up to 2 weeks in an airtight container (the dip will darken slightly and flavors will intensify). Freezer: up to 3 months. Thaw overnight in the refrigerator before serving. No reheating needed; serve chilled or at room temperature.
Substitutions
- fresh bird's eye chilies (Thai red chilies) → Thai red chilies or serrano peppers (serranos are milder, so use 10 to 12). Thai red chilies are a direct substitute. Serranos will give less heat; adjust quantity to taste.
- palm sugar (or light brown sugar) → Light brown sugar or coconut sugar. Use the same amount. Light brown sugar is closest in flavor; coconut sugar adds a subtle molasses note.
- fish sauce → Soy sauce or tamari. Use 1 tablespoon. You'll lose some of the Vietnamese funkiness, but the dip will still be delicious and more savory.
- fresh lime juice → Fresh lemon juice or rice vinegar. Use the same amount. Lemon is slightly less tart; rice vinegar adds a mellow acidity. Neither matches lime exactly but both work well.
More dips & spreads
See all →

Find more like this
- Meal
- Snack
- Cuisine
- Vietnamese
- Method
- Stovetop
- Quick & Easy
- 30-Minute5 Ingredients or LessEasyBeginner