
Tender Lamb Biryani with Mint
A fragrant, layered biryani where tender lamb is marinated in spiced yogurt, then slow-steamed with partially cooked basmati rice, saffron, and fresh mint. The dum pukht method seals in aromatics and allows the lamb to become impossibly tender while the rice absorbs all the flavors.
- Prep
- 40 min
- Cook
- 1 hr 15 min
- Wait
- 1 hr 30 min
- Total
- 3 hr 25 min
- Makes
- 6 servings (about 1.5 cups each)
Steps
Before you start
- Soak the basmati rice in cold water for at least 30 minutes before cooking (or up to 2 hours). This allows even cooking and keeps grains separate.
- Let the lamb sit at room temperature for 30 minutes before marinating so it absorbs flavors evenly.
- Steep the saffron in warm milk as soon as you start prep; it needs 20 minutes to release its color and aroma.
- Have all aromatics (onions, ginger, garlic, mint) prepped and measured before you begin the marinating step.
Marinate the lamb
- In a large bowl, combine the room-temperature lamb cubes with the yogurt, ginger paste, garlic paste, minced green chilies, toasted cumin seeds, toasted coriander seeds, crushed kasuri methi, salt, and black pepper.
- Mix thoroughly so each piece of lamb is evenly coated.
- Cover and refrigerate for at least 30 minutes, or up to 4 hours.
- The longer it sits, the more tender the lamb will become.
+ Show details− Hide details
Ready when: Lamb is evenly coated and has softened slightly
Tip: Pat the lamb dry before marinating so the yogurt coating adheres instead of sliding off. Do not skip toasting the cumin and coriander—it transforms them from flat to deeply aromatic.
Toast and fry onions
- Heat 0.25 cup (60 ml) of ghee in a large heavy skillet over medium-high heat.
- Once shimmering, add the sliced onions in batches so they cook evenly, stirring frequently.
- Cook for 12–15 minutes, stirring often, until the onions are deep mahogany brown and crispy at the edges.
- Transfer to a paper towel-lined plate.
- Once cooled, crush about half of them roughly; leave the other half whole for garnish.
- This takes focus—do not walk away, as onions burn quickly once they start browning.
+ Show details− Hide details
Ready when: Onions are deep mahogany brown with some crispy edges and smell sweet and nutty
Tip: Cooking onions in batches ensures even browning and prevents steaming. Use medium-high heat; medium heat will take 25+ minutes and risk uneven color. Drain on paper towels to remove excess ghee so they stay crisp.
Toast rice for nuttiness
- Return the skillet to medium heat and add 1 tbsp (15 ml) of the remaining ghee.
- Add the drained soaked rice and stir constantly for 3–4 minutes.
- You'll hear a gentle clicking sound as the rice grains tumble.
- Stop when the rice grains turn slightly translucent at the edges and smell toasty and nutty.
- This step deepens the flavor of every grain.
- Do not over-toast or the rice will brown and taste bitter.
+ Show details− Hide details
Ready when: Rice grains are slightly translucent at the edges and smell toasty and nutty
Tip: Toasted rice grains will not clump as easily. If you smell any browning or burning, reduce heat immediately—the difference between perfect and bitter is 30 seconds.
Parboil the rice
- Bring 8 cups (2 liters) of water to a boil in a large pot.
- Add 2 tsp (12 g) salt, the bruised green cardamom pods, cinnamon stick, and bay leaves.
- Once boiling, add the toasted rice and stir gently.
- Boil for 5 minutes.
- The rice should be about 50% cooked—tender on the outside but still firm and chalky in the center when bitten.
- Drain the rice in a colander, discarding the whole spices (or fish them out and reserve them for the final pot if you prefer).
+ Show details− Hide details
Ready when: Rice is tender on the outside, firm and chalky in the center; a grain breaks cleanly when pressed
Tip: Set a timer—exactly 5 minutes is critical. Undercooked rice will remain hard; overcooked rice will turn mushy when steamed. Test a grain by pressing it between your fingers.
Sear the marinated lamb
- Heat the remaining 0.25 cup (60 ml) ghee in the same heavy skillet over medium-high heat.
- Working in two batches so the pan stays hot and the meat sears rather than steams, add the marinated lamb pieces.
- Do not stir for the first 2–3 minutes; let them develop a golden-brown crust on one side.
- Then stir and cook for another 3–4 minutes, until the lamb is browned on most sides.
- The yogurt marinade will brown and stick to the pan—this is the flavorful fond you want.
- Transfer to a plate.
- Do not cook the lamb through; it will finish cooking during the dum pukht (steam) phase.
+ Show details− Hide details
Ready when: Lamb is browned on most sides but still pink inside; fond sticks to the pan bottom
Tip: Do not move the meat around while it sears—stillness creates crust. If the pan is too crowded, the lamb steams instead. Two batches take a few extra minutes but guarantee a proper sear.
Assemble the biryani pot
- In a heavy 5-quart (5-liter) Dutch oven, spread a thin layer of the drained parboiled rice on the bottom (about 1 cup / 200 g).
- Top with half of the seared lamb pieces and half of the yogurt marinade clinging to it.
- Scatter half of the crushed fried onions over the lamb.
- Layer half of the remaining rice on top.
- Repeat: the second half of the lamb, the second half of the crushed onions, then the final layer of rice.
- Top with the whole fried onions (the garnish set aside earlier).
- Pour the saffron-steeped milk evenly over the entire surface.
- Scatter the chopped mint and cilantro over the top.
+ Show details− Hide details
Ready when: Layers are clearly visible; top is evenly moistened by saffron milk
Tip: Layer carefully so the rice and lamb are evenly distributed. The saffron milk should just moisten the top—too much liquid will make the biryani soupy. Uneven layering leads to dry spots.
Seal and start the dum pukhtOven 325°F / 165°C
- Cover the Dutch oven with a sheet of aluminum foil, pressing it down to seal the rim.
- Place the tight-fitting lid on top, pressing down firmly.
- This double seal traps steam inside.
- Place the sealed pot on the stovetop over medium heat for 2 minutes.
- You may hear a slight hiss as steam builds.
- Then transfer the pot to a preheated 325°F (160°C) oven.
- The biryani will now slow-steam for 45 minutes, during which the lamb becomes tender, the rice absorbs all the flavors, and the aromatics infuse every grain.
+ Show details− Hide details
Ready when: No steam escapes from the sealed lid; the pot is very hot
Tip: Do not open the pot during the 45 minutes. Every opening releases steam and extends the cooking time. Trust the process. If your oven runs cool, add 5–10 minutes. If it runs hot, subtract 5 minutes.
Rest after cooking
- Remove the pot from the oven.
- It will be very hot.
- Do not open it yet.
- Let it rest on the stovetop, still sealed, for 10 minutes.
- This final rest allows the steam to gently redistribute, ensuring every grain is cooked through and the flavors settle.
- You will see condensation on the inside of the foil when you peek under the lid.
+ Show details− Hide details
Ready when: Condensation is visible on the underside of the foil when you carefully peek
Tip: This 10-minute rest is not optional if you want tender, evenly cooked rice. Resting also makes it easier to fluff without breaking grains.
Fluff and garnish
- Carefully remove the foil and lid.
- The biryani will smell intensely fragrant.
- Using a fork (not a spoon, which crushes grains), gently fluff the rice, breaking up any clumps and folding the lamb pieces back in.
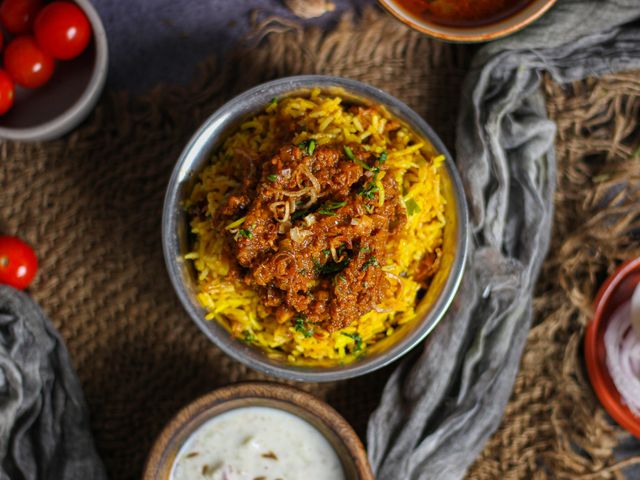
- The rice should have absorbed the saffron and turned golden and pale yellow throughout, with shreds of tender lamb visible.
- Top with the reserved whole fried onions, fresh mint and cilantro, and ginger julienne if using.
- Serve immediately on warm plates.
+ Show details− Hide details
Ready when: Rice is fluffy and separate; lamb is very tender and shreds easily with a fork
Tip: Use a fork to fluff, not a spoon or spatula, to avoid crushing and sticking the grains together. The first time you lift the lid, inhale the aroma—this is the reward for your patience.
Make optional yogurt raita
- While the biryani rests, you can prepare a cooling yogurt raita to serve alongside.
- Whisk together 1 cup (240 ml) whole-milk yogurt with 1/2 tsp (3 g) cumin powder, 1/4 tsp (0.5 g) chaat masala, and a pinch of salt.
- Finely dice 1/2 cucumber and 2 tbsp chopped mint, and fold into the yogurt.
- The raita is ready when the cucumber and mint are evenly distributed and the mixture is smooth and creamy.
- Refrigerate until ready to serve.
- This cooling side balances the warming spices in the biryani.
+ Show details− Hide details
Ready when: Cucumber and mint are evenly distributed throughout the yogurt; mixture is smooth and creamy
Tip: Raita is optional but highly recommended—it provides cooling contrast and cleanses the palate between bites of rich biryani.
Good to know
Tips
- Toasting the cumin and coriander seeds, and toasting the rice, are not steps to skip. These small actions compound to create a deeply aromatic biryani that tastes like it was made in a professional kitchen.
- Fried onions are the texture anchor of the biryani. Do not skip this step or use store-bought fried onions in a pinch—homemade onions have far better flavor and crunch.
- The dum pukht (sealed steaming) method is the soul of this recipe. Do not open the pot during cooking. The sealed steam cooks the lamb gently and forces the rice to absorb all the flavors without drying out.
- Serve the biryani within 10 minutes of fluffing for the best flavor and texture. Leftover biryani is still delicious but the rice firms up as it cools. Reheating restores warmth and softness.
Make ahead
The lamb can be marinated up to 24 hours in advance. The rice can be soaked up to 2 hours ahead. Fried onions can be made 1 day ahead and stored in an airtight container at room temperature. The entire biryani can be assembled (through Step 6) up to 2 hours ahead, covered with foil, and refrigerated; add 10 minutes to the oven time if cooking from cold.
Storage & reheating
Leftover biryani keeps in an airtight container in the refrigerator for up to 3 days. Reheat by spreading it in a shallow baking dish, covering with foil, and warming at 300°F (150°C) for 15–20 minutes, or in the microwave in a covered bowl at 50% power for 3–4 minutes per serving. Frozen biryani (without yogurt raita) keeps for up to 3 months; thaw overnight in the fridge before reheating.
Substitutions
- lamb shoulder, cut into 1.5-inch (4 cm) cubes → beef chuck or goat meat. Both take to the yogurt marinade well. Beef will cook in the same time; goat may need an extra 5–10 minutes in the oven if pieces are larger.
- basmati rice, aged → jasmine rice. Jasmine rice is shorter and slightly softer but will work. Reduce parboil time to 3–4 minutes to avoid mushiness. The biryani will have a subtly different, more delicate flavor.
- dried fenugreek leaves (kasuri methi) → 1/2 tsp dried oregano or thyme. Fenugreek leaves add a subtle bitter-sweet note; oregano/thyme provide herbal complexity but lack the funkiness. The biryani will taste less traditional but still delicious.
- saffron threads → 1/4 tsp ground turmeric mixed with a pinch of red food coloring (optional). Turmeric provides earthiness and yellow color but not saffron's subtle floral note. Food coloring is optional and purely visual. The biryani will be less aromatic but still fragrant.
More biryani
See all →



Find more like this
- Meal
- Dinner
- Cuisine
- Indian
- Main ingredient
- Basmati RiceLamb Shoulder
- Method
- Oven
- Quick & Easy
- Make Ahead