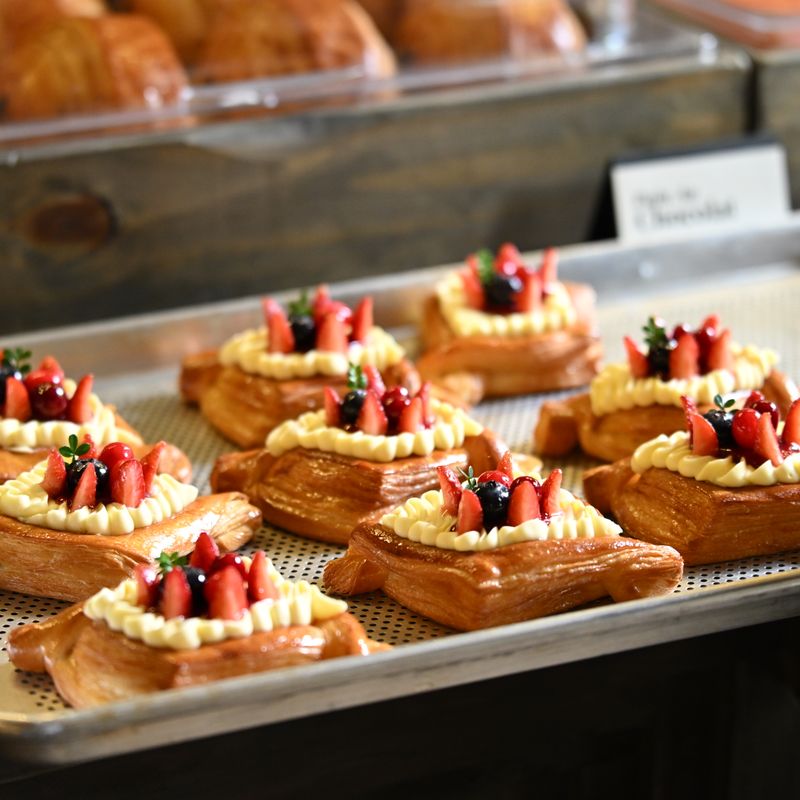
Strawberry Cream Cheese Danish
Golden, flaky Danish pastry with sweet cream cheese filling and fresh strawberries. This laminated dough technique creates delicate, buttery layers that shatter when you bite into them. Perfect for brunch or a special breakfast treat.
- Prep
- 45 min
- Cook
- 18 min
- Wait
- 4 hr 25 min
- Total
- 5 hr 28 min
- Makes
- 12 Danish pastries
Steps
Before you start
- Butter must be cold and cut into cubes; cold ingredients prevent the laminated dough from becoming greasy.
- Have all ingredients at room temperature except the butter block and dough—this controls gluten development.
- Read through the lamination steps before starting; the fold-and-turn technique requires focus.
- Clear a large, cool work surface for rolling and folding the dough.
Make the dough base
- In a large mixing bowl or stand mixer, combine 2.5 cups (312 g) all-purpose flour, 1.5 teaspoons (5 g) instant yeast, 2 tablespoons (25 g) sugar, and 1 teaspoon (6 g) salt.
- Pour in 0.75 cup (180 ml) warm milk and 1 whole egg.
- Mix on low speed with the dough hook for 2–3 minutes until a shaggy dough forms, scraping down the bowl.
- Switch to medium speed and knead for 5–6 minutes until smooth but still slightly tacky.
- The dough should feel soft and elastic.
- Do not add the cold butter yet.
+ Show details− Hide details
Ready when: Dough is smooth and elastic, slightly tacky to touch
Tip: Do not over-knead; the dough will develop gluten further during lamination. The texture should be soft, not stiff.
Chill dough before lamination
- Transfer the dough to a lightly oiled bowl, cover with plastic wrap, and refrigerate for 30 minutes.
- This stops fermentation and makes the dough easier to laminate.
+ Show details− Hide details
Ready when: Dough is cold and slightly firmed
Tip: A cold dough prevents the butter from melting into the dough prematurely, which would prevent proper lamination.
Roll out dough and prepare for lamination
- On a cool, lightly floured work surface, roll the chilled dough into a 10×8-inch (25×20 cm) rectangle.
- If the dough springs back, let it rest for 5 minutes and try again.
- Dust off excess flour.
+ Show details− Hide details
Ready when: Dough is an even rectangle without tears
Tip: Keep your work surface cool; work quickly to prevent the dough from warming up, which would soften the butter later.
Distribute cold butter and fold (first turn)
- Distribute 1.5 sticks (170 g) of cold, cubed butter evenly over the bottom two-thirds of the dough rectangle.
- Fold the uncovered third (top) down over the butter layer, then fold the bottom third up to enclose the butter in a letter fold (like a business letter).
- Press the edges lightly to seal.
- Dust with a little flour to prevent sticking.
+ Show details− Hide details
Ready when: Butter is enclosed in dough; corners and edges are roughly aligned
Tip: The butter should stay cold and not blend into the dough; if it starts to melt, refrigerate for 15 minutes before proceeding.
Roll and fold (second turn)
- Gently roll the folded dough out to a 10×8-inch rectangle again.
- Fold in thirds (letter fold) once more.
- Cover with plastic wrap and refrigerate for 45 minutes.
- This rest allows gluten to relax and the laminated layers to set.
+ Show details− Hide details
Ready when: Dough is cold and firm again
Tip: Each fold-and-rest cycle creates more layers. Don't skip the rest or the dough will tear and layers will merge.
Roll and fold (third and final turn)
- Remove dough from the fridge and perform one final letter fold.
- Roll to a 10×8-inch rectangle, fold in thirds, wrap in plastic, and refrigerate for at least 1 hour (or up to 8 hours).
- This final rest and bulk fermentation allows the yeast to proof the laminated dough gently.
+ Show details− Hide details
Ready when: Dough is cold, slightly puffed, and smells faintly yeasty
Tip: Longer resting (up to 8 hours in the fridge) actually improves flavor and makes the dough easier to shape. Plan accordingly.
Prepare cream cheese filling
- While the dough is in its final rest, beat 8 ounces (227 g) softened cream cheese and 3 tablespoons (37 g) sugar together in a bowl until light and fluffy, about 2 minutes.
- Stir in 0.5 teaspoon (2.5 ml) vanilla extract.
- Set aside at room temperature.
+ Show details− Hide details
Ready when: Filling is pale, fluffy, and smooth
Tip: Do not over-beat the cream cheese or it can become grainy. Mix just until combined and light.
Shape Danish pastries
- Line a 9×13-inch (23×33 cm) baking sheet with parchment paper.
- Remove dough from the fridge and roll out to a 12×9-inch (30×23 cm) rectangle on a lightly floured surface.
- Using a bench scraper or sharp knife, cut the dough into 12 rectangles (3 columns × 4 rows, each roughly 3×2.25 inches or 7.5×5.5 cm).
- Transfer each rectangle to the prepared baking sheet, spacing them 1 inch apart.
- You may need two baking sheets or work in batches.
+ Show details− Hide details
Ready when: 12 evenly-sized rectangles are laid out on parchment paper
Tip: Use a sharp knife or bench scraper for clean cuts; dragging a dull knife can compress the laminated layers and reduce puff.
Fill and top with strawberries
- Spoon about 1 tablespoon (15 g) cream cheese filling onto the center of each Danish rectangle.
- Top each with 2 strawberry halves, pressing them gently into the filling.
- Do not overfill or the filling will leak during baking.
+ Show details− Hide details
Ready when: Each Danish has a neat mound of filling and 2 strawberry halves arranged on top
Tip: Reserve the prettiest strawberry halves for the top. Partially dried strawberries (left out for 30 minutes) are less likely to release juice.
Proof until puffy
- Cover the pastries loosely with plastic wrap or a kitchen towel and let them rise at room temperature (70–75°F / 21–24°C) for 45–60 minutes, until they look noticeably puffy and airy but not quite doubled.
- The laminated layers should still be visible.
+ Show details− Hide details
Ready when: Pastries are visibly puffed and light; they jiggle slightly when the pan moves
Tip: Do not over-proof or the dough will collapse and lose its laminated structure. Proof in a warm (not hot) spot, away from drafts.
Apply egg wash and coarse sugarOven 400°F / 205°C
- About 15 minutes before baking, preheat the oven to 400°F (200°C).
- Beat 1 egg with 1 tablespoon water.
- Brush the top of each Danish (avoiding the strawberries if possible, so they don't brown too much) with the egg wash.
- Sprinkle with 2 tablespoons (24 g) coarse or sanding sugar if using.
+ Show details− Hide details
Ready when: Pastries have an even, glossy egg-washed coating; sugar is evenly distributed
Tip: Egg wash brushed on the dough (not the cream cheese or strawberries) helps the pastry brown evenly and gives it shine.
Bake until golden and crispyOven 400°F / 205°C
- Bake the Danish pastries at 400°F (200°C) for 16–18 minutes, until the pastry is deep golden brown and crispy-looking, and the filling is warm (you can check one with a fork—it should release steam).
- If the tops are browning too quickly before the base is cooked, reduce the oven temperature to 375°F (190°C) for the final 5 minutes.
+ Show details− Hide details
Ready when: Pastry is deep golden brown and crispy; filling is hot (you can see steam if you gently press the side)
Tip: Check pastries at 15 minutes; oven temperatures vary. The bottoms should be pale golden (not pale white), indicating the bottom is baked, not just the top.
Cool before serving
- Transfer the baking sheet to a wire cooling rack and let the pastries cool for 5–10 minutes.
- This allows the laminated layers to set and the filling to firm up slightly, making the Danish less likely to fall apart when you pick them up.
- Serve warm or at room temperature.
+ Show details− Hide details
Ready when: Pastries are cool enough to handle without burning yourself; filling is warm but not molten
Tip: If the pastries rest longer, you can reheat them for 5 minutes at 325°F (160°C) to restore crispness.
Good to know
Tips
- Lamination creates thin, crispy layers only if dough and butter stay cold. If the dough feels warm or greasy, return it to the fridge immediately.
- The final proof is gentle and long (45–60 minutes)—rushing it causes the pastries to burst during baking and lose the laminated structure.
- Fresh, ripe strawberries are essential. Underripe berries taste bland; overripe ones are mushy and release too much juice.
- For a glossy finish and even browning, always brush pastries with egg wash just before baking, not hours ahead. This prevents a dull, dry-looking crust.
Make ahead
Dough can be made through Step 6 and refrigerated for up to 8 hours (or frozen for up to 1 month). If frozen, thaw overnight in the fridge before shaping. Baked pastries are best served the same day but can be stored and reheated.
Storage & reheating
Store cooled Danish pastries in an airtight container at room temperature for up to 2 days. They taste best fresh, but can be reheated in a 325°F (160°C) oven for 5 minutes to restore crispness. Freeze unbaked, filled pastries on the baking sheet for up to 2 weeks; add 2–3 minutes to baking time without thawing.
Substitutions
- fresh strawberries → Fresh raspberries or blueberries. Use 1 whole or 2–3 berries per pastry to avoid overfilling. These berries are smaller and release less juice, making them good alternatives.
- cream cheese, softened → Mascarpone or ricotta cheese mixed with 1 tablespoon powdered sugar. Ricotta is less rich; use equal weight (227 g). Mascarpone is richer; use 6 oz (170 g) and reduce sugar to 2 tablespoons (25 g).
- instant dry yeast → Active dry yeast. Use 2 teaspoons (6 g) instead. Proof it in the warm milk for 5 minutes before adding flour. Dough may take slightly longer to proof.
- unsalted butter, cold → All-butter puff pastry sheets (thawed). Skip Steps 2–6 and use 1 package (approximately 10 oz / 283 g) of thawed puff pastry instead. Roll out, cut, fill, and bake. This shortcut yields less authentic lamination but still delicious results.
More breakfast bakes
See all →


Find more like this
- Meal
- Breakfast
- Cuisine
- French
- Diet
- VegetarianHalal
- Method
- Oven